
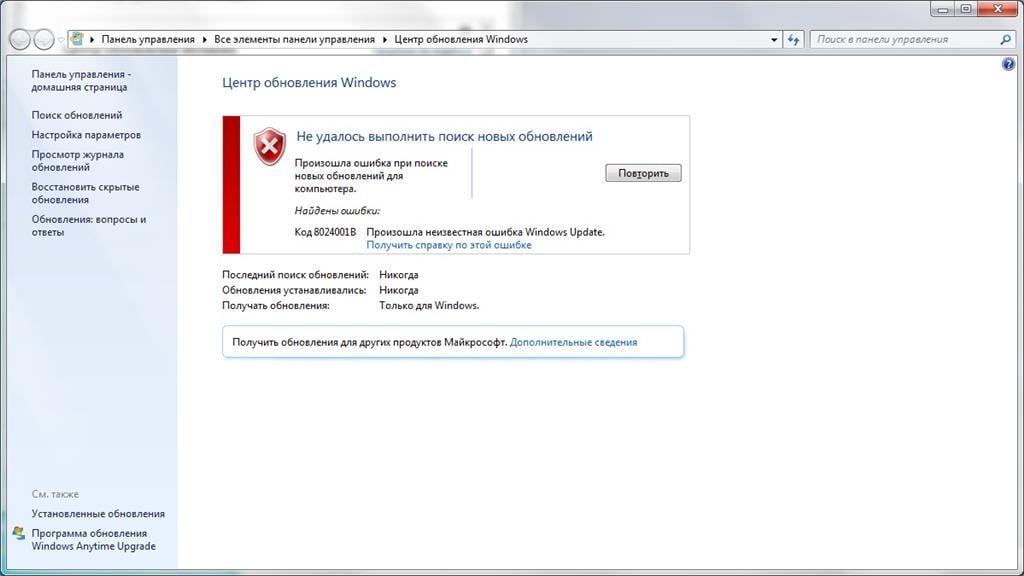
В процессе обновления Windows есть шанс увидеть ошибку 8024001B. Как правило, на подобный код жалуются владельцы таких операционных систем, как Windows 7 и Windows 8.1. Тем не менее появление ошибки также возможно и на современных сборка Windows 10.
Содержание
- Что вызывает ошибку 8024001B?
- Методы решения ошибки 8024001B
- Метод №1 Средство устранения неполадок
- Метод №2 Сброс компонентов Центра обновления
- Метод №3 Восстановление системы
Что вызывает ошибку 8024001B?
Подобную ошибку зачастую вызывают некорректно работающие компоненты Центра обновления Windows. Почему они начали работать неправильно — сложно определить. Может быть, из-за какого-то бага, возможно — они были повреждены. Так или иначе работу компонентов можно восстановить, выполнив процедуру их сброса.
Также ошибка 8024001B способна появляться в результате повреждения некоторых системных файлов Windows. Тут на выручку вам придется либо System File Checker, либо точка восстановления системы, которая была автоматически создана Windows. При наличии повреждению что-то должно помочь.
Методы решения ошибки 8024001B
Метод №1 Средство устранения неполадок
Итак, давайте для начала попытаемся положиться на автоматизированные системные средства, предназначенные для решения всевозможных неполадок. Нажмите на клавиатуре Windows+I для открытия окошка с Параметрами системы. Теперь перейдите в раздел «Обновление и безопасность», далее — в подраздел «Устранение неполадок».
В открытом подразделе перед вами предстанет обширный список из различных компонентов системы. Найдите и выберите компонент «Центр обновления Windows». Затем нажмите на кнопку «Запустить средство устранения неполадок». Все, что вам нужно дальше делать — это следовать инструкциям на экране и пытаться избавиться от ошибки 8024001B.
Метод №2 Сброс компонентов Центра обновления
В большинстве случаев никто не любит заниматься подобным делом, ведь на его выполнение требуется много сил и времени. Сброс компонентов Центра обновления Windows, как правило, производится при помощи Командной строки и целой кучи различных команд.
Тем не менее вы можете использовать «батник» собственного производства для подобной задачи. Нажмите на клавиатуре Windows+R. Пропишите в пустой строчке открывшегося окошка значение notepad и нажмите Enter.
Теперь копируйте все нижеуказанные команды и вставьте их в открытое окошко Блокнота:
@echo off
::Сброс центра обновлений
::GamesQA.ru:: Checking and Stopping the Windows Update services
set b=0:bits
set /a b=%b%+1
if %b% equ 3 (
goto end1
)net stop bits
echo Checking the bits service status.
sc query bits | findstr /I /C:»STOPPED»
if not %errorlevel%==0 (
goto bits
)
goto loop2:end1
cls
echo.
echo Cannot reset Windows Update since «Background Intelligent Transfer Service» (bits) service failed to stop.
echo.
pause
goto Start:loop2
set w=0:wuauserv
set /a w=%w%+1
if %w% equ 3 (
goto end2
)
net stop wuauserv
echo Checking the wuauserv service status.
sc query wuauserv | findstr /I /C:»STOPPED»
if not %errorlevel%==0 (
goto wuauserv
)
goto loop3:end2
cls
echo.
echo Cannot reset Windows Update since «Windows Update» (wuauserv) service failed to stop.
echo.
pause
goto Start:loop3
set app=0
:appidsvc
set /a app=%app%+1
if %app% equ 3 (
goto end3
)
net stop appidsvc
echo Checking the appidsvc service status.
sc query appidsvc | findstr /I /C:»STOPPED»
if not %errorlevel%==0 (
goto appidsvc
)
goto loop4:end3
cls
echo.
echo Cannot reset Windows Update since «Application Identity» (appidsvc) service failed to stop.
echo.
pause
goto Start:loop4
set c=0:cryptsvc
set /a c=%c%+1
if %c% equ 3 (
goto end4
)
net stop cryptsvc
echo Checking the cryptsvc service status.
sc query cryptsvc | findstr /I /C:»STOPPED»
if not %errorlevel%==0 (
goto cryptsvc
)
goto Reset:end4
cls
echo.
echo Cannot reset Windows Update since «Cryptographic Services» (cryptsvc) service failed to stop.
echo.
pause
goto Start:Reset
Ipconfig /flushdns
del /s /q /f «%ALLUSERSPROFILE%Application DataMicrosoftNetworkDownloaderqmgr*.dat»
del /s /q /f «%ALLUSERSPROFILE%MicrosoftNetworkDownloaderqmgr*.dat»
del /s /q /f «%SYSTEMROOT%LogsWindowsUpdate*»if exist «%SYSTEMROOT%winsxspending.xml.bak» del /s /q /f «%SYSTEMROOT%winsxspending.xml.bak»
if exist «%SYSTEMROOT%winsxspending.xml» (
takeown /f «%SYSTEMROOT%winsxspending.xml»
attrib -r -s -h /s /d «%SYSTEMROOT%winsxspending.xml»
ren «%SYSTEMROOT%winsxspending.xml» pending.xml.bak
)if exist «%SYSTEMROOT%SoftwareDistribution.bak» rmdir /s /q «%SYSTEMROOT%SoftwareDistribution.bak»
if exist «%SYSTEMROOT%SoftwareDistribution» (
attrib -r -s -h /s /d «%SYSTEMROOT%SoftwareDistribution»
ren «%SYSTEMROOT%SoftwareDistribution» SoftwareDistribution.bak
)if exist «%SYSTEMROOT%system32Catroot2.bak» rmdir /s /q «%SYSTEMROOT%system32Catroot2.bak»
if exist «%SYSTEMROOT%system32Catroot2» (
attrib -r -s -h /s /d «%SYSTEMROOT%system32Catroot2»
ren «%SYSTEMROOT%system32Catroot2» Catroot2.bak
):: Reset Windows Update policies
reg delete «HKCUSOFTWAREPoliciesMicrosoftWindowsWindowsUpdate» /f
reg delete «HKCUSOFTWAREMicrosoftWindowsCurrentVersionPoliciesWindowsUpdate» /f
reg delete «HKLMSOFTWAREPoliciesMicrosoftWindowsWindowsUpdate» /f
reg delete «HKLMSOFTWAREMicrosoftWindowsCurrentVersionPoliciesWindowsUpdate» /f
gpupdate /force:: Reset the BITS service and the Windows Update service to the default security descriptor
sc.exe sdset bits D:(A;;CCLCSWRPWPDTLOCRRC;;;SY)(A;;CCDCLCSWRPWPDTLOCRSDRCWDWO;;;BA)(A;;CCLCSWLOCRRC;;;AU)(A;;CCLCSWRPWPDTLOCRRC;;;PU)sc.exe sdset wuauserv D:(A;;CCLCSWRPWPDTLOCRRC;;;SY)(A;;CCDCLCSWRPWPDTLOCRSDRCWDWO;;;BA)(A;;CCLCSWLOCRRC;;;AU)(A;;CCLCSWRPWPDTLOCRRC;;;PU)
:: Reregister the BITS files and the Windows Update files
cd /d %windir%system32
regsvr32.exe /s atl.dll
regsvr32.exe /s urlmon.dll
regsvr32.exe /s mshtml.dll
regsvr32.exe /s shdocvw.dll
regsvr32.exe /s browseui.dll
regsvr32.exe /s jscript.dll
regsvr32.exe /s vbscript.dll
regsvr32.exe /s scrrun.dll
regsvr32.exe /s msxml.dll
regsvr32.exe /s msxml3.dll
regsvr32.exe /s msxml6.dll
regsvr32.exe /s actxprxy.dll
regsvr32.exe /s softpub.dll
regsvr32.exe /s wintrust.dll
regsvr32.exe /s dssenh.dll
regsvr32.exe /s rsaenh.dll
regsvr32.exe /s gpkcsp.dll
regsvr32.exe /s sccbase.dll
regsvr32.exe /s slbcsp.dll
regsvr32.exe /s cryptdlg.dll
regsvr32.exe /s oleaut32.dll
regsvr32.exe /s ole32.dll
regsvr32.exe /s shell32.dll
regsvr32.exe /s initpki.dll
regsvr32.exe /s wuapi.dll
regsvr32.exe /s wuaueng.dll
regsvr32.exe /s wuaueng1.dll
regsvr32.exe /s wucltui.dll
regsvr32.exe /s wups.dll
regsvr32.exe /s wups2.dll
regsvr32.exe /s wuweb.dll
regsvr32.exe /s qmgr.dll
regsvr32.exe /s qmgrprxy.dll
regsvr32.exe /s wucltux.dll
regsvr32.exe /s muweb.dll
regsvr32.exe /s wuwebv.dll
regsvr32.exe /s wudriver.dll
netsh winsock reset
netsh winsock reset proxy
:: Set the startup type as automatic
sc config wuauserv start= auto
sc config bits start= auto
sc config DcomLaunch start= auto:Start
net start bits
net start wuauserv
net start appidsvc
net start cryptsvc
Как только команды окажутся в Блокноте, нажмите на пункт «Файл» в строке меню и выберите пункт «Сохранить как…». Задайте создаваемому файлу любое имя, например, Сброс центра обновлений, и измените его расширение с .txt на .bat (это очень важно!), а затем сохраните файл в удобное место на компьютере.
В итоге у вас должен получиться, к примеру, файл Сброс центра обновлений.bat. Кликните на этот файл дважды левой кнопкой мыши, после чего начнется автоматический процесс сброса компонентов Центра обновления Windows. Дождитесь его окончания и проверьте наличие ошибки 8024001B.
Метод №3 Восстановление системы
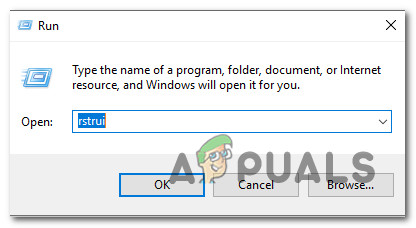
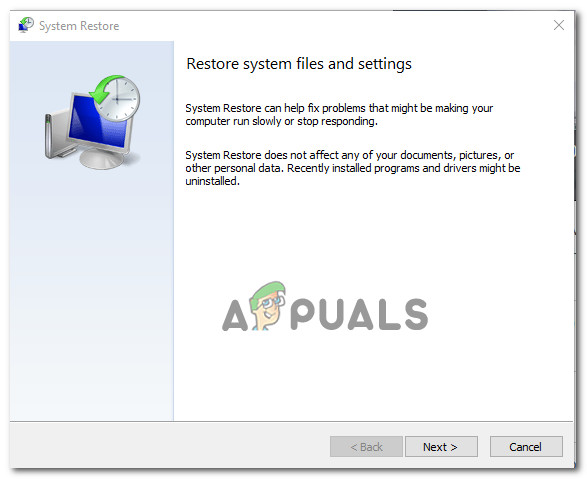
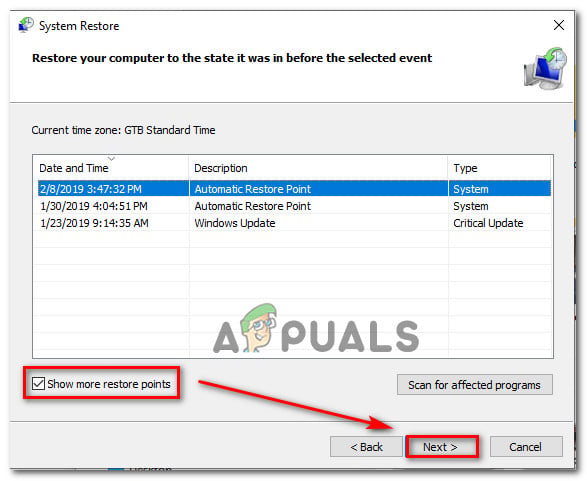
В крайнем случае можно попробовать воспользоваться точкой восстановления. Зачастую после восстановления системы никакие ошибки не должны вас больше беспокоить. Хорошо, нажмите на клавиатуре Windows+R и выполните команду rstrui. В появившемся окошке вам необходимо выбрать точку, на момент создания которой ошибки 8024001B не наблюдалось, и запустить процесс восстановления системы. Процесс очень прост и не займет много времени. Также помните: ваш компьютер может перезагружаться при восстановлении.
Мы надеемся, что данные методы помогли вам в решении ошибки 8024001B.
Some Windows users have been reaching us with questions after being unable to update their machines with the latest Windows Update. As it turns out, whenever they try to scan for new updates, they end up seeing the 8024001B error code accompanied by the message “There was a problem checking for updates“. This error appears before the scanning procedure is completed, so affected users never get to see which updates need to be installed. In most cases, this issue is reported to occur on Windows 7 and Windows 8.1

What’s causing the Windows Update Error Code 8024001B?
We investigated this particular issue by looking at various user reports and by testing out the various repair strategies that are being recommended by other users that have already managed to get to the bottom of this issue and fix it. After this analysis, we can conclude that multiple causes might be responsible for this behavior. here’s a shortlist with potential culprits:
- Glitched WU component – As some users have reported, this error code might also be triggered in situations where one or more WU component becomes stuck in a limbo state (the OS thinks the component is open, when in fact it’s not). In this case, you should be able to resolve the issue by resetting all WU components or by using the Windows Update troubleshooter.
- System File Corruption – As it turns out, system file corruption can also be responsible for the apparition of this error code during a WU installation. If one or more WU dependencies becomes corrupted, the entire update operation might be affected. In this case, you should be able to resolve the issue by going for a repair install (or clean install).
- Unidentified interference – In more special circumstances, this error might occur due to an unidentified culprit. It’s possible that a driver update interfered with the WU operation. Since these conflicts are not easy to pinpoint, the ideal approach is to use System Restore to bring back your machine state to a point where this issue was not occurring.
If you’re currently encountering the same Windows Update 8024001B error code and one of the scenarios presented above seem applicable, then this article will likely help you in resolving the issue. Down below, you’ll find a collection of methods that other users in a similar situation have successfully used to bypass the error code and install the Windows Updates normally.
If you want to remain as efficient as possible, we advise you to follow the instructions below in the same order as we arranged them in (via efficiency and difficulty). Eventually, you will get to a reparation procedure that will fix the problem regardless of the scenario that applies to you.
Let’s begin!
Method 1: Running the Windows Update troubleshooter
As you saw in the section above, multiple sections might end up triggering this error message. But, in the vast majority of possible scenarios, the issue is caused by a WU component (not an outside process or service).
Because of this, you should start your troubleshooting guide by seeing if you Windows is not capable of resolving the issue automatically (without any manual setting on your side). This can be achieved by running the Windows Update troubleshooter.
If the problem you’re dealing with is already documented by Microsoft, then the Windows Update troubleshooter should already include a repair strategy that will take care of the issue automatically. Several Windows users that were also struggling to resolve the 8024001B error have reported that they managed to get to the bottom of this issue by running this utility and applying the recommended repair strategy.
If you’re unsure on how to make use of the Windows Update troubleshooter utility, follow the instructions below for step by step instructions:
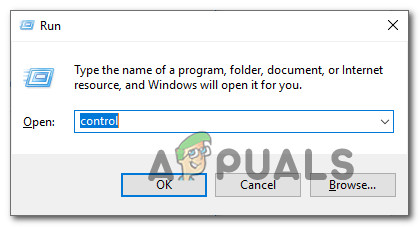
- Open up a Run dialog box by pressing Windows key + R. Next, type ‘control.exe /name Microsoft.Troubleshooting’ and press Enter to open up the Troubleshooting tab of the classic Control Panel interface.

Accessing the classic Control Panel interface Note: When you see the UAC (User Account Prompt), click Yes to grant administrative privileges.
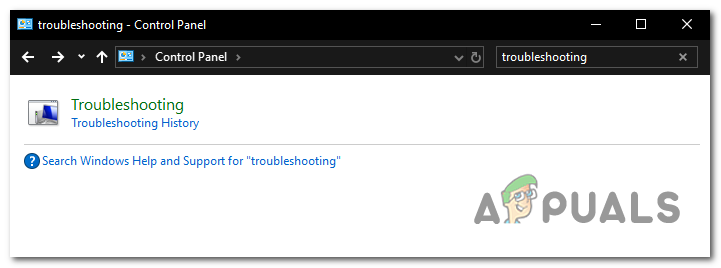
- Once you’re inside the classic Control Panel interface, use the text box in the top-right corner to search for ‘troubleshooting”. Next, from the list of results on the left-hand side, click on Troubleshooting.

Accessing the Troubleshooting option from the Classic Control Panel interface - Once you’re inside the Troubleshooting window, move over to the right-hand side menu and click on System and Security. Then, from the list of Troubleshooting strategies, click on Windows Update (under Windows).

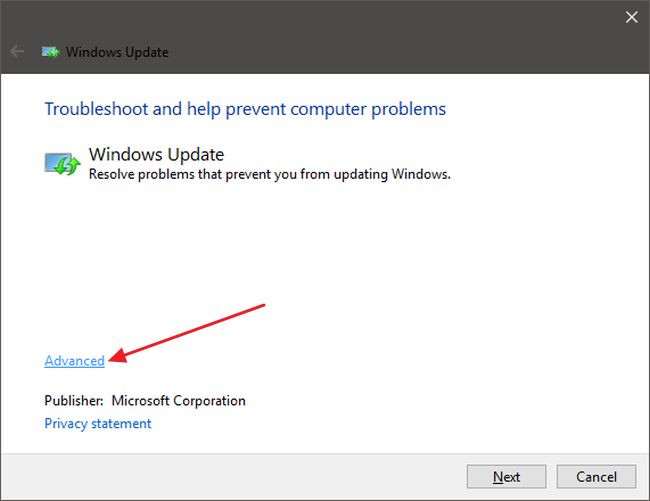
Accessing the Windows Update troubleshooter - Once the Windows Update troubleshooter window is open, start by clicking on the Advanced link, then ensure that the box associated with Apply repairs automatically is checked. Then, click Next to advance to the next menu.

Ensuring that the repairs are applied automatically by Windows Update - Wait for the problems to be detected by your utility. If a viable repair strategy is found, you will be presented with it on the next screen. To take advantage of this, click on Apply this fix and wait for the procedure to complete.

Apply this fix - If your computer doesn’t restart automatically, trigger it yourself and see if the issue is resolved at the next system startup by attempting to update your computer once again.


If the operation still fails with the same 8024001B error, move down to the next method below.
Method 2: Resetting every WU component
Another fairly common scenario that might end up triggering the 8024001B error is a WU (Windows Update) inconsistency that is effectively stopping your computer ability to find and install new updates.
We observed this behavior with several affected users and in the vast majority of cases, they managed to get it resolved by resetting all components and dependencies involved in this process.
If you think this scenario might be applicable, follow the instructions below for step by step instructions on resetting every Windows Update component manually (from an elevated CMD prompt). Here’s a quick guide on how to do this:
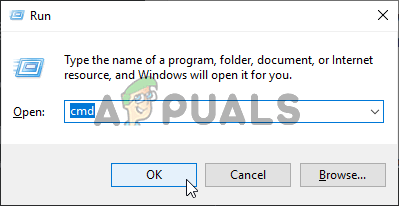
- Press Windows key + R to open up a Run dialog box. Next, type “cmd” inside the text box and press Ctrl + Shift + Enter to open up the Elevated Command Prompt. In case you’re prompted by the UAC (User Account Control), click Yes to grant admin access.

Running Command Prompt - Once you find your way inside the elevated CMD window, type the following command in order and press Enter after each command to stop every essential WU service:
net stop wuauserv
net stop cryptSvc
net stop bits
net stop msiserver
Note: After you finish running these commands, you will have effectively stopped all essential Windows Updates services from running (Windows Update, MSI Installer service, Cryptographic service, and the BITS service)
- After you manage to disable all these services, run the following commands in the same CMD prompt and press Enter after each command to rename the SoftwareDistribution and Catroot2 folders:
ren C:WindowsSoftwareDistribution SoftwareDistribution.old
ren C:WindowsSystem32catroot2 Catroot2.old
Note: These two folders are important since they are responsible for storing the update files that are being used by the Windows updating component. Renaming them essentially forces your OS to create new instances that will take their place and bypass any sort of file corruption.
- Once you get past step 3, type the final commands in order and press Enter after each one to restart the same services that you previously disabled:
net start wuauserv
net start cryptSvc
net start bits
net start msiserver
- Attempt to search for updates once again to see if you’re still dealing with the error code 8024001B.
If the same issue is still occurring, move down to the next potential fix below.
Method 3: Using the System Restore utility
In case you only started to experience this behavior recently, a recent system change might have brought about this issues with the WU component. A 3rd party service or process might very well be responsible for the apparition of this issue.
Since creating a list with all potential culprits is not possible, we will showcase a cost-efficient approach – using the System Restore utility.
This tool is capable of using a previously created snapshot to restore the entire computer state to a previous point in time where the factors that contributed to the apparition of the 8024001B error were not present.
Keep in mind that by default, Windows is configured to regularly save System Restore snapshots at important actions (such as the installation of a critical update, a driver installation, etc.) Unless you modified this default behavior, you should have plenty of restore points to choose from.
IMPORTANT: Before you start using this utility, consider the fact that any changes you made since the restore point were created will be lost if you use it to restore the machine state to a previous point in time. This includes installed apps, drivers, 3rd party applications, games, etc.
If you understand the repercussions and you still want to proceed, follow the instructions below to initiate the restoring process:
- Press Windows key + R to open up a Run dialog box. Then, type ‘rstrui’ inside the text box and press Enter to open up the System Restore menu.

Opening the System Restore wizard via Run box - After you arrive at the initial System Restore screen, click Next to advance to the next screen.

Using System Restore - At the next screen, start by ensuring that the box associated with Show more restore points are checked. After you do this, start comparing the dates of each saved restore point and select the one that is older than the apparition of this issue. With the correct system restore selected, click Next to advance to the next menu.

Restoring your system to a previous point in time - Once you get to this point, the utility is ready to go. All that’s left to do now is to initiate the restoring process by clicking on Finish.
- After a couple of seconds, your computer will restart and the previous state will be mounted. When the process is finished, attempt to search for updates again and see if the same issue is still occurring.
If you’re still seeing the 8024001B error code, move down to the final method below
Method 4: Refreshing every OS component
If none of the instructions above have allowed you to bypass the 8024001B error, you can conclude that you’re dealing with some type of system file problem that cannot be resolved conventionally. If this scenario is applicable, the only viable fix that should take care of the problem is to follow a procedure that will refresh every Windows component.
A complete system file reset can only be achieved by two procedures – a clean install or a repair install (in-place repair).
A clean install is easier to perform, but the major downside is that it will not allow you to keep any of your files (apps, games, personal media, user preferences, etc.)
If you’re looking for the most efficient approach, you should go for a repair install (in-place upgrade). It’s a more tedious procedure, but it will only touch system components, allowing you to keep any personal data (including applications and games.
Обновлено май 2023: перестаньте получать сообщения об ошибках и замедлите работу вашей системы с помощью нашего инструмента оптимизации. Получить сейчас в эту ссылку
- Скачайте и установите инструмент для ремонта здесь.
- Пусть он просканирует ваш компьютер.
- Затем инструмент почини свой компьютер.
Пользователи Windows задавали нам вопросы, так как они не могли обновить свои машины, используя последнюю версию Центр обновления Windows. Оказывается, каждый раз, когда они пытаются найти новые обновления, они видят код ошибки 8024001B с сообщением «При проверке обновлений возникла проблема». Эта ошибка возникает до завершения анализа, поэтому пользователи никогда не видят, какие обновления необходимо установить. В большинстве случаев эта проблема возникает в Windows 7 и Windows 8.1.

Мы исследовали эту проблему, изучив различные пользовательские отчеты и протестировав различные стратегии восстановления, рекомендованные другими пользователями, которые уже смогли понять и устранить проблему. После этого анализа мы можем заключить, что есть несколько причин для такого поведения. Вот краткий список возможных причин:
- WU глючный компонент
- Повреждение файлов в системе
- Неопределенные помехи
Как исправить ошибку Windows Update 8024001B?
Обновление за май 2023 года:
Теперь вы можете предотвратить проблемы с ПК с помощью этого инструмента, например, защитить вас от потери файлов и вредоносных программ. Кроме того, это отличный способ оптимизировать ваш компьютер для достижения максимальной производительности. Программа с легкостью исправляет типичные ошибки, которые могут возникнуть в системах Windows — нет необходимости часами искать и устранять неполадки, если у вас под рукой есть идеальное решение:
- Шаг 1: Скачать PC Repair & Optimizer Tool (Windows 10, 8, 7, XP, Vista — Microsoft Gold Certified).
- Шаг 2: Нажмите «Начать сканирование”, Чтобы найти проблемы реестра Windows, которые могут вызывать проблемы с ПК.
- Шаг 3: Нажмите «Починить все», Чтобы исправить все проблемы.

Переименуйте папку кеша.
Введите следующее и нажмите Enter после каждой строки:
net stop wuauserv ren% systemroot% SoftwareDistribution SoftwareDistribution.OLD net start wuauserv exit
Запустить средство устранения неполадок Windows Update
- Запустите средство устранения неполадок Центра обновления Windows после его загрузки.
- Щелкните ссылку «Дополнительно» ниже, затем щелкните ссылку «Запуск от имени администратора». Это перезапустит инструмент диагностики с правами администратора.
- Теперь нажмите кнопку «Далее», и инструмент начнет устранение неполадок, возникающих в вашей системе при обновлении Windows.
- Как только он обнаружит проблему, он покажет вам 2 кнопки: Применить патч и пропустить патч. Вы можете нажать кнопку «Применить этот патч», чтобы немедленно устранить проблему. Если вы не думаете, что проблема, обнаруженная инструментом, важна или вы не хотите ее исправлять, вы можете нажать кнопку «Пропустить этот патч», и инструмент продолжит процесс устранения неполадок.
- Как только он обнаруживает и исправляет все проблемы в вашей системе, он отображает сводку всех проблем, которые были проверены и обнаружены в вашей системе.
Это для тебя. Теперь вы можете снова использовать Центр обновления Windows в своей компьютерной системе без каких-либо проблем.
Проверка настроек брандмауэра Windows
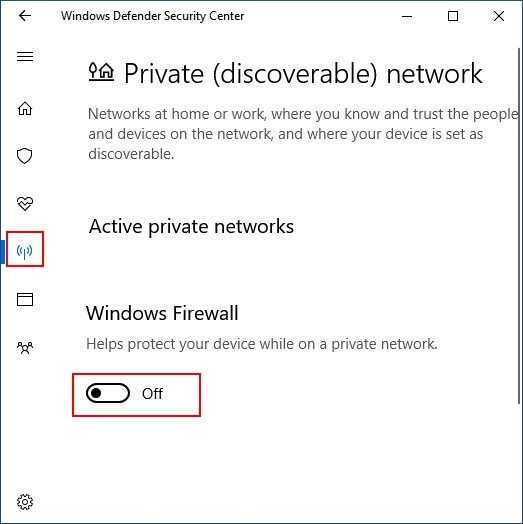
1. Нажмите и удерживайте Windows + R. Откроется диалоговое окно «Пуск».
2. Введите Firewall.cpl и нажмите ОК.
3. нажмите кнопку «Включить или отключить брандмауэр Windows».
4. В настройках частной сети выберите «Отключить брандмауэр Windows (не рекомендуется)».
5. То же относится и к созданию публичной сети.
6. Нажмите на ОК.
Примечание. После устранения проблемы необходимо активировать брандмауэр Windows.
Сбросить компонент WU
Другой довольно распространенный сценарий, который может привести к ошибке 8024001B, — это неадекватность WU (Центра обновления Windows), которая не позволяет компьютеру находить и устанавливать новые обновления.
Мы наблюдали такое поведение у некоторых затронутых пользователей, и в подавляющем большинстве случаев им удалось избавиться от него, удалив все компоненты и зависимости, связанные с этим процессом.
https://answers.microsoft.com/en-us/windows/forum/windows_other/error-code-8024001b-when-try-to-check-for-updates/c2a87213-d4cf-4c3a-88c0-e0f27cbdbb50
Совет экспертов: Этот инструмент восстановления сканирует репозитории и заменяет поврежденные или отсутствующие файлы, если ни один из этих методов не сработал. Это хорошо работает в большинстве случаев, когда проблема связана с повреждением системы. Этот инструмент также оптимизирует вашу систему, чтобы максимизировать производительность. Его можно скачать по Щелчок Здесь

CCNA, веб-разработчик, ПК для устранения неполадок
Я компьютерный энтузиаст и практикующий ИТ-специалист. У меня за плечами многолетний опыт работы в области компьютерного программирования, устранения неисправностей и ремонта оборудования. Я специализируюсь на веб-разработке и дизайне баз данных. У меня также есть сертификат CCNA для проектирования сетей и устранения неполадок.
Сообщение Просмотров: 380
Содержание
- Ошибка 8024001B при обновлении Windows — как исправить
- Что вызывает ошибку 8024001B?
- Методы решения ошибки 8024001B
- Метод №1 Средство устранения неполадок
- Метод №2 Сброс компонентов Центра обновления
- Метод №3 Восстановление системы
- Windows 10 Update wont download (Error 0x8024401b)
- Replies (8)
Ошибка 8024001B при обновлении Windows — как исправить
В процессе обновления Windows есть шанс увидеть ошибку 8024001B. Как правило, на подобный код жалуются владельцы таких операционных систем, как Windows 7 и Windows 8.1. Тем не менее появление ошибки также возможно и на современных сборка Windows 10.
Что вызывает ошибку 8024001B?
Подобную ошибку зачастую вызывают некорректно работающие компоненты Центра обновления Windows. Почему они начали работать неправильно — сложно определить. Может быть, из-за какого-то бага, возможно — они были повреждены. Так или иначе работу компонентов можно восстановить, выполнив процедуру их сброса.
Также ошибка 8024001B способна появляться в результате повреждения некоторых системных файлов Windows. Тут на выручку вам придется либо System File Checker, либо точка восстановления системы, которая была автоматически создана Windows. При наличии повреждению что-то должно помочь.
Методы решения ошибки 8024001B

Метод №1 Средство устранения неполадок
Итак, давайте для начала попытаемся положиться на автоматизированные системные средства, предназначенные для решения всевозможных неполадок. Нажмите на клавиатуре Windows+I для открытия окошка с Параметрами системы. Теперь перейдите в раздел «Обновление и безопасность», далее — в подраздел «Устранение неполадок».
В открытом подразделе перед вами предстанет обширный список из различных компонентов системы. Найдите и выберите компонент «Центр обновления Windows». Затем нажмите на кнопку «Запустить средство устранения неполадок». Все, что вам нужно дальше делать — это следовать инструкциям на экране и пытаться избавиться от ошибки 8024001B.
Метод №2 Сброс компонентов Центра обновления
В большинстве случаев никто не любит заниматься подобным делом, ведь на его выполнение требуется много сил и времени. Сброс компонентов Центра обновления Windows, как правило, производится при помощи Командной строки и целой кучи различных команд.
Тем не менее вы можете использовать «батник» собственного производства для подобной задачи. Нажмите на клавиатуре Windows+R. Пропишите в пустой строчке открывшегося окошка значение notepad и нажмите Enter.
Теперь копируйте все нижеуказанные команды и вставьте их в открытое окошко Блокнота:
::Сброс центра обновлений
::GamesQA.ru
:: Checking and Stopping the Windows Update services
set b=0
:bits
set /a b=%b%+1
if %b% equ 3 (
goto end1
)
net stop bits
echo Checking the bits service status.
sc query bits | findstr /I /C:»STOPPED»
if not %errorlevel%==0 (
goto bits
)
goto loop2
:end1
cls
echo.
echo Cannot reset Windows Update since «Background Intelligent Transfer Service» (bits) service failed to stop.
echo.
pause
goto Start
:wuauserv
set /a w=%w%+1
if %w% equ 3 (
goto end2
)
net stop wuauserv
echo Checking the wuauserv service status.
sc query wuauserv | findstr /I /C:»STOPPED»
if not %errorlevel%==0 (
goto wuauserv
)
goto loop3
:end2
cls
echo.
echo Cannot reset Windows Update since «Windows Update» (wuauserv) service failed to stop.
echo.
pause
goto Start
:loop3
set app=0
:appidsvc
set /a app=%app%+1
if %app% equ 3 (
goto end3
)
net stop appidsvc
echo Checking the appidsvc service status.
sc query appidsvc | findstr /I /C:»STOPPED»
if not %errorlevel%==0 (
goto appidsvc
)
goto loop4
:end3
cls
echo.
echo Cannot reset Windows Update since «Application Identity» (appidsvc) service failed to stop.
echo.
pause
goto Start
:cryptsvc
set /a c=%c%+1
if %c% equ 3 (
goto end4
)
net stop cryptsvc
echo Checking the cryptsvc service status.
sc query cryptsvc | findstr /I /C:»STOPPED»
if not %errorlevel%==0 (
goto cryptsvc
)
goto Reset
:end4
cls
echo.
echo Cannot reset Windows Update since «Cryptographic Services» (cryptsvc) service failed to stop.
echo.
pause
goto Start
:Reset
Ipconfig /flushdns
del /s /q /f «%ALLUSERSPROFILE%Application DataMicrosoftNetworkDownloaderqmgr*.dat»
del /s /q /f «%ALLUSERSPROFILE%MicrosoftNetworkDownloaderqmgr*.dat»
del /s /q /f «%SYSTEMROOT%LogsWindowsUpdate*»
if exist «%SYSTEMROOT%winsxspending.xml.bak» del /s /q /f «%SYSTEMROOT%winsxspending.xml.bak»
if exist «%SYSTEMROOT%winsxspending.xml» (
takeown /f «%SYSTEMROOT%winsxspending.xml»
attrib -r -s -h /s /d «%SYSTEMROOT%winsxspending.xml»
ren «%SYSTEMROOT%winsxspending.xml» pending.xml.bak
)
if exist «%SYSTEMROOT%SoftwareDistribution.bak» rmdir /s /q «%SYSTEMROOT%SoftwareDistribution.bak»
if exist «%SYSTEMROOT%SoftwareDistribution» (
attrib -r -s -h /s /d «%SYSTEMROOT%SoftwareDistribution»
ren «%SYSTEMROOT%SoftwareDistribution» SoftwareDistribution.bak
)
if exist «%SYSTEMROOT%system32Catroot2.bak» rmdir /s /q «%SYSTEMROOT%system32Catroot2.bak»
if exist «%SYSTEMROOT%system32Catroot2» (
attrib -r -s -h /s /d «%SYSTEMROOT%system32Catroot2»
ren «%SYSTEMROOT%system32Catroot2» Catroot2.bak
)
:: Reset Windows Update policies
reg delete «HKCUSOFTWAREPoliciesMicrosoftWindowsWindowsUpdate» /f
reg delete «HKCUSOFTWAREMicrosoftWindowsCurrentVersionPoliciesWindowsUpdate» /f
reg delete «HKLMSOFTWAREPoliciesMicrosoftWindowsWindowsUpdate» /f
reg delete «HKLMSOFTWAREMicrosoftWindowsCurrentVersionPoliciesWindowsUpdate» /f
gpupdate /force
:: Reset the BITS service and the Windows Update service to the default security descriptor
sc.exe sdset bits D:(A;;CCLCSWRPWPDTLOCRRC;;;SY)(A;;CCDCLCSWRPWPDTLOCRSDRCWDWO;;;BA)(A;;CCLCSWLOCRRC;;;AU)(A;;CCLCSWRPWPDTLOCRRC;;;PU)
sc.exe sdset wuauserv D:(A;;CCLCSWRPWPDTLOCRRC;;;SY)(A;;CCDCLCSWRPWPDTLOCRSDRCWDWO;;;BA)(A;;CCLCSWLOCRRC;;;AU)(A;;CCLCSWRPWPDTLOCRRC;;;PU)
:: Reregister the BITS files and the Windows Update files
cd /d %windir%system32
regsvr32.exe /s atl.dll
regsvr32.exe /s urlmon.dll
regsvr32.exe /s mshtml.dll
regsvr32.exe /s shdocvw.dll
regsvr32.exe /s browseui.dll
regsvr32.exe /s jscript.dll
regsvr32.exe /s vbscript.dll
regsvr32.exe /s scrrun.dll
regsvr32.exe /s msxml.dll
regsvr32.exe /s msxml3.dll
regsvr32.exe /s msxml6.dll
regsvr32.exe /s actxprxy.dll
regsvr32.exe /s softpub.dll
regsvr32.exe /s wintrust.dll
regsvr32.exe /s dssenh.dll
regsvr32.exe /s rsaenh.dll
regsvr32.exe /s gpkcsp.dll
regsvr32.exe /s sccbase.dll
regsvr32.exe /s slbcsp.dll
regsvr32.exe /s cryptdlg.dll
regsvr32.exe /s oleaut32.dll
regsvr32.exe /s ole32.dll
regsvr32.exe /s shell32.dll
regsvr32.exe /s initpki.dll
regsvr32.exe /s wuapi.dll
regsvr32.exe /s wuaueng.dll
regsvr32.exe /s wuaueng1.dll
regsvr32.exe /s wucltui.dll
regsvr32.exe /s wups.dll
regsvr32.exe /s wups2.dll
regsvr32.exe /s wuweb.dll
regsvr32.exe /s qmgr.dll
regsvr32.exe /s qmgrprxy.dll
regsvr32.exe /s wucltux.dll
regsvr32.exe /s muweb.dll
regsvr32.exe /s wuwebv.dll
regsvr32.exe /s wudriver.dll
netsh winsock reset
netsh winsock reset proxy
:: Set the startup type as automatic
sc config wuauserv start= auto
sc config bits start= auto
sc config DcomLaunch start= auto
:Start
net start bits
net start wuauserv
net start appidsvc
net start cryptsvc
Как только команды окажутся в Блокноте, нажмите на пункт «Файл» в строке меню и выберите пункт «Сохранить как…». Задайте создаваемому файлу любое имя, например, Сброс центра обновлений, и измените его расширение с .txt на .bat (это очень важно!), а затем сохраните файл в удобное место на компьютере.
В итоге у вас должен получиться, к примеру, файл Сброс центра обновлений.bat. Кликните на этот файл дважды левой кнопкой мыши, после чего начнется автоматический процесс сброса компонентов Центра обновления Windows. Дождитесь его окончания и проверьте наличие ошибки 8024001B.
Метод №3 Восстановление системы
В крайнем случае можно попробовать воспользоваться точкой восстановления. Зачастую после восстановления системы никакие ошибки не должны вас больше беспокоить. Хорошо, нажмите на клавиатуре Windows+R и выполните команду rstrui. В появившемся окошке вам необходимо выбрать точку, на момент создания которой ошибки 8024001B не наблюдалось, и запустить процесс восстановления системы. Процесс очень прост и не займет много времени. Также помните: ваш компьютер может перезагружаться при восстановлении.
Мы надеемся, что данные методы помогли вам в решении ошибки 8024001B.
Windows 10 Update wont download (Error 0x8024401b)
My start bar and cortana have stopped working and after scrolling along the web apparently the only way to fix it is to install the lastest windows 10 updates but when i try to install the latest i get Error 0x8024401b.
![]()
Thank you for posting in Microsoft Community and being part of Windows 10.
I understand your concern installing the latest update on your computer with error: 0x8024401b . We will help you to resolve this issue.
This issue might have occurred due to corrupted/ missing Windows Update Components or system files.
Do let us know if you are able to see any error code/ error message when accessing Start button and Cortana?
Method 1: I suggest you to disable any third-party anti-virus software and check if you are able to install the updates.
S tep 1: Disable anti-virus software.
NOTE : Antivirus software can help protect your computer against viruses and other security threats. In most cases, you shouldn’t disable your antivirus software. If you have to temporarily disable it to install other software, you should re-enable it as soon as you’re done. If you’re connected to the Internet or a network while your antivirus software is disabled, your computer is vulnerable to attacks.
If the issue still persists, I suggest you to uninstall the anti-virus software.
Step 2: I suggest you to run Windows Update troubleshooter.
Windows Update troubleshooter resolves problems that prevents you from updating windows.
Steps:
- Press Windows + X , click on Control Panel , select Category and then select Large or Small icons .
- Click on Troubleshooting and click on View all in the left pane.
- Select Windows Update to run the Windows Update Troubleshooter and follow the on-screen instructions.
Method 2: I suggest you to perform Clean boot to avoid any third party software conflict.
Disclaimer: Putting your system in Clean Boot state helps in identifying if any third party applications or startup items are causing the issue. You need to follow the steps from the article mentioned below to perform a Clean Boot.
(Applies to Windows 10 as well)
Note: Refer «How to reset the computer to start normally after clean boot troubleshooting» to reset the computer to start as normal after troubleshooting.
For more information refer: Get help with the Windows 10 Start menu
Hope it helps. Try the above and update us the status of this issue for further assistance.
Was this reply helpful?
Sorry this didn’t help.
Great! Thanks for your feedback.
How satisfied are you with this reply?
Thanks for your feedback, it helps us improve the site.
How satisfied are you with this reply?
Thanks for your feedback.
Was this reply helpful?
Sorry this didn’t help.
Great! Thanks for your feedback.
How satisfied are you with this reply?
Thanks for your feedback, it helps us improve the site.
How satisfied are you with this reply?
Thanks for your feedback.
![]()
Thank you for responding.
I suggest you to try the below troubleshooting steps to rename the Software distribution folder, start the Windows Update service and check if it helps.
Step 1: Stop BITS, Cryptographic, MSI Installer and the Windows Update Services.
- Press Windows Key + X on the keyboard.
- Select Command Prompt (Admin) from the menu.
- Type the following commands at a command prompt. Press ENTER key after each command.
- net stop wuauserv
- net stop cryptSvc
- net stop bits
- net stop msiserver
Step 2: Rename SoftwareDistribution folder.
Press Windows key + X key on the keyboard.
Click on Command Prompt (Admin).
Type net stop wuauserv and press Enter.
Type rename c:windowsSoftwareDistribution softwaredistribution.old and press enter
Type net start wuauserv and press Enter.
Type Exit and press Enter
Step 3: Start BITS, Cryptographic, MSI Installer and the Windows Update Services
- Type the following commands in the Command Prompt.
- Press the ENTER key each command.
- net start wuauserv
- net start cryptSvc
- net start bits
- net start msiserver
3. Type Exit in the Command Prompt to close
4. Restart the computer and check with the status of this issue.
Hope it helps. Try the above and kindly update the status of this issue for further assistance.
Was this reply helpful?
Sorry this didn’t help.
Great! Thanks for your feedback.
How satisfied are you with this reply?
Thanks for your feedback, it helps us improve the site.
How satisfied are you with this reply?
Thanks for your feedback.
I don’t really understand all of this stuff, if win 10 worked fine, then some updates installed, and now the start menu and cortana won’t work, why should we the people have to go into this long drawn out rigamarole to fix something that we had nothing to do with in the first place?
Microsoft: you see that a gajillion folks have had this issue, figure it out and send the fix to our computers!
I am just about ready to go find a different operating system, or throw my 1,000.00 HP computer on the burn pile. This gets really old.
I started with Windows SE, XP, 7, and now 10. We get told we have to upgrade to new platforms because Microsoft will no longer support those platforms, so like sheep we follow the herd and get bigger and better windows. Well it looks like the same old stuff, because once again, this update and that up date messes up something that was working just fine. Not only does my windows icon not work, but cortana doesn’t, plus I have to jump through hoops now just to find my settings, and boy was that fun. My DVD player no longer works, the new and improved photo thingy, won’t display my pictures.
Yep, enjoying the new and improved Windows 10 platform. NOT!
Was this reply helpful?
Sorry this didn’t help.
Great! Thanks for your feedback.
How satisfied are you with this reply?
Thanks for your feedback, it helps us improve the site.
How satisfied are you with this reply?
Thanks for your feedback.
![]()
Thank you for responding.
I regret for the inconvenience caused to you after installing the latest update.
Do let us know which was the latest update (KB number) installed on your computer?
I suggest you to perform a system restore to the earlier point before installing the latest update. When you perform a System Restore the time and date would be changed on your computer.
System Restore: Though it is said that System Restore does not affect your personal information such as email, documents, photos, videos, etc., but there is highly possible that some of your personal files are deleted while system restoring.
During System Restore, there may be errors and such errors may cause damage to the files that are present in the system. And, computer shutdown during restoring process may also lead to file loss. Sometimes when System Restore is failed, it may lead to loss of important files as well.
I recommend you to refer to the Microsoft article to perform System Restore: Recovery options in Windows 10
Section: Restore from a system restore point.
Hope it helps. Reply to the post with an updated status of this issue for further assistance.
Was this reply helpful?
Sorry this didn’t help.
Great! Thanks for your feedback.
How satisfied are you with this reply?
Thanks for your feedback, it helps us improve the site.
How satisfied are you with this reply?
Thanks for your feedback.
Was this reply helpful?
Sorry this didn’t help.
Great! Thanks for your feedback.
How satisfied are you with this reply?
Thanks for your feedback, it helps us improve the site.
How satisfied are you with this reply?
Thanks for your feedback.
My computer hasn’t worked well for quite some time, these are the issues: when you click on the windows icon in the lower left corner, the hour glass flickers but nothing happens When you right click on it, you have a lot of choices to shut down the computer, reach the control panel, event viewer, programs and features, etc. You can’t click into the box to ask Cortana anything. My new notification area, won’t open, and when you right click on it, there is an option to open command center, and when you do that, it doesn’t do anything. The new photo area used to work, and when I now click on a picture, it just flickers and won’t open any pictures, luckily, I was able to tell it to open with photo gallery, & I can access my photos that way.
I am unable to download the pictures from my phone to the computer. ya, not happy with that. And some of my photo folders are missing since all of this.
And I see that I am supposed to do the recovery thing. Everything had been working fine then updates were added to my computer, and now things don’t work. This is none of my doing, this is your updates that have messed up my computer.
What part about that are you not getting?
The windows updates that I have been able to access are: KB3116908 on 12/7/15, KB3122947 on 12/8/15, KB3124262 on 1/29/16, KB3139907on 3/1/16 KB3140743 on 3/2/16. BUT my computer hasn’t been doing all of these things properly since November of 2015.
How is any of this my fault and why should I have to do recovery, or do this or do that when I did not cause any of these problems?
I am not the only one that has the issue with Cortana and the start menu.
When some users are trying to search for updates, they see Windows Update Error 0x8024001B. The error comes with a message that says “There was a problem checking for updates”. This doesn’t allow Windows to scan for the update, hence, they never get to update their computer. If you are one of those users, then this post is for you.
0x8024001B -2145124325 WU_E_SELFUPDATE_IN_PROGRESS The operation could not be performed because the Windows Update Agent is self-updating.
What causes Error 0x8024001B of Windows Update?
One thing you need to know is that this error code sometimes means that the update is installing, but users have reported that even after a day or two, the update doesn’t seem to get installed. That’s why we need to know why this error code is appearing and what should be done to resolve the issue. Usually, if the system files are corrupted, these kinds of errors are triggered. Even though this still is a reason here, it’s not the most obvious one. The Windows Update Agent can also cause this issue.
If you are encountering Windows Update Error 0x8024001B, check out the following solutions.
- Restart your computer and retry
- Run Windows Update Troubleshooter
- Reset Software Distribution and Catroot Folders
- Reset Windows Update Agent to default
- Repair System Files.
1] Restart your computer and retry
Sometimes, the error just comes out of the blue because of a glitch. To get rid of it, try restarting your computer. After that, try updating your OS and see if that works. If not, move to the next solution.
2] Run Windows Update Troubleshooter
Now, let us begin with our troubleshooting. First up, we are going to run Windows Update Troubleshooter and let it recognize the cause and rectify it. Follow the given steps to do the same.
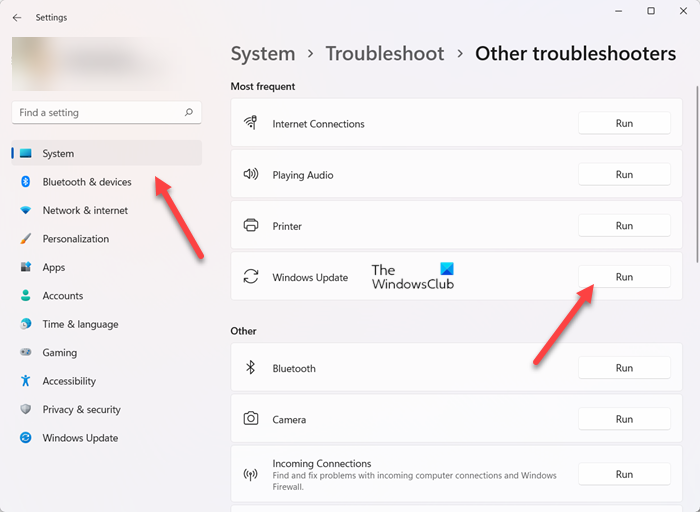
Windows 11
- Open Settings.
- Go to System.
- Click on Troubleshoot and then select Other troubleshooters.
- Now, click the Run button for Windows Update.
Run the troubleshooter and see if that helps.
Windows 10
- Launch the Settings app.
- Click on Update & Security > Troubleshoot > Additional troubleshooters.
- Finally, select Windows Update and click Run the troubleshooter.
Hopefully, this will do the job for you.
Read: Windows Update Troubleshooter not working
3] Reset Software Distribution and Catroot Folders
If the Windows Update Components, Software Distribution and Catroot, have corrupted files, chances are you will see the error code in question. You should flush the folders and see if that works.
Our portable freeware FixWin allows you to reset this and most other Windows settings or functions with a single click.
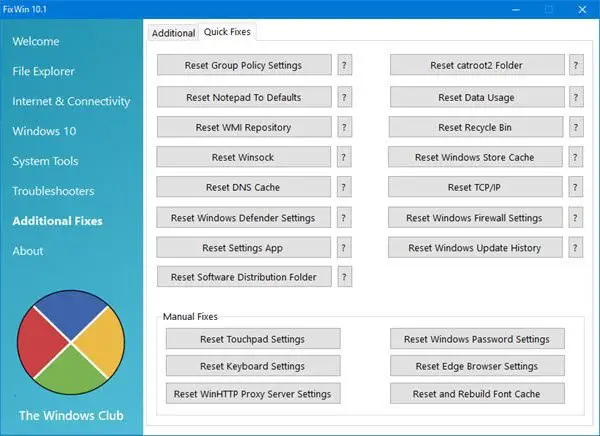
Open FixWin > Additional Fixes > Quick Fixes and press the following buttons one after the other:
- Reset Software Distribution folder
- Reset Catroot2 folder.
Your job will be done in a click!
4] Reset Windows Update Agent to default
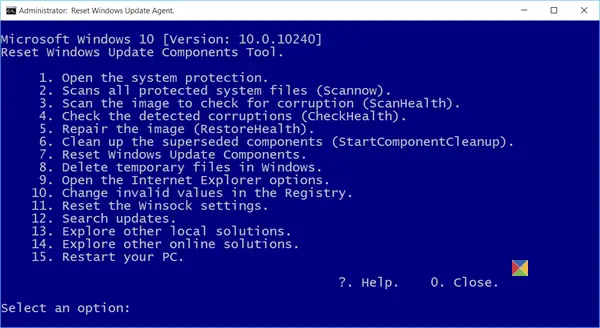
If you are facing problems while downloading or installing Windows Updates on Windows 11/10/8/7, you definitely want to run the Reset Windows Update Agent Tool from Microsoft. This Reset Windows Update Agent will reset & repair all WU-related components & registry keys, detect corruptions, replace corrupted system files, fix corrupted system images, Reset Winsock settings, and so on.
5] Repair System Files
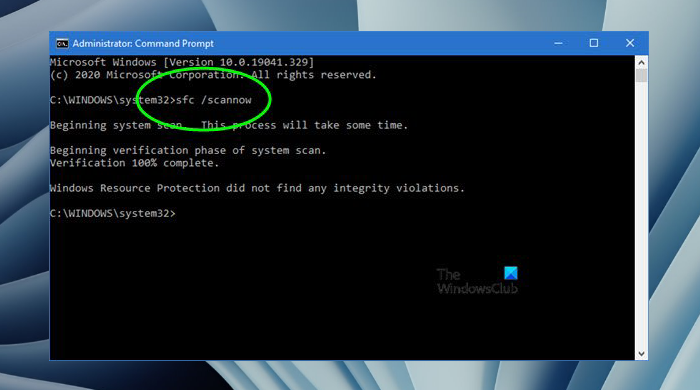
If your computer has recently suffered a virus attack or you usually do an improper shutdown, your Operating System’s file can get corrupted. But this doesn’t mean that these files can not be resolved. We are going to use some commands to do the same. Open Command Prompt as an administrator and run the following commands.
sfc /scannow
If that doesn’t work, then try the next command.
DISM /Online /Cleanup-Image /RestoreHealth
These should do the trick for you.
If Needed: SFC not working, will not run or could not repair corrupt file
How do I fix Windows Update error 0x80242016?
To fix Windows Update error 0x80242016 on Windows 11/10, temporarily disable any third-party antivirus tool that you’re using and try again. Also, disable the proxy connection (if any) and run SFC Scan and DISM tool to solve the problem. You may also need to manually reset all Windows Update Components, restart the relevant Windows services, or manually download updates if nothing works.
How do I fix Windows Update error 0x80246019?
Error 0x80246019 can occur for Windows Update as well as Microsoft Store. To fix error 0x80246019, delete system files (cache files, temporary internet files, etc.) that are safe to delete using the Disk Cleanup tool, and stop Insider Preview builds (if you are a part of Windows Insider Program). This should work or you should run System File Checker to repair corrupt Windows files.
Following are some other common Windows Update errors.
- Windows Update Error 0xCA00A009
- Windows Update Error 0x800f080a
- Windows Update Error 0x80248007.