
It looks like it installed correctly, so I suspect a .net error. What version are you on?
Try starting the game directly from the modded game’s folder instead of from the Mod Launcher. Does it start?
Try «Pre-sync Mod» from the Mod Launcher game screen. Then try again to launch the game.
Is the game folder excluded from av?
7DTD Mod Launcher errors on update/manual install
I’d post this in the correct 7DTD forum, but it seems that my e-mail is both unused and incorrect when trying to log in, so….
When I’m trying to update the mod launcher to the latest version, or I download the latest version to manually install it, I get an error that reads: Error 1001. Exception occured while initializing the installation: System.Configuration.ConfigurationErrorsException: Configuration system failed to initialize.
I’m not sure how to go about correcting this, and I don’t really want to try wiping the folder and clean reinstalling just yet, since the launcher is supposed to be able to autoupdate itself anyway.
Any help would be appreciated!
Thanks
“Fatal error in GC” on 7 Days to Die can be caused by several reasons. They range from unexpected interactions between programs and drivers to physical faults in the hardware.
These errors can impede your adventure, ruin your fun moment, and can be very frustrating. To help you solve this problem, our pro gamers will provide you with these 5 quick and easy fixes.
How to Fix 7D2D Fatal Error in GC: 5 Methods
Fix #1: Change Page File Size
In most cases, the 7 Days to Die fatal error in GC happens because your game does not have access to enough usable memory. This causes the game to lag and eventually crash. In some situations, you might not be able to relaunch the game after the crash.
Clear your PC cache memory to circumvent the situation. If this does not work, you may need to change your Page File Size.

Here is how to go about it:
- Press the Windows Key
- Type systempropertiesadvanced
- Once the result appears, right-click, and click Run as Administrator
- If you do this right, you will see the Advanced properties page.
- Click on Settings to open the Performance tab
- On the Performance tab, click Advanced
- Click on Change
- Check the “Automatically managing paging file size for all drives” box
- Select Custom size and fill in a Value to change the page file size. Advisably, you should set this value to 20GB.
Fix #2: Try Removing Mods
If you do not install the suitable Mod on your 7 Days to Die game or use it with the right launcher, it will most likely run into this error. The reason is that mods can encumber your PC memory, thus affecting the overall gameplay of your 7D2D game.

To remove mods from your PC, you can use the Steam launcher to validate all game files on your PC. Also, you can download the mod launcher to remove or add a mod without having to redownload the game.
Fix #3: Switch Renderer
Another way to solve the 7 Days to Die Fatal Error in GC is to switch the renderer. You can change the renderer from the game launcher.
By preset, the renderer is always DirectX 11, which does not work well with the 7D2D game. As pro gamers, we advise you to switch the renderer to GLCore. This should stop your game from running into frequent crashes.
Fix #4: Check Anti-Virus Settings
They design some anti-virus tools specifically to interfere with games. This can stop your 7 Days to Die game from running correctly, thus running into a fatal error. You can solve this problem by simply checking your anti-virus settings.

Look for the Gaming mode feature, and enable it. Alternatively, you can add your 7 Days to Die game directory to the anti-virus exclusion list.
Fix #5: Deactivate VSync
VSync, although very useful, can cause your game to run into a fatal error if the monitor can’t synchronize with the game. This lowers your frame rate, thus causing the game to lag and crash.
To deactivate VSync:
- Open your Windows Start Menu
- Navigate through to NVIDIA Control Panel
- Select Manage 3d Settings, then Vsync (Vertical Sync)
- Click on Disable to deactivate.
Conclusion
The tips we have listed in this guide are guaranteed to fix the 72D2 “fatal error in GC” with no hassle. As a bonus tip, always ensure that your drivers are updated [1] and close all background processes before launching your game.

7D2D Mod Launcher обеспечивает легкий способ играть в ваши любимые моды для 7 Days To Die.
Преимущества:
- Автоматически обновляет последние версии модов с выбранных серверов
- Автоматически задает адрес сервера в окне «Подключиться к серверу»
- Подключение к различным серверам с использованием разных модов
- Поддержка My Mods для обеспечения более широкой базы модов для игроков
Для игроков
Одна из самых неприятных вещей в игре на модифицированом сервере — это когда на сервере установлены новые моды, а ваши оказываются неожиданно устаревшими. 7D2D Mod Launcher будет следить за ссылками на скачивание, загружая новые версии модов каждый раз, когда вы запускаете игру.
Пробовали мод в первый раз, но он оказался нерабочим? Не беспокойтесь, просто выберите другой мод, пока разработчики не выпустят обновление для испорченного мода. Больше никаких проблем с попытками самостоятельно интегрировать изменения, делать резервные копии или бороться с несовместимостью модов.
Для администраторов сервера
7D2D Mod Launcher обеспечивает единый вариант конфигурационного файла, который позволяет вам указывать ссылки для загрузки ваших моды, ссылки на ваш сайт и другую информацию. Предоставляя этот файл своим игрокам, они будут в курсе всех ваших изменений, которые вы делаете, без необходимости поиска сообщений об изменениях на форуме.
- Простая конфигурация файла XML, в которой перечислены все ваши серверы и ссылки для скачивания.
Для моддеров
7D2D Mod Launcher предоставляет вам более широкую аудиторию для ваших модов. Просто скопируйте свой собственный файл конфигурации XML, или даже просто предоставьте прямую ссылку для скачивания вашим игрокам, и они смогут без проблем играть с вашими модами.
Использование 7D2D Mod Launcher на примере запуска мода Starvation
My initial thought is to make sure the client and EAC are excluded from Antivirus.
Also, I’ve seen issues with EAC and some overlays like MSI Afterburner or Overwolf.
I also found this interesting solution regarding the same error for Rust…
Originally posted by Scycthe: I just found a solution that worked for me. I went to services, looked and right clicked on EasyAntiCheat, chose properties and changed the startup type to ‘automatically’. I didn’t need to start the service beacuse it only starts if a program is using it. After that, Rust opened without a problem for me.
I also found this tidbit on the Steam forum….
If you receive this error none of the above will fix it for you. Here is the Fix:
You are probably running on a 64-bit OS or Windows Server 2012 R2 or higher. EasyAntiCheat installs a Windows Service, you’ll notice when looking at the service it is pointing to C:WindowsSystem32 for EasyAntiCheat.exe. However the installer detects 64-bit and installs it into C:WindowsSysWOW64 instead. Go into C:WindowsSysWOW64 and copy EasyAntiCheat.exe out of there and into C:WindowsSystem32 directory, and try again. This will fix this issue for you.
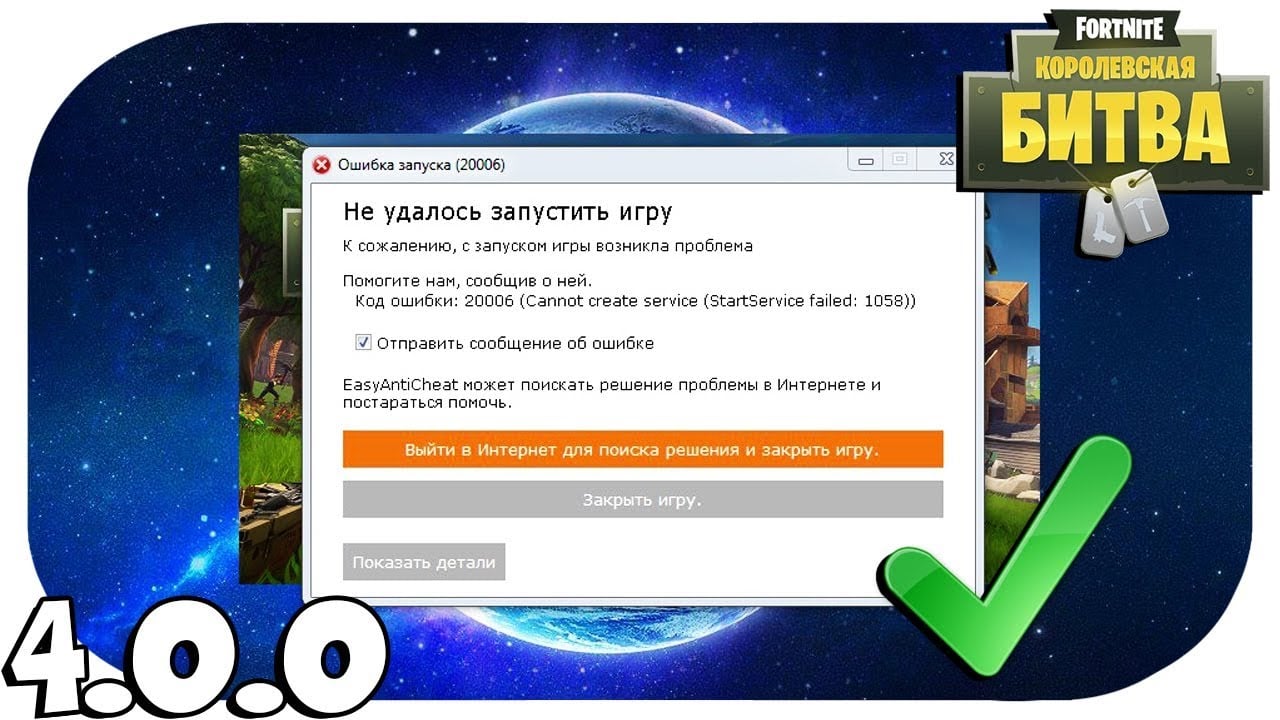
In games like Fortnite, Far Cry 5, For Honor, Rust, Scum, and anything else that runs Easy Anti-Cheat, it’s possible to get an Error Code 20006 … StartService failed: 1058 (or alternatively a 1072 error). These errors are extremely annoying and both result in you not being able to play the game you want to.
That is… Not without doing what we’re about to walk you through.
The full error will likely read as “Error Code: 20006 (Cannot create service (StartService failed: 1058)).” Or at the very least something similar to that – the 1058 tells us that EAC has been disabled and needs to be re-enabled. Another possibility is a 1072 error which indicates that EAC has been “flagged for deletion”.
The error you get will dictate the steps you need to follow. Luckily, neither problem is insanely difficult to fix and should only take a few minutes (maybe 10-15) at most.
On this page, you’ll find 3 possible routes to take:
- If your error was a 1058, start at Option A and if that doesn’t work then Option B definitely will.
- If your error was a 1072, skip both A and B and jump right to Option C. Once you’re done with C, go back and do Option B.
Note: This will not work if you’ve been banned for cheating. It’s a fix for those who are running into the aforementioned errors with EAC itself.
 1")
A.) Fixing Error Code 20006 (Error 1058)
As I mentioned previously, a 1058 error generally tells us that the program has been disabled. Often, you can quickly figure this out by opening Services, right-clicking the program and opening “Properties”. In the Properties window under “Startup type” you’ll either see “Disabled”, “Automatic”, “Automatic (delayed)”, or “Manual”. For EAC’s sake, we want it to be either “Automatic” or “Automatic (delayed)” if you’re worried about it impacting your startup times.
But, we’ll come back around to that with a proper set of steps further down.
First, make sure that Easy Anti-Cheat is not being blocked or disabled by your anti-virus/firewall. To do that, open your firewall, find the permissions section, find EAC, then make sure it’s not blocked.
Note: If you want to be extra-vigilant, you can set up an exclusion for EAC’s root folder (it should be “C:Program Files (x86)EasyAntiCheat”). To go the extra mile you could also set up exclusions for the EAC folders that any EAC-enabled game will have in its root folder.
Not blocked? Okay, let’s keep going.
The next step is reinstalling/repairing Easy Anti-Cheat. It might be that the current install is corrupted for the one game you want and a quick repair will fix the problem. Wouldn’t that be nice?
You can choose to repair/reinstall EAC from 1 of 2 locations. Either from EasyAntiCheat folder found within your game’s install folder; or from the EasyAntiCheat folder in Program Files (likely C:Program Files (x86)EasyAntiCheat). Once you’ve located the folder all you have to do is run the EAC install executable and choose “Repair” in the new window that pops up.
Here’s a good walkthrough on how you can reinstall or repair Easy Anti-Cheat:
In the video, he uses Fortnite as an example, but the same method will work with any of the 70+ games that run EAC.
Hopefully, that works and gets you gaming. If it doesn’t, you might want to try temporarily turning off your antivirus and trying the reinstall again, or reboot your PC; or try both.
If you’re met with yet another error upon trying to reinstall or repair then we have more work to do! On to the next set of steps!
B.) Reinstalling/repairing didn’t work
If none of the above worked, chances are EAC has been disabled by something else. Why or what? I haven’t quite figured that part out yet. But, the simple solution is to turn it back on. However, doing that isn’t easy (or possible) unless you know where to find the right settings.
To turn EAC back on:
- Open “Services” – Open the Start menu and type “Services” on Windows 10
- Find “EasyAntiCheat” within Services then right-click it and select “Properties”
- In the Properties window, find “Startup type” and change it from “Disabled” to “Automatic” (or Automatic (delayed) if you’re worried about bootup performance)
- Click “Apply” and close both the Properties and Services windows.
- Launch your game
Following those steps should hopefully get you back to gaming within no time. However, if it happened once it will likely happen again the next time you restart your PC. Keep that in mind.e
C.) Fixing Error 1072: Marked for deletion
If you ran into a problem around Step 3 while trying to turn EAC back on and you received an error that said EAC has been “scheduled for deletion”, then you’re going to have to follow one more set of steps…
Alternatively, if you noticed the 1072 error right away, you should start from this point as the previous steps will not work without first doing this.
Luckily, it’s easy to do and should only take a couple of minutes at most.
 2")
Our next set of steps involves either removing or editing a “DeleteFlag” that you’ll find within the EAC registry folder.
To remove the DeleteFlag:
- Open Regedit – Open the Start menu and type “Regedit” on Windows 10
- Navigate to “ComputerHKEY_LOCAL_MACHINESYSTEMCurrentControlSetServicesEasyAntiCheat” (if you copy and paste that into regedit, it should bring you to the right spot)
- Right click “DeleteFlag” and select “Modify, then change the Value data from “1” to “0”
- Restart your PC
- Attempt to turn EAC back on again (previous set of steps)
- If EAC turns on without a hitch, boot your game!
 3")
With any luck, now you should be able to turn EAC back on and boot your game(s) without an issue. If you’ve tried before restarting your PC and it doesn’t work, try a quick reboot before you panic too much.
Games that run Easy Anti-Cheat
There are a ton of games that run EAC, the last time this guide was updated (September 2nd, 2018) there was a total of 77. If one of your EAC protected games is giving you the 20006 error, then anything else in your library running EAC will as well.
So, if you’re curious how many of your games are EAC protected, here’s the full list of games that currently utilize it. More are added all the time so I’ll try to keep this list as relevant and up to date as possible.
- 7 Days to Die
- Absolver
- Ar:piel
- Audition TH
- Battalion 1944
- Block N Load
- Cabal Online
- Combat Arms
- Combat Arms: Line of Sight
- Crossout
- Cuisine Royale
- Darkfall: Rise of Agon
- Darwin Project
- Days of War
- Dead by Daylight
- Death Field: The Battle Royale of Disaster
- Dirty Bomb
- Dragon Ball Fighter Z
- Dragon Ball Xenoverse 2
- Dragonica: Lavalon Awakens
- Dying Light: Bad Blood
- Empyrion
- Far Cry 5
- Fear the Wolves
- For Honor
- Fortnite Battle Royale
- Fractured Lands
- Friday the 13th
- Gigantic
- Hide & Hold Out
- Hunt: Showdown
- Hurtworld
- Infestation: Survivor Stories
- Infestation: World
- Insurgency: Sandstorm
- Intershelter
- iRacing
- Ironsight
- Lifeless
- Luna
- Magicka: Wizard Wars
- Memories of Mars
- Miscreated
- Naruto To Boruto: Shinobi Striker
- Next Day
- Offensive Combat: Redux!
- Onward VR
- Paladins
- Post Scriptum
- Ragnarok
- Realm Royale
- Reign of Kings
- Rend
- RF Online
- Rising Storm 2: Vietnam
- Robocraft
- Robocraft Royale
- Rockshot
- Rust
- SCUM
- Sky Noon
- Smite
- Squad
- Sword Art Online: Fatal Bullet
- Tales Runner TH
- The Culling
- Tom Clancy’s Ghost Recon: Wildlands
- Total War: Arena
- War of the Roses
- War of the Vikings
- War Rock
- Warface
- Warhammer 40,000: Eternal Crusade
- Warhammer: Vermintide 2
- Watch Dogs 2
- Worlds Adrift
- Yulgang TH
Conclusion
I hope this was able to help you fix Easy Anti-Cheat’s Error Code 20006. Whether you’re playing Fortnite, Squad, or For Honor, this is a seriously annoying problem to run into and can be even more painful to solve… Without the proper help, that is!
If none of the steps listed above worked for you, get in touch with EAC’s support directly and they will be able to help you further.
If you have your own potential fix that you feel could help people out, feel free to post it in the comments!
EsyAntiCheat при запуске с любой игрой появляется ошибка Error 20006 [StarService failed]
EsyAntiCheat при запуске абсолютно любой игры, выдается ошибка Error 20006, и нигде нет никакой информации по этому поводу, переустановка античита не помогла. В технической поддержке не отвечают, иногда если отключить интернет в момент загрузки античита то можно пропустить его запуск, что дает понять всю надежность сего творения.
17347 просмотров
больше 5 лет назад
 EAC проблемы во всех играх.
2 ответа
 3
3
 3
3

Здравствуйте, здесь я думаю ситуация вполне исправима, так как все таки эта обычная ошибка которая происходит внутри этого продуманного античита.
Сейчас я вам скину несколько рекомендаций (чисто из личного опыта), после чего вы должны сказать что пробовали из этого сделать, хорошо? А там дальше я вам уже дам некоторые инструкции которые будут зависеть от вашего ответа.
1.Установили ли вы обновления Windows? (да-да, может прозвучать глупо, но это нужно сделать, поверьте мне).
2.Проверка целостности файлов, в играх в которых появляется ошибка, к примеру Paladins , что-то исправила?
3.Пробовали ли вы копировать файлы EAC в директорию sysWOW64, с полной заменой и перезаписью старых?
4.Есть вероятность что в этом виноват антивирус, полностью отключите его до следующей загрузки системы.
5.Можно так же попытаться провести чистку системы и реестра при помощи CCleaner — думаю это будет весьма актуально в вашем случае.
Если что, отвечайте просто в комментарии под моим ответом, буду ждать вашего обратного сообщения.
Ответ дан
больше 5 лет назад
3

Здравствуйте, здесь можно легко убедится, проблемы с самим античитом, либо он конфликтует с вашим программным обеспечением (софтом) который установлен на компьютере.
Для того чтобы это узнать, попробуйте просто добавить нового пользователя Windows и выдать ему полные привилегии администратора как у вас. Зайдите через него и вы увидите перед собой дефолтную тему и никаких запущенных в ДП дополнительных приложений или программ,
все только корневое и системное.
Вообщем запустите Steam и попробуйте войти в любую игру где у вас это происходит — если ситуация не изменится тогда уже проблемы в анти чите, и я думаю пофиксить это будет не сложно.
Ответ дан
больше 5 лет назад
0
Помогаю найти игру, исправить ошибки, вылеты, фризы, лаги и проседания FPS.
Fortnite может не запускаться из-за ошибки 20006. Существует несколько способов решения проблемы, но обо всем по порядку.
Содержание
- Описание ошибки
- Причина проблемы
- Способы решения ошибки 20006
- Восстановление EAC
- Проверка целостности игровых файлов
- Переустановка драйвера EAC
Описание ошибки
При старте Фортнайт появляется экран загрузки, но поверх него отображается ошибка с кодом 20006: “Не удается создать службу (StartService failed: 2)” или “Cannot create service (StartService failed: 2)”. После чего игра не запускается.
Причина проблемы
Всему виной EasyAntiCheat (EAC) – система борьбы с читерами, которая почему-то не запускается. Fortnite не будет работать без античита и поэтому выдает ошибку. Неполадке часто предшествует обновление игрового клиента.
Все действия направлены на исправление неизвестной проблемы с античитом. Обязательно в начале проверьте, что и игра, и клиент “Epic Games” отключены.
Восстановление EAC
Действуйте следующим образом:
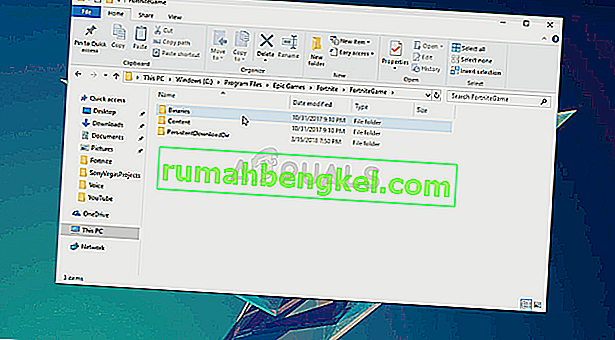
- Откройте папку, где установлена игра. Если вы изменяли настройки по умолчанию, то это “C:Program FilesEpic GamesFortniteFortniteGame”.
- Далее перейдите в директорию с EAC. Она находится во внутренней папке: “BinariesWin64EasyAntiCheat”. Если у вас 32-битная ОС, то вместо Win64 будет директория Win32.
- В конечной папке отыщите файл “EasyAntiCheat_Setup.exe” и запустите его от имени администратора. Правый клик мышкой по иконке => выбор соответствующего пункта из контекстного меню.
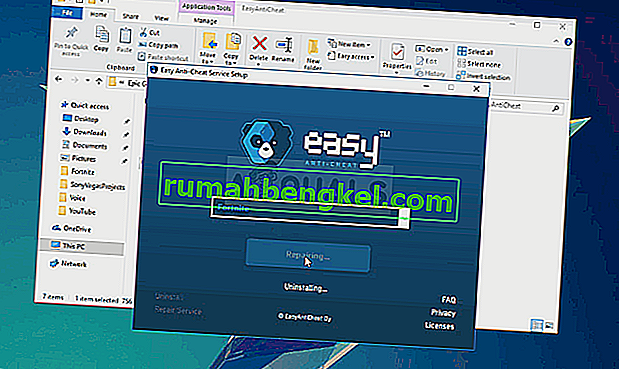
- Откроется приложение. По центру убедитесь, чтобы в строчке указана игра “Fortnite”. Далее клик на “Repair Service” – эта кнопка находится чуть ниже. По истечении пары секунд появится оповещение “Installed Successfully”.
- Закрывайте окна и пробуйте запустить игру
Проверка целостности игровых файлов
Для этого выполняйте следующие действия:
- Запуск “Epic Games Store” от имени администратора. Для этого – правый клик мышкой на иконке и выбор соответствующей строчки в выпадающем списке.
- В окне клиента перейдите на раздел с Фортнайт. С правой стороны от “Запустить” клик на иконку шестеренки.
- В новом окне клик на “Проверить”. Начнется анализ игровых файлов, что обычно длится до 10-15 минут.
- По окончании пробуйте запускать “Fortnite”.
Переустановка драйвера EAC
Последовательно делайте следующее:
- Убедитесь, что в ОС включено отображение скрытых файлов. В Windows 10 это делается так: в любой папке выбираете вверху вкладку “Вид”, в ней раздел “Параметры”. Появится новое окно, в нем переходите на вкладку “Вид”, а чуть ниже в окне ищите строчку “Скрывать защищенные …” и снимаете с нее отметку. Еще чуть ниже ставите галочку в строке “Показывать скрытые … “. После – клик внизу на “ОК” и “Применить”.
- Откройте директорию “C:WindowsSystem32″. Отыщите в ней файл “EasyAntiCheat.sys”. Его можно удалить, переместить, переименовать. Главное, чтобы в этой папке не было файла с таким названием.
- Запустите Fortnite. Клиент “увидит”, что недостает важных файлов и самостоятельно догрузит их.
Для каждого способа в конце рекомендуется выйти из своего игрового профиля и снова зайти в него. Также для надежности стоит перезагрузить ПК.
Fortnite — это игра-стрелялка в стиле королевской битвы, главная цель которой — выжить. Это определенно одна из самых популярных игр, но многие люди до сих пор жалуются, что не могут нормально играть.
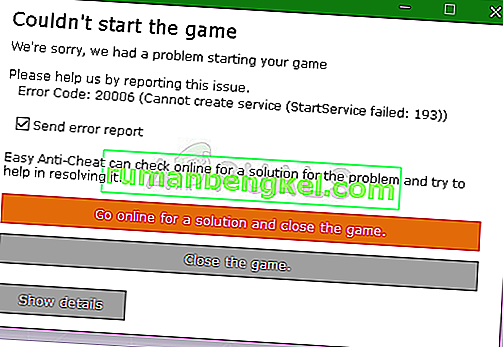
При запуске игры появляется код ошибки Fortnite 20006. Это ошибка запуска, а исполняемый файл игры даже не запускается. Следующее сообщение выглядит примерно так: «Не удалось запустить игру. Код ошибки: 20006 (Невозможно создать службу (ошибка StartService: 193)) ». Проблема обычно связана с инструментом EasyAntiCheat, который использует игра. Следуйте приведенным ниже методам, чтобы решить проблему!
Что вызывает код ошибки Fortnite 20006?
Код ошибки Fortnite 20006 почти всегда возникает либо из-за отсутствия службы EasyAntiCheat на вашем компьютере, либо из-за того, что служба не работает, устарела или просто не отвечает при запуске игры. Epic Games не хочет, чтобы вы заходили в игру, если вас заранее не проверили на читерство и взлом.
Кроме того, некоторые из ваших файлов игры могли быть повреждены или отсутствовать, и это можно легко исправить, проверив игру из средства запуска Fortnite. Поврежденные файлы могут запутать игру и заставить думать, что у вас читерство, хотя на самом деле это не так.
Восстановите службу EasyAntiCheat
Это сервис Anti-Cheat, используемый игрой для распознавания читеров и хакеров. Он активно сканирует вашу установку на предмет всего, что может дать вам несправедливое преимущество перед вашими оппонентами. Однако иногда эта служба выходит из строя, и вам может потребоваться отремонтировать ее самостоятельно, чтобы избавиться от кода ошибки Fortnite 20006.
- Вы можете найти основной исполняемый файл игры, нажав кнопку меню «Пуск» или кнопку поиска рядом с ним и набрав Fortnite. В любом случае щелкните исполняемый файл правой кнопкой мыши и выберите в появившемся контекстном меню опцию «Открыть файл».
- Папка по умолчанию для установки — C >> Program Files >> Epic Games >> Fortnite, но это также зависит от архитектуры вашего компьютера. Вы также можете выполнить поиск Fortnite, щелкнув меню «Пуск» или кнопку поиска, щелкнув правой кнопкой мыши первую запись и выбрав «Открыть расположение файла».
- В любом случае, как только вы окажетесь внутри папки Fortnite, перейдите в FortniteGame >> Двоичные файлы >> Win64 (или Win32 в зависимости от вашей ОС) >> EasyAntiCheat. Внутри вы должны увидеть файл EasyAntiCheat_Setup.exe. Щелкните правой кнопкой мыши файл « EasyAntiCheat_setup.exe » в папке и выберите пункт «Запуск от имени администратора» в появившемся контекстном меню.
- Подтвердите все запросы UAC о том, что файл хочет внести изменения в ваш компьютер, и дождитесь открытия его окна.
- Убедитесь, что Fortnite выбран в списке игр, и нажмите кнопку « Ремонт» ниже. Вскоре после этого должно появиться сообщение «Установлено успешно», поэтому попробуйте перезапустить игру и проверить, появляется ли по-прежнему код ошибки Fornite 20006!
Решение 2. Проверьте установку игры
Игра недоступна в Steam, и у вас нет доступа к полезной функции под названием «Проверка целостности файлов игры». К счастью, Epic Games решили включить эту функцию в свой клиент Fortnite, который обычно выполняет ту же работу. Он просто сканирует вашу установку игры на предмет отсутствия или повреждения игровых файлов и повторно загружает их, чтобы исправить вашу игру. Обязательно попробуйте это ниже!
- Вы должны открыть основной исполняемый файл игры, нажав кнопку меню «Пуск» или кнопку поиска рядом с ним и набрав Fortnite. В любом случае щелкните исполняемый файл правой кнопкой мыши и выберите опцию «Открыть» в появившемся контекстном меню.
- Папка по умолчанию для установки — C >> Program Files >> Epic Games >> Fortnite, но это также зависит от архитектуры вашего компьютера. Вы также можете выполнить поиск Fortnite, щелкнув меню «Пуск» или кнопку поиска и щелкнув первую запись.
- Щелкните значок шестеренки рядом с текстом запуска в окне запуска Fortnite, в котором должно открыться новое меню. Нажмите «Подтвердить» в меню и дождитесь, пока программа запуска завершит проверку файлов игры.

- Процесс займет около 10 минут. Проверьте, не были ли повторно загружены какие-либо файлы, и перезапустите Fortnite, чтобы увидеть, появляется ли код ошибки Fortnite 20006.

Решение 3. Переименуйте драйвер EasyAntiCheat
Переименование или удаление файла EasyAntiCheat.sys в папке System32 на вашем компьютере может быть правильным решением, поскольку игра загрузится повторно, как только вы откроете ее снова. Если его драйвер поврежден, даже ремонт или переустановка инструмента могут работать некорректно. Этот метод прост в применении и может уберечь вас от дальнейших проблем.
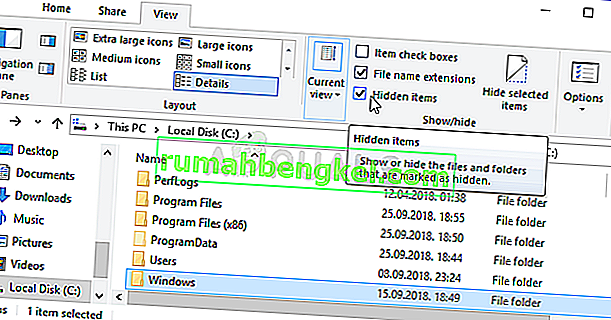
- Перейдите в это место на вашем компьютере C >> Windows >> System32 , перейдя к нему после запуска проводника Windows. Сначала щелкните «Этот компьютер» или «Мой компьютер» на левой панели, чтобы найти и открыть локальный диск C.
- Если вы не можете просмотреть папку Windows, вам может потребоваться включить параметр, который позволяет вам видеть скрытые файлы и папки. Щелкните вкладку « Просмотр » в верхнем меню проводника и установите флажок « Скрытые элементы » в разделе меню «Показать / скрыть». Проводник покажет скрытые файлы и запомнит эти настройки, пока вы не измените их снова.
- Найдите файл EasyAntiCheat.sys в папке System32, щелкните его правой кнопкой мыши и выберите « Переименовать» . Измените его имя на что-нибудь вроде EasyAntiCheat.old.sys и нажмите клавишу Enter, чтобы подтвердить свои изменения. Перезапустите Fortnite и проверьте, по-прежнему ли вы видите ошибку 20006 при запуске!
- by
Matthew Paxton - Last Updated: April 7, 2022
“Fatal error in GC” on 7 Days to Die can be caused by several reasons. They range from unexpected interactions between programs and drivers to physical faults in the hardware.
These errors can impede your adventure, ruin your fun moment, and can be very frustrating. To help you solve this problem, our pro gamers will provide you with these 5 quick and easy fixes.
How to Fix 7D2D Fatal Error in GC: 5 Methods
Fix #1: Change Page File Size
In most cases, the 7 Days to Die fatal error in GC happens because your game does not have access to enough usable memory. This causes the game to lag and eventually crash. In some situations, you might not be able to relaunch the game after the crash.
Clear your PC cache memory to circumvent the situation. If this does not work, you may need to change your Page File Size.

Here is how to go about it:
- Press the Windows Key
- Type systempropertiesadvanced
- Once the result appears, right-click, and click Run as Administrator
- If you do this right, you will see the Advanced properties page.
- Click on Settings to open the Performance tab
- On the Performance tab, click Advanced
- Click on Change
- Check the “Automatically managing paging file size for all drives” box
- Select Custom size and fill in a Value to change the page file size. Advisably, you should set this value to 20GB.
Fix #2: Try Removing Mods
If you do not install the suitable Mod on your 7 Days to Die game or use it with the right launcher, it will most likely run into this error. The reason is that mods can encumber your PC memory, thus affecting the overall gameplay of your 7D2D game.

To remove mods from your PC, you can use the Steam launcher to validate all game files on your PC. Also, you can download the mod launcher to remove or add a mod without having to redownload the game.
Fix #3: Switch Renderer
Another way to solve the 7 Days to Die Fatal Error in GC is to switch the renderer. You can change the renderer from the game launcher.
By preset, the renderer is always DirectX 11, which does not work well with the 7D2D game. As pro gamers, we advise you to switch the renderer to GLCore. This should stop your game from running into frequent crashes.
Fix #4: Check Anti-Virus Settings
They design some anti-virus tools specifically to interfere with games. This can stop your 7 Days to Die game from running correctly, thus running into a fatal error. You can solve this problem by simply checking your anti-virus settings.

Look for the Gaming mode feature, and enable it. Alternatively, you can add your 7 Days to Die game directory to the anti-virus exclusion list.
Fix #5: Deactivate VSync
VSync, although very useful, can cause your game to run into a fatal error if the monitor can’t synchronize with the game. This lowers your frame rate, thus causing the game to lag and crash.
To deactivate VSync:
- Open your Windows Start Menu
- Navigate through to NVIDIA Control Panel
- Select Manage 3d Settings, then Vsync (Vertical Sync)
- Click on Disable to deactivate.
Conclusion
The tips we have listed in this guide are guaranteed to fix the 72D2 “fatal error in GC” with no hassle. As a bonus tip, always ensure that your drivers are updated [1] and close all background processes before launching your game.
Matthew Paxton
Mathew has nursed a love of video games since childhood. Now, as an adult, he enjoys playing challenging games as much as he enjoys relating with other gamers. Matthew created Hypernia to give gamers like himself accurate and reliable information about games, servers, communication protocols, and much more.
 report this ad
report this ad
Leave a Reply
- Partition Wizard
- Partition Manager
- Top 4 Methods to Fix 7 Days to Die Crashing
Top 4 Methods to Fix 7 Days to Die Crashing [Partition Manager]
By Amanda | Follow |
Last Updated May 28, 2020
Are you experiencing 7 Days to Die crashing issue? Are you seeking some effective solutions to this issue? If your answers are yes, this post should be helpful for you. Here, MiniTool Software will show you 4 methods to fix 7 Days to Die crashing.
7 Days to Die is a survival horror game and is popular among players for its realistic characters and scenes. Recently, some players report that 7 Days to Die crashes on startup. If you encountered 7 Days to Die crashing on your computer unfortunately, it’s very likely that there are certain graphics issues. Of course, there might be other factors.
This problem should be rather frustrating for players. The good news is that some effective solutions have been reported by some players. Eager to get rid of 7 Days to Die crashing issue? Just keep on your reading to get the detailed steps.
Method 1: Force the Use of DirectX 10
In gaming, DirectX is necessary and it works to ensure that the audio and video hardware sync well with the gameplay. It has been reported that 7 Days to Die will crash down if you use other versions of DirectX than DirectX 10. So, if your 7 Days to Die keeps crashing, you can try forcing the use of DirectX 10 in Steam.
Step 1: Open your Steam client.
Step 2: Go to LIBRARY, right-click your 7 Days to Die from the list and choose Properties.
Step 3: Under GENERAL tab, click the SET LAUNCH OPTIONS.
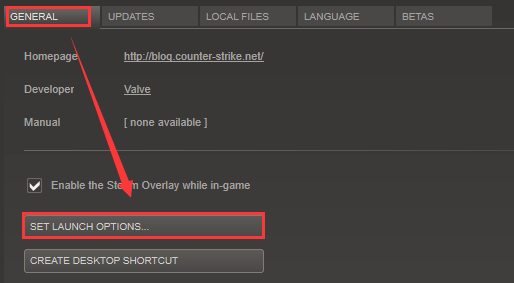
Step 4: In the pop-up dialog, input -force-feature-level–10–0 in the editable box and click OK to apply the changes.
After that, you can restart the game and check if it runs properly again.
Method 2: Verify the Integrity of Game Files
If a game gets crashing, perhaps the related game files are corrupted or missing due to misoperation or being regarded as a threat by your antivirus. In this case, you might need to verify the integrity of the game files in Steam. To do that, you should:
Step 1: Open Steam and go to LIBRARY.
Step 2: Right-click the game 7 Days to Die and choose Properties.
Step 3: Switch to LOCAL FILES tab and click VERIFY INTEGRITY OF GAME FILES button.
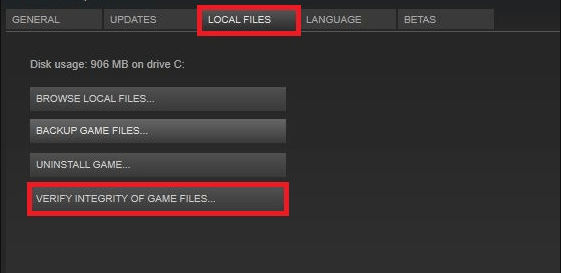
Then, Steam will start validating the files related to 7 Days to Die. You should wait until the process is completed. Hopefully, this can remove the issue successfully. If 7 Days to Die keeps crashing still, you can try the next method.
Method 3: Disable Motion Blur
Motion Blur is a graphics setting that makes the game smoother and more cinematic. But it has been proven that Motion Blur can lead to certain graphics issues and result in 7 Days to Die crashing. So, if you can start the game but it crashes when you are playing it, you can try disabling this setting. Here’s how to do it.
Step 1: Launch 7 Days to Die.
Step 2: In the home screen of the game, click Options and click Video to open Video settings.
Step 3: Locate Motion Blur option and choose Off from the drop-down list.
Step 4: Click Apply and OK to save the changes.
Method 4: Use the Steam of 32-bit
If all the methods above fail to fix 7 Days to Die crashing issue, you can try using the 32-bit version of both Steam and the game. To achieve this, you need SteamCMD which works like Command Prompt. Just follow the instruction below to complete the operation.
Step 1: Download SteamCMD ZIP file and extract it to a newly-created folder.
Step 2: Press Windows + R, input cmd and click OK to open Command Prompt.
Step 3: Input the following commands and press Enter after each to access SteamCMD:
- cd Path (Path should be replaced by the folder path of SteamCMD)
- steamcmd
Step 4: Type the following commands and press Enter after each. This will log into your Steam account to force use of the 32-bit Steam and download the 32-bit version of the game.
- login username password (username and password here should be replaced by your actual Steam credentials.)
- @sSteamCmdForcePlatformBitness 32
- force_install_dir ./7dtd/
- app_update 251570
Once it’s done, you can launch the 32-bit version 7 Days to Die from the 7dtd subfolder in the SteamCMD folder and check if you can play the game without any problems.
About The Author

Position: Columnist
Amanda has been working as English editor for the MiniTool team since she was graduated from university. She enjoys sharing effective solutions and her own experience to help readers fix various issues with computers, dedicated to make their tech life easier and more enjoyable.
She has published many articles, covering fields of data recovery, partition management, disk backup, and etc. In order to provide more useful tips and information, she is still committed to expand her technical knowledge.