
Description
The toner cartridge is not installed or installed improperly.
Solution
<Cause>
The toner cartridge is not installed or installed improperly.
<Solution>
Install the toner cartridge properly.
Follow the procedure below to replace the toner cartridge.
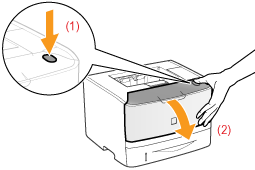
1. Open the front cover while pressing the open button.
2. Remove the toner cartridge.
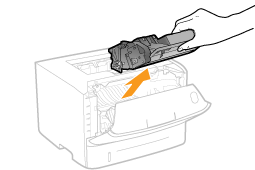
2. Remove the toner cartridge.
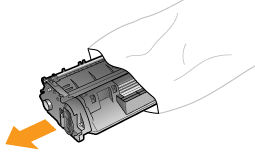
3. Take out the new toner cartridge from the protective bag.
You can open the protective bag with your hands from the notch.
![]() Keep the protective bag. Do not discard it. You will need it when you remove the toner cartridge for printer maintenance or other purposes.
Keep the protective bag. Do not discard it. You will need it when you remove the toner cartridge for printer maintenance or other purposes.
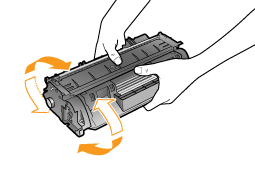
4. Shake the toner cartridge five or six times as shown in the figure to evenly distribute the toner inside the cartridge.
 Keep the protective bag. Do not discard it. You will need it when you remove the toner cartridge for printer maintenance or other purposes.
4. Shake the toner cartridge five or six times as shown in the figure to evenly distribute the toner inside the cartridge.
5. Place the toner cartridge on a flat surface.
6. Fold the tab, and then pull out the sealing tape (approx. 19 in. (48cm)).
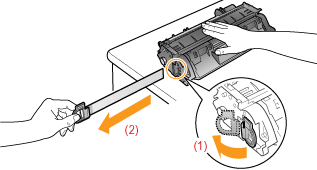
IMPORTANT
Precautions when pulling out the sealing tape
- Do not pull the sealing tape diagonally, upward, or downward. If the tape is severed, this may become difficult to pull out completely.
- If the sealing tape stops at midpoint, pull it out of the toner cartridge completely. If any tape remains in the toner cartridge, this may result in poor print quality.
- Dispose of the removed sealing taper according to local regulations.

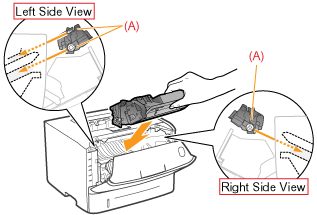
7, Install the toner cartridge.
Push the toner cartridge into the printer firmly until it touches the back of the printer while aligning (A) on sides of the toner cartridge with the toner cartridge guides inside the printer.
8. Close the front cover.
If you cannot close the front cover
Make sure that the toner cartridge is installed in the printer properly. Do not try to forcefully close the front cover, as this may damage the printer.
I’m using LD Products toner cartridges and have had no problems with them since I started useing them in all my printers starting about 2001.
After my original post, I noticed that my photo printouts were degraded. The colors were not what they should be and they had streaks in them. This forced me to find out what was going wrong since the printer was no help. So, the following ensued:
The diagnostic page shows the alignment to be correct. Using paint shop pro I generated a page with four color bars running across it. Black, cyan, magenta, and yellow. When I printed it I saw that the black cartridge was failing to print correctly. Now, I’ve been doing a ton of greyscale photo printing and the cartridge was about a year old. A call to LD Products informed that the cartridge was rated for 1200 pages at 5% coverage and the way I was using it would reduce that by as much as a half. Examining the cartridge, I found that the roller that is normally coated with toner, Was nearly bare. I removed it, shook it vigoursly, reinstalled it, and printed the test page again. The error message went away but the printout was still messed up. I’ve ordered a new cartridge and, after I install it, I’ll run a new print and le tyou know how it turns out.
Since the cartridge was, for all practical purposes empty, I would have thought the printer would have alerted me to this fact. Every time I printed something, the information window that pops up showed the black cartridge was nearly full.
Solution
When the printer cannot continue printing for some reason (an error status), the printer beeps, the Message indicator comes on, and an error message that indicates the description of the error appears in the display. A Warning message appears in the display when the printer requires some remedy (a warning status) although the job is not affected.
If either of these messages appears, perform the following procedures according to the message.
NOTE
- When multiple warnings are occurring at the same time, the Warning messages appear by rotation.
- When the printer is in error status and warning status at the same time, the Warning message does not appear.
- Even when a message with (Warning Message) appears (when the printer is in a warning status), the printer does not stop printing.
- For a message with the <Auto Error Skip> mark, you can skip the error by pressing [Online] and continue printing. However, part of the print data may be missing or it may not be printed properly. When you want to stop the process, perform a soft reset to eliminate the cause of the error, press [Online], and then print again. Also, you can automatically skip the errors to which this mark is attached by setting AUTO ERROR SKIP in the SETUP menu to ON.
<E nnn-nnnn> («n» represents a number)
<Cause>
A problem has occurred inside the printer.
<Remedy>
Solve the problem following the instructions of «Service Call Display» in «Chapter 8 Troubleshooting» in User’s Guide in the CD-ROM supplied with the printer.
<OF OPT.CONN.ERR.>
<Cause 1>
The optional paper feeder is not installed properly.
<Remedy>
Turn the power OFF, install the paper feeder properly, and then turn it ON again.
<Cause 2>
The optional paper feeder is installed or removed when the printer is ON.
<Remedy>
Turn the power OFF, install or remove the paper feeder, then turn the printer ON again.
<Cause 3>
The connector of the optional paper feeder is disconnected.
<Remedy>
Turn the printer OFF, unplug the power plug from the AC power outlet and contact your local authorized Canon dealer.
<Cause 4>
A paper feeder that is not for this printer is installed.
<Remedy>
Turn the power OFF, install the paper feeder for this printer, and then turn it ON again.
<11 NO «size» PAPER>
<Cause>
Paper of the size specified in the application is not loaded in the paper source (in all the paper sources when PAPER SOURCE is set to AUTO; in the specified paper source when the setting is fixed).
<Remedy 1>
Refill or load paper.
<Remedy 2>
Press [Feeder Selection], then select other paper source for the same paper size or larger paper size.[Selecting a Paper Source]
<12 COVER OPEN>
<Cause>
The front cover is open.
<Remedy>
Close the front cover firmly. If the printer is not online, press [Online].
<13 PAPER JAM>
<Cause>
Paper is jammed inside the printer
<Remedy>
Remove the jammed paper and set the paper cassette and covers to the original position. If the printer is not online, press [Online]. [Paper Jams]
IMPORTANT
- If paper jams have occurred at multiple areas at the same time, the areas appear in the display by rotation.
- If you have removed the jammed paper without opening any cover, be sure to open and close the front cover once, and then press [Online].
<14 NO TONER CART>
<Cause>
The toner cartridge is not installed or installed improperly.
<Remedy>
<18 FEED ERROR>
<Cause>
Paper of the size or type that cannot be fed from the multi-purpose tray or paper cassette is specified.
<Remedy 1>
If a paper source is specified, press [Feeder Selection], then set PAPER SOURCE to AUTO.
<Remedy 2>
Press [Feeder Selection], select a paper source from which paper of the specified size or type can be fed, then load paper.
<Remedy 3>
Specify the settings for STD PAPER SIZE and STD PAPER TYPE in the FEEDER MENU options in the SETUP menu to the size or type of paper that can be loaded in the paper source.
<Remedy 4>
Press [Online], then print from the currently selected paper source. However, this may result in deterioration in print quality.
<1H CHK TNR CONN.> (Warning Message)
<Cause>
There is a possibility that the toner cartridge is not installed properly.
<Remedy 1>
Remove the toner cartridge, then reinstall it properly.
<Remedy 2>
If <1H CHK TNR CONN.> appears and there is a problem with the print quality even after applying the Remedy 1, remove the toner cartridge and replace it with a new one. [Replacing the Toner Cartridge]
<23 DOWN.MEM.FULL> <Auto Error Skip>
<Cause>
The memory for registering macro and custom characters has run out and overflowed.
<Remedy 1>
The printer continues printing by pressing [Online]. However, the overflowed data cannot be registered.
<Remedy 2>
Perform a soft reset using the RESET menu, increase the free space of RAM using the following procedure, register the data again, and then print again.
- Perform a hard reset or cycle the power of the printer (Be aware that all the data in the memory will be deleted).
<26 SYS.MEM.FULL> <Auto Error Skip>
<Cause>
The work memory required for the printer process has run out while the system is processing the data (mainly the graphics data and text data).
<Remedy 1>
The printer continues printing by pressing [Online]. However, the data with which an error has occurred is not printed properly.
<Remedy 2>
Perform a soft reset using the RESET menu, and then increase the free space of RAM using the following procedure.
- Perform a hard reset or cycle the power of the printer (Be aware that all thedata in the memory will be deleted).
<27 JOB START ERR> <Auto Error Skip>
<Cause>
The specified emulation does not exist.
<Remedy>
Press [Online] to continue printing from the next data. However, the data with which an error has occurred is not printed.
<30 MEMORY FULL> <Auto Error Skip>
<Cause>
The work memory has run out while the system is processing the data.
<Remedy>
The printer continues printing by pressing [Online]. However, the data with which an error has occurred may not be printed properly.
<32 2-SIDED ERROR> <Auto Error Skip>
<Cause>
The printer received 2-sided printing data of paper sizes (including the orientation) or paper types unavailable for automatic 2-sided printing.
<Remedy 1>
The printer continues printing by pressing [Online]. However, the data on each side is printed on two pages.
<Remedy 2>
After performing a soft reset in the RESET menu, change the setting to a paper size or type available for automatic 2-sided printing, and then print again.
<33 WORK MEM.FULL> <Auto Error Skip>
<Cause>
The work memory for each print mode cannot be secured.
<Remedy 1>
The printer continues printing by pressing [Online]. However, the data with which an error has occurred is not printed properly.
IMPORTANT
When you continue printing by pressing [Online], be aware that the data of macro that is already registered may be deleted.
<Remedy 2>
Perform a soft reset in the RESET menu, increase the free space of RAM using the following procedure, and then print again.
- Perform a hard reset or cycle the power of the printer (Be aware that all the data in the memory that the printer has received will be deleted).
<35 TABLE FULL> <Auto Error Skip>
<Cause>
The number of the documents in a job has exceeded 16.
<Remedy>
The printer continues printing by pressing [Online]. However, the job with which an error has occurred is not printed.
<38 LOW IMGE QLTY> <Auto Error Skip>
<Cause>
The printer cannot process the data because it is too complicated.
<Remedy 1>
The printer continues printing by pressing [Online]. However, the printer prints with the image quality level being lowered.
<Remedy 2>
Perform a soft reset in the RESET menu, set GRADATION LEVEL in the QUALITY MENU options in the SETUP menu to STANDARD, and then print again.
<39 SPL MEM.FULL> <Auto Error Skip>
<Cause>
Because spool memory has run out, the printer cannot print.
<Remedy 1>
The printer continues printing by pressing [Online]. However, the page with which an error has occurred is not printed.
<Remedy 2>
Perform a soft reset in the RESET menu, specify the paper size smaller, and then print again.
<Remedy 3>
Perform a soft reset in the RESET menu, set GRADATION LEVEL in the QUALITY MENU options in the SETUP menu to STANDARD, and then print again.
<Remedy 4>
If 2-SIDED PRINT. in the FEEDER MENU options in the SETUP menu is set to ON, specify OFF, and then print again.
<Remedy 5>
Change the setting for HALFTONES in the QUALITY MENU options in the SETUP menu, and then print again.
<41 CHK PAPER SZE>
<Cause 1>
The size of the paper loaded in the multi-purpose tray or paper cassette is different from the setting for TRAY PAPER SIZE, CASSETTE1 SIZE, or CASSETTE2 SIZE specified from the computer or control panel.
<Remedy>
Match the size specified in TRAY PAPER SIZE, CASSETTE1 SIZE, or CASSETTE2 SIZE and the size of the loaded paper, and then press [Online].
<Cause 2>
You are using UFR II Printer Driver, and you loaded custom paper of its long edges 215.9 mm or less and printed when TRAY PAPER SIZE, CASSETTE1 SIZE, or CASSETTE2 SIZE in the FEEDER MENU options in the SETUP menu was set to MIXED SIZE.
<Remedy>
Load the paper in landscape orientation, then print again.
<Cause 3>
CHK PAPER SIZE in the USER MAIN. options in the SETUP menu is set to OFF.
<Remedy>
<52 RAST.MODE ERR> <Auto Error Skip>
<Cause>
The printer received data in format that it does not support during printing in the Raster mode.
<Remedy 1>
The printer continues printing by pressing [Online]. However, the data may not be printed properly.
<Remedy 2>
Print again using a printer driver that supports image data formats.
<53 SEC.PRINT ERR> <Auto Error Skip>
<Cause>
Secured print data is sent from a printer driver that is not for LBP3370.
<Remedy>
Press [Online] to cancel the job.
<53 STORE ERROR> <Auto Error Skip>
<Cause>
The data for which a stored job print is specified is sent from a printer driver that is not for LBP3370.
<Remedy>
Press [Online] to cancel the job.
<58 JOB MEM.FULL> <Auto Error Skip>
<Cause>
There is not sufficient free RAM space to process jobs.
<Remedy 1>
If you are processing multiple jobs at once, press [Online] to cancel printing, wait for other jobs complete, and then print again.
<Remedy 2>
If the job data is too large, divide the job and print again.
<59 JOB RX ERROR> <Auto Error Skip>
<Cause>
The printer received any unanalyzable data while it is receiving a job, or it timed out.
<Remedy 1>
Press [Online] to cancel printing, then print again.
<Remedy 2>
A problem may be occurring in the network you are using. Check the status of the network that your are using.
<A4 nn ERROR> («nn» represents two-digit alphanumeric characters)
<Cause>
A problem has occurred and the printer does not operate properly.
<Remedy>
Cycle the power of the printer. If the message appears even after cycling the power of the printer, note down the message in the display, and contact your local authorized Canon dealer.
<A5 nn ERROR> («nn» represents two-digit alphanumeric characters)
<Cause>
A problem has occurred and the printer does not operate properly.
<Remedy>
Cycle the power of the printer. If the message appears even after cycling the power of the printer, note down the message in the display, and contact your local authorized Canon dealer.
<A7 nn ERROR> («nn» represents two-digit alphanumeric characters)
<Cause>
A problem has occurred and the printer does not operate properly.
<Remedy>
Cycle the power of the printer. If the message appears even after cycling the power of the printer, note down the message in the display, and contact your local authorized Canon dealer.
<D7 nn ERROR> («nn» represents two-digit alphanumeric characters)
<Cause>
A problem has occurred and the printer does not operate properly.
<Remedy>
Cycle the power of the printer. If the message appears even after cycling the power of the printer, note down the message in the display, and contact your local authorized Canon dealer.
<D8 LAYOUT ERROR>
<Cause>
The page cannot be laid out because the memory has run out.
<Remedy 1>
Set [Graphics Mode] in UFR II Printer Driver to [Raster Mode], then print again. (See Help of UFR II Printer Driver)
<Remedy 2>
After performing a soft reset using the RESET menu, perform a hard reset to increase the free memory space or cycle the power of the printer, and then print again. (Be aware that all the data in the memory that the printer has received will be deleted.)
<Remedy 3>
Perform «Error Skip», then continue printing. However, the data with which an error has occurred is not printed properly.
<D8 VERSION ERROR>
<Cause>
You tried to print from a printer driver that is not for LBP3370.
<Remedy>
Print from the printer driver for LBP3370.
<D8 SYNTAX ERROR>
<Cause>
Invalid data is sent when printing using UFR II Printer Driver.
<Remedy 1>
Press [Online] to continue printing from the next data. However, the page with which an error has occurred and its subsequent pages are not printed.
<Remedy 2>
Confirm the data to be printed, then print again.
<D8 nn ERROR> («nn» represents two-digit alphanumeric characters)
<Cause>
A problem has occurred and the printer does not operate properly.
<Remedy>
Cycle the power of the printer. If the message appears even after cycling the power of the printer, note down the message in the display, and contact your local authorized Canon dealer.
<D9 IMG.DATA ERR.>
<Cause>
Data which this printer cannot process is included in TIFF data or JPEG data.
<Remedy>
This printer cannot print the data. Press [Online] to cancel the job.
<D9 IMG.REFER.ERR>
<Cause>
Data which this printer cannot process is included in TIFF data.
<Remedy>
This printer cannot print the data. Press [Online] to cancel the job.
<D9 nn ERROR> («nn» represents two-digit alphanumeric characters)
<Cause>
A problem has occurred and the printer does not operate properly.
<Remedy>
Cycle the power of the printer. If the message appears even after cycling the power of the printer, note down the message in the display, and contact your local authorized Canon dealer.
<F9-nn PWR OFF>ON> («nn» represents two-digit alphanumeric characters)
<Cause>
A problem has occurred while the printer is processing print data.
<Remedy>
Cycle the power of the printer. If the message appears even after cycling the power of the printer, note down the message in the display, and contact your local authorized Canon dealer.
<FF FONT FULL> <Auto Error Skip>
<Cause>
Because of too many fonts to be registered, the field (font table) for registering font information has run out and overflowed.
<Remedy>
The printer continues printing by pressing [Online]. However, the page with which an error has occurred is not printed properly.
<FM SIZE ERROR> <Auto Error Skip>
<Cause>
There is some font with its size exceeds the pseudo-scalable font size.
<Remedy>
Perform «Error Skip», then continue printing. However, the characters with which an error has occurred are not printed properly.
<FM SCALE ERROR> <Auto Error Skip>
<Cause>
There is a character in which the number of coordinate points on the contour lines exceeds the limitation of a pseudo-scalable font.
<Remedy>
Perform «Error Skip», then continue printing. However, the characters with which an error has occurred are not printed properly.
<PC LOAD «size»>
<Cause>
The paper of the size specified in the application is not loaded in the paper cassette or multi-purpose tray, or the paper source for the different paper size is selected.
<Remedy 1>
<Remedy 2>
If you are using the multi-purpose tray, check TRAY PAPER SIZE, and when the paper size does not match the size specified in the application, specify the setting properly. [Loading Paper in the Multi-purpose Tray]
<Remedy 3>
Press [Feeder Selection], then select the paper cassette in which the paper of the matched size is loaded. [Selecting a Paper Source]
<Remedy 4>
Press [Online], then print to the currently loaded paper forcibly. If you are using the multi-purpose tray, the setting for TRAY PAPER SIZE automatically changes to the setting specified in the application.
IMPORTANT
If you open the front cover when the message <PC LOAD «size»> is displayed, the message may disappear. However, be sure to follow the directions in the displayed message to change the paper.
I’m using LD Products toner cartridges and have had no problems with them since I started useing them in all my printers starting about 2001.
After my original post, I noticed that my photo printouts were degraded. The colors were not what they should be and they had streaks in them. This forced me to find out what was going wrong since the printer was no help. So, the following ensued:
The diagnostic page shows the alignment to be correct. Using paint shop pro I generated a page with four color bars running across it. Black, cyan, magenta, and yellow. When I printed it I saw that the black cartridge was failing to print correctly. Now, I’ve been doing a ton of greyscale photo printing and the cartridge was about a year old. A call to LD Products informed that the cartridge was rated for 1200 pages at 5% coverage and the way I was using it would reduce that by as much as a half. Examining the cartridge, I found that the roller that is normally coated with toner, Was nearly bare. I removed it, shook it vigoursly, reinstalled it, and printed the test page again. The error message went away but the printout was still messed up. I’ve ordered a new cartridge and, after I install it, I’ll run a new print and le tyou know how it turns out.
Since the cartridge was, for all practical purposes empty, I would have thought the printer would have alerted me to this fact. Every time I printed something, the information window that pops up showed the black cartridge was nearly full.
Issue
When the printer cannot continue printing for some reason (an error status), the printer beeps, the  (Message) indicator comes on, and an error message that indicates the description of the error appears in the display. A Warning message appears in the display when the printer requires some remedy (a warning status) although the job is not affected.
If either of these messages appears, perform the following procedures according to the message.
NOTE
Clarifications of the operation and additional explanations for the procedure are indicated at the end of this page. Reading these notes is highly recommended.
Cause and Solution
| Message | Cause and Remedy |
| <E nnn-nnnn> («n» represents a number) | Cause: A problem has occurred inside the printer. Remedy : Solve the problem following the instructions in «Service Call Display». |
| <00 NO SLOT LOAD> | Cause: Because the printer is in the middle of printing, it forbids loading paper in the manual feed slot. Remedy : When loading paper in the manual feed slot, wait until printing and printer operation finish completely.Important: Make sure that the printer is not operating and the  (Ready) indicator is on when loading paper in the manual feed slot. When printing multiple copies or multiple pages from the manual feed slot, make sure that the printer is not operating and the (Ready) indicator is on when loading paper in the manual feed slot. When printing multiple copies or multiple pages from the manual feed slot, make sure that the printer is not operating and the  (Message) indicator is on before loading the second and subsequent paper. If paper is loaded in the manual feed slot while the printer is operating such as when the printer is printing or immediately after outputting paper, the loaded paper may be output without being printed, or this may result in paper jams. (Message) indicator is on before loading the second and subsequent paper. If paper is loaded in the manual feed slot while the printer is operating such as when the printer is printing or immediately after outputting paper, the loaded paper may be output without being printed, or this may result in paper jams.
|
| <OF OPT.CONN.ERR.> | Cause 1: The optional paper feeder is not installed properly. Remedy : Turn the power OFF, install the paper feeder properly, and then turn it ON again. Cause 2: Cause 3: Cause 4: |
| <11 NO «size» PAPER> | Cause: Paper of the size specified in the application is not loaded in the paper source (in all the paper sources when PAPER SOURCE is set to AUTO; in the specified paper source when the setting is fixed). Remedy 1: Refill or load paper. Remedy 2: Press the  (Feeder Selection) key, then select other paper source for the same paper size or larger paper size. (Feeder Selection) key, then select other paper source for the same paper size or larger paper size.
|
| <12 COVER OPEN> | Cause: Paper is jammed inside the printer. Remedy : Remove the jammed paper and set the paper cassette and covers to the original position. If the printer is not online, press the  (Online) key. (Online) key. |
| <13 PAPER JAM> | Cause: Paper is jammed inside the printer. Remedy : Remove the jammed paper and set the paper cassette and covers to the original position. If the printer is not online, press the (Online) key.Important:a. If paper jams have occurred at multiple areas at the same time, the areas appear in the display by rotation. b. If you have removed the jammed paper without opening any cover, be sure to open and close the front cover once, and then press the (Online)key. |
| <14 NO TONER CART> | Cause: The toner cartridge is not installed or installed improperly. Remedy : Install the toner cartridge properly. |
| <18 FEED ERROR> | Cause: Paper of the size or type that cannot be fed from the manual feed slot or paper cassette is specified. Remedy 1: If a paper source is specified, press the (Feeder Selection) key, then set PAPER SOURCE to AUTO.Remedy 2: Press the (Feeder Selection) key, select a paper source from which paper of the specified size or type can be fed, then load paper.Remedy 3: Specify the settings for STD PAPER SIZE and STD PAPER TYPE in the FEEDER MENU options in the SETUP menu to the size or type of paper that can be loaded in the paper source. Remedy 4: Press the (Online) key, then print from the currently selected paper source. However, this may result in deterioration in print quality.
|
| <18 CHK MANU SLOT > | Cause: Paper is loaded in the manual feed slot. Remedy 1: If you want to use the paper loaded in the manual feed slot for printing, press the the (Feeder Selection) key, and then set PAPER SOURCE to MANU.FEED SLOT.Remedy 2: Remove any paper loaded in the manual feed slot. |
| <1H CHK TNR CONN.>
(Warning Message) |
Cause: There is a possibility that the toner cartridge is not installed properly. Remedy 1: Remove the toner cartridge, then reinstall it properly. Remedy 2: If <1H CHK TNR CONN.> appears and there is a problem with the print quality even after applying the Remedy 1, remove the toner cartridge and replace it with a new one. |
| <23 DOWN.MEM.FULL>
<Auto Error Skip> |
Cause: The memory for registering overlay forms and custom characters has run out and overflowed. Remedy 1: The printer continues printing by pressing the (Online) key. However, the overflowed data cannot be registered.Remedy 2: Perform a soft reset using the RESET menu, increase the free space of RAM using the following procedure, register the data again, and then print again. — Perform a hard reset or cycle the power of the printer (Be aware that all the data in the memory will be deleted). |
| <26 SYS.MEM.FULL>
<Auto Error Skip> |
Cause: The work memory required for the printer process has run out while the system is processing the data (mainly the graphics data and text data). Remedy 1: The printer continues printing by pressing the (Online) key. However, the data with which an error has occurred is not printed properly.Remedy 2: Perform a soft reset using the RESET menu, and then increase the free space of RAM using the following procedure. — Perform a hard reset or cycle the power of the printer (Be aware that all the data in the memory will be deleted). |
| <27 JOB START ERR>
<Auto Error Skip> |
Cause: The specified emulation does not exist. Remedy : Press the (Online) key to continue printing from the next data. However, the data with which an error has occurred is not printed.
|
| <30 MEMORY FULL>
<Auto Error Skip> |
Cause : The work memory has run out while the system is processing the data. Remedy : The printer continues printing by pressing the (Online) key. However, the data with which an error has occurred may not be printed properly.
|
| <32 2-SIDED ERROR>
<Auto Error Skip> |
Cause : The printer received 2-sided printing data of paper sizes (including the orientation) or paper types unavailable for automatic 2-sided printing. Remedy 1: The printer continues printing by pressing the (Online) key. However, the data on each side is printed on two pages.Remedy 2: After performing a soft reset in the RESET menu, change the setting to a paper size or type available for automatic 2-sided printing, and then print again. |
| <33 WORK MEM.FULL>
<Auto Error Skip> |
Cause: The work memory for each operation mode cannot be secured. Remedy 1: The printer continues printing by pressing the (Online) key. However, the data with which an error has occurred is not printed properly.Important:When you continue printing by pressing the (Online) key, be aware that the data of overlay or macro that is already registered may be deleted.
Remedy 2: |
| <35 TABLE FULL>
<Auto Error Skip> |
Cause: The number of the documents in a job has exceeded 16. Remedy : The printer continues printing by pressing the (Online) key. However, the job with which an error has occurred is not printed.
|
| <38 LOW IMAGE QLTY>
<Auto Error Skip> |
Cause: The printer cannot process the data because it is too complicated. Remedy 1: The printer continues printing by pressing the (Online) key. However, the printer prints with the image quality level being lowered.Remedy 2: Perform a soft reset in the RESET menu, set GRADATION LEVEL in the QUALITY MENU options in the SETUP menu to STANDARD, and then print again. |
| <39 SPL MEM.FULL>
<Auto Error Skip> |
Cause: Because spool memory has run out, the printer cannot print. Remedy 1: The printer continues printing by pressing the (Online) key. However, the page with which an error has occurred is not printed.Remedy 2: Perform a soft reset in the RESET menu, specify the paper size smaller, and then print again. Remedy 3: Perform a soft reset in the RESET menu, set GRADATION LEVEL in the QUALITY MENU options in the SETUP menu to STANDARD, and then print again. Remedy 4: If 2-SIDED PRINT. in the FEEDER MENU options in the SETUP menu is set to ON, specify OFF, and then print again. Remedy 5: Change the setting for HALFTONES in the QUALITY MENU options in the SETUP menu, and then print again. |
| <41 CHK PAPER SZE> | Cause 1:
The size of the paper loaded in the manual feed slot or paper cassette is different from the setting for SLOT PAPER SIZE, CASSETTE1 SIZE, or CASSETTE2 SIZE specified from the computer or control panel. Cause 2:
You are using UFR II Printer Driver, and you loaded custom paper of its long edges 215.9 mm or less and printed when SLOT PAPER SIZE, CASSETTE1 SIZE, or CASSETTE2 SIZE in the FEEDER MENU options in the SETUP menu was set to MIXED SIZE. Load the paper in landscape orientation, then print again. Cause 3: Set SPECIAL MODE J to ON, then print again. |
| <52 RAST.MODE ERR>
<Auto Error Skip> |
Cause: The printer received data in format that it does not support during printing in the Raster mode. Remedy 1: The printer continues printing by pressing the (Online) key. However, the data may not be printed properly.Remedy 2: Print again using a printer driver that supports image data formats. |
| <53 SEC.PRINT ERR>
<Auto Error Skip> |
Cause:
Secured print data is sent from a printer driver that is not for LBP3360. |
| <53 STORE ERROR>
<Auto Error Skip> |
Cause: The data for which a stored job print is specified is sent from a printer driver that is not for LBP3360. Remedy : Press the (Online) key to cancel the job. |
| <58 JOB MEM.FULL>
<Auto Error Skip> |
Cause: There is not sufficient free RAM space to process jobs. Remedy 1: If you are processing multiple jobs at once, press the (Online) key to cancel printing, wait for other jobs complete, and then print again.Remedy 2: If the job data is too large, divide the job and print again. |
| <59 JOB RX ERROR>
<Auto Error Skip> |
Cause: The printer received any unanalyzable data while it is receiving a job, or it timed out. Remedy 1: Press the (Online) key to cancel printing, then print again.Remedy 2: A problem may be occurring in the network you are using. Check the status of the network that you are using. |
| <A4 nn ERROR> («nn» represents two-digit alphanumeric characters) | Cause: A problem has occurred and the printer does not operate properly. Remedy : Cycle the power of the printer. If the message appears even after cycling the power of the printer, note down the message in the display, and contact your local authorized Canon dealer. |
| <A5 nn ERROR> («nn» represents two-digit alphanumeric characters) | Cause: A problem has occurred and the printer does not operate properly. Remedy : Cycle the power of the printer. If the message appears even after cycling the power of the printer, note down the message in the display, and contact your local authorized Canon dealer. |
| <A7 nn ERROR> («nn» represents two-digit alphanumeric characters) | Cause: A problem has occurred and the printer does not operate properly. Remedy : Cycle the power of the printer. If the message appears even after cycling the power of the printer, note down the message in the display, and contact your local authorized Canon dealer. |
| <D7 nn ERROR> («nn» represents two-digit alphanumeric characters) | Cause: A problem has occurred and the printer does not operate properly. Remedy : Cycle the power of the printer. If the message appears even after cycling the power of the printer, note down the message in the display, and contact your local authorized Canon dealer. |
| <D8 LAYOUT ERROR> | Cause: The page cannot be laid out because the memory has run out. Remedy 1: Set [Graphics Mode] in UFR II Printer Driver to [Raster Mode], then print again. Remedy 2: After performing a soft reset using the RESET menu, perform a hard reset to increase the free memory space or cycle the power of the printer, and then print again. (Be aware that all the data in the memory that the printer has received will be deleted.) Remedy 3: Perform «Error Skip», then continue printing. However, the data with which an error has occurred is not printed properly. |
| <D8 VERSION ERROR> | Cause: Any job is sent from a UFR II Printer Driver that this printer does not support. Remedy 1: Change the version of the UFR II Printer Driver to that this printer supports, and then print again. Remedy 2: Perform «Error Skip», then continue printing. However, the data with which an error has occurred is not printed properly. |
| <D8 SYNTAX ERROR> | Cause: Invalid data is sent when printing using UFR II Printer Driver. Remedy 1: Press the (Online) key to continue printing from the next data. However, the page with which an error has occurred and its subsequent pages are not printed.Remedy 2: Confirm the data to be printed, then print again. |
| <D8 nn ERROR> («nn» represents two-digit alphanumeric characters) | Cause: A problem has occurred and the printer does not operate properly. Remedy : Cycle the power of the printer. If the message appears even after cycling the power of the printer, note down the message in the display, and contact your local authorized Canon dealer. |
| <F2 NO FONT>
< Auto Error Skip> |
Cause: The registered fonts used for creating overlay forms had been deleted during printing. Remedy 1: The printer continues printing by pressing the (Online) key. However, unregistered fonts are not printed.Remedy 2: Register the fonts in the memory again or create a form using usable registered fonts, and then print again. |
| <F9-nn PWR OFF>ON> («nn» represents two-digit alphanumeric characters) | Cause: A problem has occurred while the printer is processing print data. Remedy : Cycle the power of the printer. If the message appears even after cycling the power of the printer, note down the message in the display, and contact your local authorized Canon dealer. |
| <FF FONT FULL>
<Auto Error Skip> |
Cause: Because of too many fonts to be registered, the field (font table) for registering font information has run out and overflowed. Remedy : The printer continues printing by pressing the (Online) key. However, the page with which an error has occurred is not printed properly. |
| <FM SIZE ERROR>
<Auto Error Skip> |
Cause: There is some font with its size exceeds the pseudo-scalable font size. Remedy : Perform «Error Skip», then continue printing. However, the characters with which an error has occurred are not printed properly. |
| <FM SCALE ERROR>
<Auto Error Skip> |
Cause: There is a character in which the number of coordinate points on the contour lines exceeds the limitation of a pseudo-scalable font. Remedy : Perform «Error Skip», then continue printing. However, the characters with which an error has occurred are not printed properly. |
| <PC LOAD «size»> | Cause: The paper of the size specified in the application is not loaded in the paper cassette or manual feed slot, or the paper source for the different paper size is selected. Remedy 1: Load the paper of the size selected in the application (or the one specified by scaling factors). Remedy 2: If you are using the manual feed slot, check SLOT PAPER SIZE, and when the paper size does not match the size specified in the application, specify the setting properly. Remedy 3: Press the (Feeder Selection) key, then select the paper cassette in which the paper of the matched size is loaded.Remedy 4: Press the (Online) key, then print to the currently loaded paper forcibly. If you are using the manual feed slot, the setting for SLOT PAPER SIZE automatically changes to the setting specified in the application.Important:If you open the front cover when the message is displayed, the message may disappear. However, be sure to follow the directions in the displayed message to change the paper. |
NOTE
a. When multiple warnings are occurring at the same time, the Warning messages appear by rotation.
b. When the printer is in error status and warning status at the same time, the Warning message does not appear.
c. Even when a message with (Warning Message) appears (when the printer is in a warning status), the printer does not stop printing.
d. For a message with the <Auto Error Skip> mark, you can skip the error by pressing the  (Online) key and continue printing. However, part of the print data may be missing or it may not be printed properly. When you want to stop the process, perform a soft reset to eliminate the cause of the error, press the (Online) key, and then print again. Also, you can automatically skip the errors to which this mark is attached by setting AUTO ERROR SKIP in the SETUP menu to ON.
Лазерный принтер HP LaserJet 1200 — При включении ошибка — н
Помогите разобраться, пожалуйста! При включеении принтера, после прохождения теста выдает ошибку нет картриджа или бумаги. Как реально проверить работоспосбность оптодатчиков? И, если дело не в них, то в чем еще?
- Михаил С.
- Консультант
- Сообщения: 793
- Зарегистрирован: 17:49 — 11.04.06
- Откуда: Пятигорск
- Баллы репутации: 0


![]()
8. Close the front cover.
If you cannot close the front cover
Make sure that the toner cartridge is installed in the printer properly. Do not try to forcefully close the front cover, as this may damage the printer.
I’m using LD Products toner cartridges and have had no problems with them since I started useing them in all my printers starting about 2001.
After my original post, I noticed that my photo printouts were degraded. The colors were not what they should be and they had streaks in them. This forced me to find out what was going wrong since the printer was no help. So, the following ensued:
The diagnostic page shows the alignment to be correct. Using paint shop pro I generated a page with four color bars running across it. Black, cyan, magenta, and yellow. When I printed it I saw that the black cartridge was failing to print correctly. Now, I’ve been doing a ton of greyscale photo printing and the cartridge was about a year old. A call to LD Products informed that the cartridge was rated for 1200 pages at 5% coverage and the way I was using it would reduce that by as much as a half. Examining the cartridge, I found that the roller that is normally coated with toner, Was nearly bare. I removed it, shook it vigoursly, reinstalled it, and printed the test page again. The error message went away but the printout was still messed up. I’ve ordered a new cartridge and, after I install it, I’ll run a new print and le tyou know how it turns out.
Since the cartridge was, for all practical purposes empty, I would have thought the printer would have alerted me to this fact. Every time I printed something, the information window that pops up showed the black cartridge was nearly full.
Solution
When the printer cannot continue printing for some reason (an error status), the printer beeps, the Message indicator comes on, and an error message that indicates the description of the error appears in the display. A Warning message appears in the display when the printer requires some remedy (a warning status) although the job is not affected.
If either of these messages appears, perform the following procedures according to the message.
NOTE
- When multiple warnings are occurring at the same time, the Warning messages appear by rotation.
- When the printer is in error status and warning status at the same time, the Warning message does not appear.
- Even when a message with (Warning Message) appears (when the printer is in a warning status), the printer does not stop printing.
- For a message with the <Auto Error Skip> mark, you can skip the error by pressing [Online] and continue printing. However, part of the print data may be missing or it may not be printed properly. When you want to stop the process, perform a soft reset to eliminate the cause of the error, press [Online], and then print again. Also, you can automatically skip the errors to which this mark is attached by setting AUTO ERROR SKIP in the SETUP menu to ON.
<E nnn-nnnn> («n» represents a number)
<Cause>
A problem has occurred inside the printer.
<Remedy>
Solve the problem following the instructions of «Service Call Display» in «Chapter 8 Troubleshooting» in User’s Guide in the CD-ROM supplied with the printer.
<OF OPT.CONN.ERR.>
<Cause 1>
The optional paper feeder is not installed properly.
<Remedy>
Turn the power OFF, install the paper feeder properly, and then turn it ON again.
<Cause 2>
The optional paper feeder is installed or removed when the printer is ON.
<Remedy>
Turn the power OFF, install or remove the paper feeder, then turn the printer ON again.
<Cause 3>
The connector of the optional paper feeder is disconnected.
<Remedy>
Turn the printer OFF, unplug the power plug from the AC power outlet and contact your local authorized Canon dealer.
<Cause 4>
A paper feeder that is not for this printer is installed.
<Remedy>
Turn the power OFF, install the paper feeder for this printer, and then turn it ON again.
<11 NO «size» PAPER>
<Cause>
Paper of the size specified in the application is not loaded in the paper source (in all the paper sources when PAPER SOURCE is set to AUTO; in the specified paper source when the setting is fixed).
<Remedy 1>
Refill or load paper.
<Remedy 2>
Press [Feeder Selection], then select other paper source for the same paper size or larger paper size.[Selecting a Paper Source]
<12 COVER OPEN>
<Cause>
The front cover is open.
<Remedy>
Close the front cover firmly. If the printer is not online, press [Online].
<13 PAPER JAM>
<Cause>
Paper is jammed inside the printer
<Remedy>
Remove the jammed paper and set the paper cassette and covers to the original position. If the printer is not online, press [Online]. [Paper Jams]
IMPORTANT
- If paper jams have occurred at multiple areas at the same time, the areas appear in the display by rotation.
- If you have removed the jammed paper without opening any cover, be sure to open and close the front cover once, and then press [Online].
<14 NO TONER CART>
<Cause>
The toner cartridge is not installed or installed improperly.
<Remedy>
<18 FEED ERROR>
<Cause>
Paper of the size or type that cannot be fed from the multi-purpose tray or paper cassette is specified.
<Remedy 1>
If a paper source is specified, press [Feeder Selection], then set PAPER SOURCE to AUTO.
<Remedy 2>
Press [Feeder Selection], select a paper source from which paper of the specified size or type can be fed, then load paper.
<Remedy 3>
Specify the settings for STD PAPER SIZE and STD PAPER TYPE in the FEEDER MENU options in the SETUP menu to the size or type of paper that can be loaded in the paper source.
<Remedy 4>
Press [Online], then print from the currently selected paper source. However, this may result in deterioration in print quality.
<1H CHK TNR CONN.> (Warning Message)
<Cause>
There is a possibility that the toner cartridge is not installed properly.
<Remedy 1>
Remove the toner cartridge, then reinstall it properly.
<Remedy 2>
If <1H CHK TNR CONN.> appears and there is a problem with the print quality even after applying the Remedy 1, remove the toner cartridge and replace it with a new one. [Replacing the Toner Cartridge]
<23 DOWN.MEM.FULL> <Auto Error Skip>
<Cause>
The memory for registering macro and custom characters has run out and overflowed.
<Remedy 1>
The printer continues printing by pressing [Online]. However, the overflowed data cannot be registered.
<Remedy 2>
Perform a soft reset using the RESET menu, increase the free space of RAM using the following procedure, register the data again, and then print again.
- Perform a hard reset or cycle the power of the printer (Be aware that all the data in the memory will be deleted).
<26 SYS.MEM.FULL> <Auto Error Skip>
<Cause>
The work memory required for the printer process has run out while the system is processing the data (mainly the graphics data and text data).
<Remedy 1>
The printer continues printing by pressing [Online]. However, the data with which an error has occurred is not printed properly.
<Remedy 2>
Perform a soft reset using the RESET menu, and then increase the free space of RAM using the following procedure.
- Perform a hard reset or cycle the power of the printer (Be aware that all thedata in the memory will be deleted).
<27 JOB START ERR> <Auto Error Skip>
<Cause>
The specified emulation does not exist.
<Remedy>
Press [Online] to continue printing from the next data. However, the data with which an error has occurred is not printed.
<30 MEMORY FULL> <Auto Error Skip>
<Cause>
The work memory has run out while the system is processing the data.
<Remedy>
The printer continues printing by pressing [Online]. However, the data with which an error has occurred may not be printed properly.
<32 2-SIDED ERROR> <Auto Error Skip>
<Cause>
The printer received 2-sided printing data of paper sizes (including the orientation) or paper types unavailable for automatic 2-sided printing.
<Remedy 1>
The printer continues printing by pressing [Online]. However, the data on each side is printed on two pages.
<Remedy 2>
After performing a soft reset in the RESET menu, change the setting to a paper size or type available for automatic 2-sided printing, and then print again.
<33 WORK MEM.FULL> <Auto Error Skip>
<Cause>
The work memory for each print mode cannot be secured.
<Remedy 1>
The printer continues printing by pressing [Online]. However, the data with which an error has occurred is not printed properly.
IMPORTANT
When you continue printing by pressing [Online], be aware that the data of macro that is already registered may be deleted.
<Remedy 2>
Perform a soft reset in the RESET menu, increase the free space of RAM using the following procedure, and then print again.
- Perform a hard reset or cycle the power of the printer (Be aware that all the data in the memory that the printer has received will be deleted).
<35 TABLE FULL> <Auto Error Skip>
<Cause>
The number of the documents in a job has exceeded 16.
<Remedy>
The printer continues printing by pressing [Online]. However, the job with which an error has occurred is not printed.
<38 LOW IMGE QLTY> <Auto Error Skip>
<Cause>
The printer cannot process the data because it is too complicated.
<Remedy 1>
The printer continues printing by pressing [Online]. However, the printer prints with the image quality level being lowered.
<Remedy 2>
Perform a soft reset in the RESET menu, set GRADATION LEVEL in the QUALITY MENU options in the SETUP menu to STANDARD, and then print again.
<39 SPL MEM.FULL> <Auto Error Skip>
<Cause>
Because spool memory has run out, the printer cannot print.
<Remedy 1>
The printer continues printing by pressing [Online]. However, the page with which an error has occurred is not printed.
<Remedy 2>
Perform a soft reset in the RESET menu, specify the paper size smaller, and then print again.
<Remedy 3>
Perform a soft reset in the RESET menu, set GRADATION LEVEL in the QUALITY MENU options in the SETUP menu to STANDARD, and then print again.
<Remedy 4>
If 2-SIDED PRINT. in the FEEDER MENU options in the SETUP menu is set to ON, specify OFF, and then print again.
<Remedy 5>
Change the setting for HALFTONES in the QUALITY MENU options in the SETUP menu, and then print again.
<41 CHK PAPER SZE>
<Cause 1>
The size of the paper loaded in the multi-purpose tray or paper cassette is different from the setting for TRAY PAPER SIZE, CASSETTE1 SIZE, or CASSETTE2 SIZE specified from the computer or control panel.
<Remedy>
Match the size specified in TRAY PAPER SIZE, CASSETTE1 SIZE, or CASSETTE2 SIZE and the size of the loaded paper, and then press [Online].
<Cause 2>
You are using UFR II Printer Driver, and you loaded custom paper of its long edges 215.9 mm or less and printed when TRAY PAPER SIZE, CASSETTE1 SIZE, or CASSETTE2 SIZE in the FEEDER MENU options in the SETUP menu was set to MIXED SIZE.
<Remedy>
Load the paper in landscape orientation, then print again.
<Cause 3>
CHK PAPER SIZE in the USER MAIN. options in the SETUP menu is set to OFF.
<Remedy>
<52 RAST.MODE ERR> <Auto Error Skip>
<Cause>
The printer received data in format that it does not support during printing in the Raster mode.
<Remedy 1>
The printer continues printing by pressing [Online]. However, the data may not be printed properly.
<Remedy 2>
Print again using a printer driver that supports image data formats.
<53 SEC.PRINT ERR> <Auto Error Skip>
<Cause>
Secured print data is sent from a printer driver that is not for LBP3370.
<Remedy>
Press [Online] to cancel the job.
<53 STORE ERROR> <Auto Error Skip>
<Cause>
The data for which a stored job print is specified is sent from a printer driver that is not for LBP3370.
<Remedy>
Press [Online] to cancel the job.
<58 JOB MEM.FULL> <Auto Error Skip>
<Cause>
There is not sufficient free RAM space to process jobs.
<Remedy 1>
If you are processing multiple jobs at once, press [Online] to cancel printing, wait for other jobs complete, and then print again.
<Remedy 2>
If the job data is too large, divide the job and print again.
<59 JOB RX ERROR> <Auto Error Skip>
<Cause>
The printer received any unanalyzable data while it is receiving a job, or it timed out.
<Remedy 1>
Press [Online] to cancel printing, then print again.
<Remedy 2>
A problem may be occurring in the network you are using. Check the status of the network that your are using.
<A4 nn ERROR> («nn» represents two-digit alphanumeric characters)
<Cause>
A problem has occurred and the printer does not operate properly.
<Remedy>
Cycle the power of the printer. If the message appears even after cycling the power of the printer, note down the message in the display, and contact your local authorized Canon dealer.
<A5 nn ERROR> («nn» represents two-digit alphanumeric characters)
<Cause>
A problem has occurred and the printer does not operate properly.
<Remedy>
Cycle the power of the printer. If the message appears even after cycling the power of the printer, note down the message in the display, and contact your local authorized Canon dealer.
<A7 nn ERROR> («nn» represents two-digit alphanumeric characters)
<Cause>
A problem has occurred and the printer does not operate properly.
<Remedy>
Cycle the power of the printer. If the message appears even after cycling the power of the printer, note down the message in the display, and contact your local authorized Canon dealer.
<D7 nn ERROR> («nn» represents two-digit alphanumeric characters)
<Cause>
A problem has occurred and the printer does not operate properly.
<Remedy>
Cycle the power of the printer. If the message appears even after cycling the power of the printer, note down the message in the display, and contact your local authorized Canon dealer.
<D8 LAYOUT ERROR>
<Cause>
The page cannot be laid out because the memory has run out.
<Remedy 1>
Set [Graphics Mode] in UFR II Printer Driver to [Raster Mode], then print again. (See Help of UFR II Printer Driver)
<Remedy 2>
After performing a soft reset using the RESET menu, perform a hard reset to increase the free memory space or cycle the power of the printer, and then print again. (Be aware that all the data in the memory that the printer has received will be deleted.)
<Remedy 3>
Perform «Error Skip», then continue printing. However, the data with which an error has occurred is not printed properly.
<D8 VERSION ERROR>
<Cause>
You tried to print from a printer driver that is not for LBP3370.
<Remedy>
Print from the printer driver for LBP3370.
<D8 SYNTAX ERROR>
<Cause>
Invalid data is sent when printing using UFR II Printer Driver.
<Remedy 1>
Press [Online] to continue printing from the next data. However, the page with which an error has occurred and its subsequent pages are not printed.
<Remedy 2>
Confirm the data to be printed, then print again.
<D8 nn ERROR> («nn» represents two-digit alphanumeric characters)
<Cause>
A problem has occurred and the printer does not operate properly.
<Remedy>
Cycle the power of the printer. If the message appears even after cycling the power of the printer, note down the message in the display, and contact your local authorized Canon dealer.
<D9 IMG.DATA ERR.>
<Cause>
Data which this printer cannot process is included in TIFF data or JPEG data.
<Remedy>
This printer cannot print the data. Press [Online] to cancel the job.
<D9 IMG.REFER.ERR>
<Cause>
Data which this printer cannot process is included in TIFF data.
<Remedy>
This printer cannot print the data. Press [Online] to cancel the job.
<D9 nn ERROR> («nn» represents two-digit alphanumeric characters)
<Cause>
A problem has occurred and the printer does not operate properly.
<Remedy>
Cycle the power of the printer. If the message appears even after cycling the power of the printer, note down the message in the display, and contact your local authorized Canon dealer.
<F9-nn PWR OFF>ON> («nn» represents two-digit alphanumeric characters)
<Cause>
A problem has occurred while the printer is processing print data.
<Remedy>
Cycle the power of the printer. If the message appears even after cycling the power of the printer, note down the message in the display, and contact your local authorized Canon dealer.
<FF FONT FULL> <Auto Error Skip>
<Cause>
Because of too many fonts to be registered, the field (font table) for registering font information has run out and overflowed.
<Remedy>
The printer continues printing by pressing [Online]. However, the page with which an error has occurred is not printed properly.
<FM SIZE ERROR> <Auto Error Skip>
<Cause>
There is some font with its size exceeds the pseudo-scalable font size.
<Remedy>
Perform «Error Skip», then continue printing. However, the characters with which an error has occurred are not printed properly.
<FM SCALE ERROR> <Auto Error Skip>
<Cause>
There is a character in which the number of coordinate points on the contour lines exceeds the limitation of a pseudo-scalable font.
<Remedy>
Perform «Error Skip», then continue printing. However, the characters with which an error has occurred are not printed properly.
<PC LOAD «size»>
<Cause>
The paper of the size specified in the application is not loaded in the paper cassette or multi-purpose tray, or the paper source for the different paper size is selected.
<Remedy 1>
<Remedy 2>
If you are using the multi-purpose tray, check TRAY PAPER SIZE, and when the paper size does not match the size specified in the application, specify the setting properly. [Loading Paper in the Multi-purpose Tray]
<Remedy 3>
Press [Feeder Selection], then select the paper cassette in which the paper of the matched size is loaded. [Selecting a Paper Source]
<Remedy 4>
Press [Online], then print to the currently loaded paper forcibly. If you are using the multi-purpose tray, the setting for TRAY PAPER SIZE automatically changes to the setting specified in the application.
IMPORTANT
If you open the front cover when the message <PC LOAD «size»> is displayed, the message may disappear. However, be sure to follow the directions in the displayed message to change the paper.
I’m using LD Products toner cartridges and have had no problems with them since I started useing them in all my printers starting about 2001.
After my original post, I noticed that my photo printouts were degraded. The colors were not what they should be and they had streaks in them. This forced me to find out what was going wrong since the printer was no help. So, the following ensued:
The diagnostic page shows the alignment to be correct. Using paint shop pro I generated a page with four color bars running across it. Black, cyan, magenta, and yellow. When I printed it I saw that the black cartridge was failing to print correctly. Now, I’ve been doing a ton of greyscale photo printing and the cartridge was about a year old. A call to LD Products informed that the cartridge was rated for 1200 pages at 5% coverage and the way I was using it would reduce that by as much as a half. Examining the cartridge, I found that the roller that is normally coated with toner, Was nearly bare. I removed it, shook it vigoursly, reinstalled it, and printed the test page again. The error message went away but the printout was still messed up. I’ve ordered a new cartridge and, after I install it, I’ll run a new print and le tyou know how it turns out.
Since the cartridge was, for all practical purposes empty, I would have thought the printer would have alerted me to this fact. Every time I printed something, the information window that pops up showed the black cartridge was nearly full.
Solution
When the printer cannot continue printing for some reason (an error status), the printer beeps, the Message indicator comes on, and an error message that indicates the description of the error appears in the display. A Warning message appears in the display when the printer requires some remedy (a warning status) although the job is not affected.
If either of these messages appears, perform the following procedures according to the message.
NOTE
- When multiple warnings are occurring at the same time, the Warning messages appear by rotation.
- When the printer is in error status and warning status at the same time, the Warning message does not appear.
- Even when a message with (Warning Message) appears (when the printer is in a warning status), the printer does not stop printing.
- For a message with the <Auto Error Skip> mark, you can skip the error by pressing [Online] and continue printing. However, part of the print data may be missing or it may not be printed properly. When you want to stop the process, perform a soft reset to eliminate the cause of the error, press [Online], and then print again. Also, you can automatically skip the errors to which this mark is attached by setting AUTO ERROR SKIP in the SETUP menu to ON.
<E nnn-nnnn> («n» represents a number)
<Cause>
A problem has occurred inside the printer.
<Remedy>
Solve the problem following the instructions of «Service Call Display» in «Chapter 8 Troubleshooting» in User’s Guide in the CD-ROM supplied with the printer.
<OF OPT.CONN.ERR.>
<Cause 1>
The optional paper feeder is not installed properly.
<Remedy>
Turn the power OFF, install the paper feeder properly, and then turn it ON again.
<Cause 2>
The optional paper feeder is installed or removed when the printer is ON.
<Remedy>
Turn the power OFF, install or remove the paper feeder, then turn the printer ON again.
<Cause 3>
The connector of the optional paper feeder is disconnected.
<Remedy>
Turn the printer OFF, unplug the power plug from the AC power outlet and contact your local authorized Canon dealer.
<Cause 4>
A paper feeder that is not for this printer is installed.
<Remedy>
Turn the power OFF, install the paper feeder for this printer, and then turn it ON again.
<11 NO «size» PAPER>
<Cause>
Paper of the size specified in the application is not loaded in the paper source (in all the paper sources when PAPER SOURCE is set to AUTO; in the specified paper source when the setting is fixed).
<Remedy 1>
Refill or load paper.
<Remedy 2>
Press [Feeder Selection], then select other paper source for the same paper size or larger paper size.[Selecting a Paper Source]
<12 COVER OPEN>
<Cause>
The front cover is open.
<Remedy>
Close the front cover firmly. If the printer is not online, press [Online].
<13 PAPER JAM>
<Cause>
Paper is jammed inside the printer
<Remedy>
Remove the jammed paper and set the paper cassette and covers to the original position. If the printer is not online, press [Online]. [Paper Jams]
IMPORTANT
- If paper jams have occurred at multiple areas at the same time, the areas appear in the display by rotation.
- If you have removed the jammed paper without opening any cover, be sure to open and close the front cover once, and then press [Online].
<14 NO TONER CART>
<Cause>
The toner cartridge is not installed or installed improperly.
<Remedy>
<18 FEED ERROR>
<Cause>
Paper of the size or type that cannot be fed from the multi-purpose tray or paper cassette is specified.
<Remedy 1>
If a paper source is specified, press [Feeder Selection], then set PAPER SOURCE to AUTO.
<Remedy 2>
Press [Feeder Selection], select a paper source from which paper of the specified size or type can be fed, then load paper.
<Remedy 3>
Specify the settings for STD PAPER SIZE and STD PAPER TYPE in the FEEDER MENU options in the SETUP menu to the size or type of paper that can be loaded in the paper source.
<Remedy 4>
Press [Online], then print from the currently selected paper source. However, this may result in deterioration in print quality.
<1H CHK TNR CONN.> (Warning Message)
<Cause>
There is a possibility that the toner cartridge is not installed properly.
<Remedy 1>
Remove the toner cartridge, then reinstall it properly.
<Remedy 2>
If <1H CHK TNR CONN.> appears and there is a problem with the print quality even after applying the Remedy 1, remove the toner cartridge and replace it with a new one. [Replacing the Toner Cartridge]
<23 DOWN.MEM.FULL> <Auto Error Skip>
<Cause>
The memory for registering macro and custom characters has run out and overflowed.
<Remedy 1>
The printer continues printing by pressing [Online]. However, the overflowed data cannot be registered.
<Remedy 2>
Perform a soft reset using the RESET menu, increase the free space of RAM using the following procedure, register the data again, and then print again.
- Perform a hard reset or cycle the power of the printer (Be aware that all the data in the memory will be deleted).
<26 SYS.MEM.FULL> <Auto Error Skip>
<Cause>
The work memory required for the printer process has run out while the system is processing the data (mainly the graphics data and text data).
<Remedy 1>
The printer continues printing by pressing [Online]. However, the data with which an error has occurred is not printed properly.
<Remedy 2>
Perform a soft reset using the RESET menu, and then increase the free space of RAM using the following procedure.
- Perform a hard reset or cycle the power of the printer (Be aware that all thedata in the memory will be deleted).
<27 JOB START ERR> <Auto Error Skip>
<Cause>
The specified emulation does not exist.
<Remedy>
Press [Online] to continue printing from the next data. However, the data with which an error has occurred is not printed.
<30 MEMORY FULL> <Auto Error Skip>
<Cause>
The work memory has run out while the system is processing the data.
<Remedy>
The printer continues printing by pressing [Online]. However, the data with which an error has occurred may not be printed properly.
<32 2-SIDED ERROR> <Auto Error Skip>
<Cause>
The printer received 2-sided printing data of paper sizes (including the orientation) or paper types unavailable for automatic 2-sided printing.
<Remedy 1>
The printer continues printing by pressing [Online]. However, the data on each side is printed on two pages.
<Remedy 2>
After performing a soft reset in the RESET menu, change the setting to a paper size or type available for automatic 2-sided printing, and then print again.
<33 WORK MEM.FULL> <Auto Error Skip>
<Cause>
The work memory for each print mode cannot be secured.
<Remedy 1>
The printer continues printing by pressing [Online]. However, the data with which an error has occurred is not printed properly.
IMPORTANT
When you continue printing by pressing [Online], be aware that the data of macro that is already registered may be deleted.
<Remedy 2>
Perform a soft reset in the RESET menu, increase the free space of RAM using the following procedure, and then print again.
- Perform a hard reset or cycle the power of the printer (Be aware that all the data in the memory that the printer has received will be deleted).
<35 TABLE FULL> <Auto Error Skip>
<Cause>
The number of the documents in a job has exceeded 16.
<Remedy>
The printer continues printing by pressing [Online]. However, the job with which an error has occurred is not printed.
<38 LOW IMGE QLTY> <Auto Error Skip>
<Cause>
The printer cannot process the data because it is too complicated.
<Remedy 1>
The printer continues printing by pressing [Online]. However, the printer prints with the image quality level being lowered.
<Remedy 2>
Perform a soft reset in the RESET menu, set GRADATION LEVEL in the QUALITY MENU options in the SETUP menu to STANDARD, and then print again.
<39 SPL MEM.FULL> <Auto Error Skip>
<Cause>
Because spool memory has run out, the printer cannot print.
<Remedy 1>
The printer continues printing by pressing [Online]. However, the page with which an error has occurred is not printed.
<Remedy 2>
Perform a soft reset in the RESET menu, specify the paper size smaller, and then print again.
<Remedy 3>
Perform a soft reset in the RESET menu, set GRADATION LEVEL in the QUALITY MENU options in the SETUP menu to STANDARD, and then print again.
<Remedy 4>
If 2-SIDED PRINT. in the FEEDER MENU options in the SETUP menu is set to ON, specify OFF, and then print again.
<Remedy 5>
Change the setting for HALFTONES in the QUALITY MENU options in the SETUP menu, and then print again.
<41 CHK PAPER SZE>
<Cause 1>
The size of the paper loaded in the multi-purpose tray or paper cassette is different from the setting for TRAY PAPER SIZE, CASSETTE1 SIZE, or CASSETTE2 SIZE specified from the computer or control panel.
<Remedy>
Match the size specified in TRAY PAPER SIZE, CASSETTE1 SIZE, or CASSETTE2 SIZE and the size of the loaded paper, and then press [Online].
<Cause 2>
You are using UFR II Printer Driver, and you loaded custom paper of its long edges 215.9 mm or less and printed when TRAY PAPER SIZE, CASSETTE1 SIZE, or CASSETTE2 SIZE in the FEEDER MENU options in the SETUP menu was set to MIXED SIZE.
<Remedy>
Load the paper in landscape orientation, then print again.
<Cause 3>
CHK PAPER SIZE in the USER MAIN. options in the SETUP menu is set to OFF.
<Remedy>
<52 RAST.MODE ERR> <Auto Error Skip>
<Cause>
The printer received data in format that it does not support during printing in the Raster mode.
<Remedy 1>
The printer continues printing by pressing [Online]. However, the data may not be printed properly.
<Remedy 2>
Print again using a printer driver that supports image data formats.
<53 SEC.PRINT ERR> <Auto Error Skip>
<Cause>
Secured print data is sent from a printer driver that is not for LBP3370.
<Remedy>
Press [Online] to cancel the job.
<53 STORE ERROR> <Auto Error Skip>
<Cause>
The data for which a stored job print is specified is sent from a printer driver that is not for LBP3370.
<Remedy>
Press [Online] to cancel the job.
<58 JOB MEM.FULL> <Auto Error Skip>
<Cause>
There is not sufficient free RAM space to process jobs.
<Remedy 1>
If you are processing multiple jobs at once, press [Online] to cancel printing, wait for other jobs complete, and then print again.
<Remedy 2>
If the job data is too large, divide the job and print again.
<59 JOB RX ERROR> <Auto Error Skip>
<Cause>
The printer received any unanalyzable data while it is receiving a job, or it timed out.
<Remedy 1>
Press [Online] to cancel printing, then print again.
<Remedy 2>
A problem may be occurring in the network you are using. Check the status of the network that your are using.
<A4 nn ERROR> («nn» represents two-digit alphanumeric characters)
<Cause>
A problem has occurred and the printer does not operate properly.
<Remedy>
Cycle the power of the printer. If the message appears even after cycling the power of the printer, note down the message in the display, and contact your local authorized Canon dealer.
<A5 nn ERROR> («nn» represents two-digit alphanumeric characters)
<Cause>
A problem has occurred and the printer does not operate properly.
<Remedy>
Cycle the power of the printer. If the message appears even after cycling the power of the printer, note down the message in the display, and contact your local authorized Canon dealer.
<A7 nn ERROR> («nn» represents two-digit alphanumeric characters)
<Cause>
A problem has occurred and the printer does not operate properly.
<Remedy>
Cycle the power of the printer. If the message appears even after cycling the power of the printer, note down the message in the display, and contact your local authorized Canon dealer.
<D7 nn ERROR> («nn» represents two-digit alphanumeric characters)
<Cause>
A problem has occurred and the printer does not operate properly.
<Remedy>
Cycle the power of the printer. If the message appears even after cycling the power of the printer, note down the message in the display, and contact your local authorized Canon dealer.
<D8 LAYOUT ERROR>
<Cause>
The page cannot be laid out because the memory has run out.
<Remedy 1>
Set [Graphics Mode] in UFR II Printer Driver to [Raster Mode], then print again. (See Help of UFR II Printer Driver)
<Remedy 2>
After performing a soft reset using the RESET menu, perform a hard reset to increase the free memory space or cycle the power of the printer, and then print again. (Be aware that all the data in the memory that the printer has received will be deleted.)
<Remedy 3>
Perform «Error Skip», then continue printing. However, the data with which an error has occurred is not printed properly.
<D8 VERSION ERROR>
<Cause>
You tried to print from a printer driver that is not for LBP3370.
<Remedy>
Print from the printer driver for LBP3370.
<D8 SYNTAX ERROR>
<Cause>
Invalid data is sent when printing using UFR II Printer Driver.
<Remedy 1>
Press [Online] to continue printing from the next data. However, the page with which an error has occurred and its subsequent pages are not printed.
<Remedy 2>
Confirm the data to be printed, then print again.
<D8 nn ERROR> («nn» represents two-digit alphanumeric characters)
<Cause>
A problem has occurred and the printer does not operate properly.
<Remedy>
Cycle the power of the printer. If the message appears even after cycling the power of the printer, note down the message in the display, and contact your local authorized Canon dealer.
<D9 IMG.DATA ERR.>
<Cause>
Data which this printer cannot process is included in TIFF data or JPEG data.
<Remedy>
This printer cannot print the data. Press [Online] to cancel the job.
<D9 IMG.REFER.ERR>
<Cause>
Data which this printer cannot process is included in TIFF data.
<Remedy>
This printer cannot print the data. Press [Online] to cancel the job.
<D9 nn ERROR> («nn» represents two-digit alphanumeric characters)
<Cause>
A problem has occurred and the printer does not operate properly.
<Remedy>
Cycle the power of the printer. If the message appears even after cycling the power of the printer, note down the message in the display, and contact your local authorized Canon dealer.
<F9-nn PWR OFF>ON> («nn» represents two-digit alphanumeric characters)
<Cause>
A problem has occurred while the printer is processing print data.
<Remedy>
Cycle the power of the printer. If the message appears even after cycling the power of the printer, note down the message in the display, and contact your local authorized Canon dealer.
<FF FONT FULL> <Auto Error Skip>
<Cause>
Because of too many fonts to be registered, the field (font table) for registering font information has run out and overflowed.
<Remedy>
The printer continues printing by pressing [Online]. However, the page with which an error has occurred is not printed properly.
<FM SIZE ERROR> <Auto Error Skip>
<Cause>
There is some font with its size exceeds the pseudo-scalable font size.
<Remedy>
Perform «Error Skip», then continue printing. However, the characters with which an error has occurred are not printed properly.
<FM SCALE ERROR> <Auto Error Skip>
<Cause>
There is a character in which the number of coordinate points on the contour lines exceeds the limitation of a pseudo-scalable font.
<Remedy>
Perform «Error Skip», then continue printing. However, the characters with which an error has occurred are not printed properly.
<PC LOAD «size»>
<Cause>
The paper of the size specified in the application is not loaded in the paper cassette or multi-purpose tray, or the paper source for the different paper size is selected.
<Remedy 1>
<Remedy 2>
If you are using the multi-purpose tray, check TRAY PAPER SIZE, and when the paper size does not match the size specified in the application, specify the setting properly. [Loading Paper in the Multi-purpose Tray]
<Remedy 3>
Press [Feeder Selection], then select the paper cassette in which the paper of the matched size is loaded. [Selecting a Paper Source]
<Remedy 4>
Press [Online], then print to the currently loaded paper forcibly. If you are using the multi-purpose tray, the setting for TRAY PAPER SIZE automatically changes to the setting specified in the application.
IMPORTANT
If you open the front cover when the message <PC LOAD «size»> is displayed, the message may disappear. However, be sure to follow the directions in the displayed message to change the paper.
Solution
When the printer cannot continue printing for some reason (an error status), the printer beeps, the Message indicator comes on, and an error message that indicates the description of the error appears in the display. A Warning message appears in the display when the printer requires some remedy (a warning status) although the job is not affected.
If either of these messages appears, perform the following procedures according to the message.
NOTE
- When multiple warnings are occurring at the same time, the Warning messages appear by rotation.
- When the printer is in error status and warning status at the same time, the Warning message does not appear.
- Even when a message with (Warning Message) appears (when the printer is in a warning status), the printer does not stop printing.
- For a message with the <Auto Error Skip> mark, you can skip the error by pressing [Online] and continue printing. However, part of the print data may be missing or it may not be printed properly. When you want to stop the process, perform a soft reset to eliminate the cause of the error, press [Online], and then print again. Also, you can automatically skip the errors to which this mark is attached by setting AUTO ERROR SKIP in the SETUP menu to ON.
<E nnn-nnnn> («n» represents a number)
<Cause>
A problem has occurred inside the printer.
<Remedy>
Solve the problem following the instructions of «Service Call Display» in «Chapter 8 Troubleshooting» in User’s Guide in the CD-ROM supplied with the printer.
<OF OPT.CONN.ERR.>
<Cause 1>
The optional paper feeder is not installed properly.
<Remedy>
Turn the power OFF, install the paper feeder properly, and then turn it ON again.
<Cause 2>
The optional paper feeder is installed or removed when the printer is ON.
<Remedy>
Turn the power OFF, install or remove the paper feeder, then turn the printer ON again.
<Cause 3>
The connector of the optional paper feeder is disconnected.
<Remedy>
Turn the printer OFF, unplug the power plug from the AC power outlet and contact your local authorized Canon dealer.
<Cause 4>
A paper feeder that is not for this printer is installed.
<Remedy>
Turn the power OFF, install the paper feeder for this printer, and then turn it ON again.
<11 NO «size» PAPER>
<Cause>
Paper of the size specified in the application is not loaded in the paper source (in all the paper sources when PAPER SOURCE is set to AUTO; in the specified paper source when the setting is fixed).
<Remedy 1>
Refill or load paper.
<Remedy 2>
Press [Feeder Selection], then select other paper source for the same paper size or larger paper size.[Selecting a Paper Source]
<12 COVER OPEN>
<Cause>
The front cover is open.
<Remedy>
Close the front cover firmly. If the printer is not online, press [Online].
<13 PAPER JAM>
<Cause>
Paper is jammed inside the printer
<Remedy>
Remove the jammed paper and set the paper cassette and covers to the original position. If the printer is not online, press [Online]. [Paper Jams]
IMPORTANT
- If paper jams have occurred at multiple areas at the same time, the areas appear in the display by rotation.
- If you have removed the jammed paper without opening any cover, be sure to open and close the front cover once, and then press [Online].
<14 NO TONER CART>
<Cause>
The toner cartridge is not installed or installed improperly.
<Remedy>
<18 FEED ERROR>
<Cause>
Paper of the size or type that cannot be fed from the multi-purpose tray or paper cassette is specified.
<Remedy 1>
If a paper source is specified, press [Feeder Selection], then set PAPER SOURCE to AUTO.
<Remedy 2>
Press [Feeder Selection], select a paper source from which paper of the specified size or type can be fed, then load paper.
<Remedy 3>
Specify the settings for STD PAPER SIZE and STD PAPER TYPE in the FEEDER MENU options in the SETUP menu to the size or type of paper that can be loaded in the paper source.
<Remedy 4>
Press [Online], then print from the currently selected paper source. However, this may result in deterioration in print quality.
<1H CHK TNR CONN.> (Warning Message)
<Cause>
There is a possibility that the toner cartridge is not installed properly.
<Remedy 1>
Remove the toner cartridge, then reinstall it properly.
<Remedy 2>
If <1H CHK TNR CONN.> appears and there is a problem with the print quality even after applying the Remedy 1, remove the toner cartridge and replace it with a new one. [Replacing the Toner Cartridge]
<23 DOWN.MEM.FULL> <Auto Error Skip>
<Cause>
The memory for registering macro and custom characters has run out and overflowed.
<Remedy 1>
The printer continues printing by pressing [Online]. However, the overflowed data cannot be registered.
<Remedy 2>
Perform a soft reset using the RESET menu, increase the free space of RAM using the following procedure, register the data again, and then print again.
- Perform a hard reset or cycle the power of the printer (Be aware that all the data in the memory will be deleted).
<26 SYS.MEM.FULL> <Auto Error Skip>
<Cause>
The work memory required for the printer process has run out while the system is processing the data (mainly the graphics data and text data).
<Remedy 1>
The printer continues printing by pressing [Online]. However, the data with which an error has occurred is not printed properly.
<Remedy 2>
Perform a soft reset using the RESET menu, and then increase the free space of RAM using the following procedure.
- Perform a hard reset or cycle the power of the printer (Be aware that all thedata in the memory will be deleted).
<27 JOB START ERR> <Auto Error Skip>
<Cause>
The specified emulation does not exist.
<Remedy>
Press [Online] to continue printing from the next data. However, the data with which an error has occurred is not printed.
<30 MEMORY FULL> <Auto Error Skip>
<Cause>
The work memory has run out while the system is processing the data.
<Remedy>
The printer continues printing by pressing [Online]. However, the data with which an error has occurred may not be printed properly.
<32 2-SIDED ERROR> <Auto Error Skip>
<Cause>
The printer received 2-sided printing data of paper sizes (including the orientation) or paper types unavailable for automatic 2-sided printing.
<Remedy 1>
The printer continues printing by pressing [Online]. However, the data on each side is printed on two pages.
<Remedy 2>
After performing a soft reset in the RESET menu, change the setting to a paper size or type available for automatic 2-sided printing, and then print again.
<33 WORK MEM.FULL> <Auto Error Skip>
<Cause>
The work memory for each print mode cannot be secured.
<Remedy 1>
The printer continues printing by pressing [Online]. However, the data with which an error has occurred is not printed properly.
IMPORTANT
When you continue printing by pressing [Online], be aware that the data of macro that is already registered may be deleted.
<Remedy 2>
Perform a soft reset in the RESET menu, increase the free space of RAM using the following procedure, and then print again.
- Perform a hard reset or cycle the power of the printer (Be aware that all the data in the memory that the printer has received will be deleted).
<35 TABLE FULL> <Auto Error Skip>
<Cause>
The number of the documents in a job has exceeded 16.
<Remedy>
The printer continues printing by pressing [Online]. However, the job with which an error has occurred is not printed.
<38 LOW IMGE QLTY> <Auto Error Skip>
<Cause>
The printer cannot process the data because it is too complicated.
<Remedy 1>
The printer continues printing by pressing [Online]. However, the printer prints with the image quality level being lowered.
<Remedy 2>
Perform a soft reset in the RESET menu, set GRADATION LEVEL in the QUALITY MENU options in the SETUP menu to STANDARD, and then print again.
<39 SPL MEM.FULL> <Auto Error Skip>
<Cause>
Because spool memory has run out, the printer cannot print.
<Remedy 1>
The printer continues printing by pressing [Online]. However, the page with which an error has occurred is not printed.
<Remedy 2>
Perform a soft reset in the RESET menu, specify the paper size smaller, and then print again.
<Remedy 3>
Perform a soft reset in the RESET menu, set GRADATION LEVEL in the QUALITY MENU options in the SETUP menu to STANDARD, and then print again.
<Remedy 4>
If 2-SIDED PRINT. in the FEEDER MENU options in the SETUP menu is set to ON, specify OFF, and then print again.
<Remedy 5>
Change the setting for HALFTONES in the QUALITY MENU options in the SETUP menu, and then print again.
<41 CHK PAPER SZE>
<Cause 1>
The size of the paper loaded in the multi-purpose tray or paper cassette is different from the setting for TRAY PAPER SIZE, CASSETTE1 SIZE, or CASSETTE2 SIZE specified from the computer or control panel.
<Remedy>
Match the size specified in TRAY PAPER SIZE, CASSETTE1 SIZE, or CASSETTE2 SIZE and the size of the loaded paper, and then press [Online].
<Cause 2>
You are using UFR II Printer Driver, and you loaded custom paper of its long edges 215.9 mm or less and printed when TRAY PAPER SIZE, CASSETTE1 SIZE, or CASSETTE2 SIZE in the FEEDER MENU options in the SETUP menu was set to MIXED SIZE.
<Remedy>
Load the paper in landscape orientation, then print again.
<Cause 3>
CHK PAPER SIZE in the USER MAIN. options in the SETUP menu is set to OFF.
<Remedy>
<52 RAST.MODE ERR> <Auto Error Skip>
<Cause>
The printer received data in format that it does not support during printing in the Raster mode.
<Remedy 1>
The printer continues printing by pressing [Online]. However, the data may not be printed properly.
<Remedy 2>
Print again using a printer driver that supports image data formats.
<53 SEC.PRINT ERR> <Auto Error Skip>
<Cause>
Secured print data is sent from a printer driver that is not for LBP3370.
<Remedy>
Press [Online] to cancel the job.
<53 STORE ERROR> <Auto Error Skip>
<Cause>
The data for which a stored job print is specified is sent from a printer driver that is not for LBP3370.
<Remedy>
Press [Online] to cancel the job.
<58 JOB MEM.FULL> <Auto Error Skip>
<Cause>
There is not sufficient free RAM space to process jobs.
<Remedy 1>
If you are processing multiple jobs at once, press [Online] to cancel printing, wait for other jobs complete, and then print again.
<Remedy 2>
If the job data is too large, divide the job and print again.
<59 JOB RX ERROR> <Auto Error Skip>
<Cause>
The printer received any unanalyzable data while it is receiving a job, or it timed out.
<Remedy 1>
Press [Online] to cancel printing, then print again.
<Remedy 2>
A problem may be occurring in the network you are using. Check the status of the network that your are using.
<A4 nn ERROR> («nn» represents two-digit alphanumeric characters)
<Cause>
A problem has occurred and the printer does not operate properly.
<Remedy>
Cycle the power of the printer. If the message appears even after cycling the power of the printer, note down the message in the display, and contact your local authorized Canon dealer.
<A5 nn ERROR> («nn» represents two-digit alphanumeric characters)
<Cause>
A problem has occurred and the printer does not operate properly.
<Remedy>
Cycle the power of the printer. If the message appears even after cycling the power of the printer, note down the message in the display, and contact your local authorized Canon dealer.
<A7 nn ERROR> («nn» represents two-digit alphanumeric characters)
<Cause>
A problem has occurred and the printer does not operate properly.
<Remedy>
Cycle the power of the printer. If the message appears even after cycling the power of the printer, note down the message in the display, and contact your local authorized Canon dealer.
<D7 nn ERROR> («nn» represents two-digit alphanumeric characters)
<Cause>
A problem has occurred and the printer does not operate properly.
<Remedy>
Cycle the power of the printer. If the message appears even after cycling the power of the printer, note down the message in the display, and contact your local authorized Canon dealer.
<D8 LAYOUT ERROR>
<Cause>
The page cannot be laid out because the memory has run out.
<Remedy 1>
Set [Graphics Mode] in UFR II Printer Driver to [Raster Mode], then print again. (See Help of UFR II Printer Driver)
<Remedy 2>
After performing a soft reset using the RESET menu, perform a hard reset to increase the free memory space or cycle the power of the printer, and then print again. (Be aware that all the data in the memory that the printer has received will be deleted.)
<Remedy 3>
Perform «Error Skip», then continue printing. However, the data with which an error has occurred is not printed properly.
<D8 VERSION ERROR>
<Cause>
You tried to print from a printer driver that is not for LBP3370.
<Remedy>
Print from the printer driver for LBP3370.
<D8 SYNTAX ERROR>
<Cause>
Invalid data is sent when printing using UFR II Printer Driver.
<Remedy 1>
Press [Online] to continue printing from the next data. However, the page with which an error has occurred and its subsequent pages are not printed.
<Remedy 2>
Confirm the data to be printed, then print again.
<D8 nn ERROR> («nn» represents two-digit alphanumeric characters)
<Cause>
A problem has occurred and the printer does not operate properly.
<Remedy>
Cycle the power of the printer. If the message appears even after cycling the power of the printer, note down the message in the display, and contact your local authorized Canon dealer.
<D9 IMG.DATA ERR.>
<Cause>
Data which this printer cannot process is included in TIFF data or JPEG data.
<Remedy>
This printer cannot print the data. Press [Online] to cancel the job.
<D9 IMG.REFER.ERR>
<Cause>
Data which this printer cannot process is included in TIFF data.
<Remedy>
This printer cannot print the data. Press [Online] to cancel the job.
<D9 nn ERROR> («nn» represents two-digit alphanumeric characters)
<Cause>
A problem has occurred and the printer does not operate properly.
<Remedy>
Cycle the power of the printer. If the message appears even after cycling the power of the printer, note down the message in the display, and contact your local authorized Canon dealer.
<F9-nn PWR OFF>ON> («nn» represents two-digit alphanumeric characters)
<Cause>
A problem has occurred while the printer is processing print data.
<Remedy>
Cycle the power of the printer. If the message appears even after cycling the power of the printer, note down the message in the display, and contact your local authorized Canon dealer.
<FF FONT FULL> <Auto Error Skip>
<Cause>
Because of too many fonts to be registered, the field (font table) for registering font information has run out and overflowed.
<Remedy>
The printer continues printing by pressing [Online]. However, the page with which an error has occurred is not printed properly.
<FM SIZE ERROR> <Auto Error Skip>
<Cause>
There is some font with its size exceeds the pseudo-scalable font size.
<Remedy>
Perform «Error Skip», then continue printing. However, the characters with which an error has occurred are not printed properly.
<FM SCALE ERROR> <Auto Error Skip>
<Cause>
There is a character in which the number of coordinate points on the contour lines exceeds the limitation of a pseudo-scalable font.
<Remedy>
Perform «Error Skip», then continue printing. However, the characters with which an error has occurred are not printed properly.
<PC LOAD «size»>
<Cause>
The paper of the size specified in the application is not loaded in the paper cassette or multi-purpose tray, or the paper source for the different paper size is selected.
<Remedy 1>
<Remedy 2>
If you are using the multi-purpose tray, check TRAY PAPER SIZE, and when the paper size does not match the size specified in the application, specify the setting properly. [Loading Paper in the Multi-purpose Tray]
<Remedy 3>
Press [Feeder Selection], then select the paper cassette in which the paper of the matched size is loaded. [Selecting a Paper Source]
<Remedy 4>
Press [Online], then print to the currently loaded paper forcibly. If you are using the multi-purpose tray, the setting for TRAY PAPER SIZE automatically changes to the setting specified in the application.
IMPORTANT
If you open the front cover when the message <PC LOAD «size»> is displayed, the message may disappear. However, be sure to follow the directions in the displayed message to change the paper.
I’m using LD Products toner cartridges and have had no problems with them since I started useing them in all my printers starting about 2001.
After my original post, I noticed that my photo printouts were degraded. The colors were not what they should be and they had streaks in them. This forced me to find out what was going wrong since the printer was no help. So, the following ensued:
The diagnostic page shows the alignment to be correct. Using paint shop pro I generated a page with four color bars running across it. Black, cyan, magenta, and yellow. When I printed it I saw that the black cartridge was failing to print correctly. Now, I’ve been doing a ton of greyscale photo printing and the cartridge was about a year old. A call to LD Products informed that the cartridge was rated for 1200 pages at 5% coverage and the way I was using it would reduce that by as much as a half. Examining the cartridge, I found that the roller that is normally coated with toner, Was nearly bare. I removed it, shook it vigoursly, reinstalled it, and printed the test page again. The error message went away but the printout was still messed up. I’ve ordered a new cartridge and, after I install it, I’ll run a new print and le tyou know how it turns out.
Since the cartridge was, for all practical purposes empty, I would have thought the printer would have alerted me to this fact. Every time I printed something, the information window that pops up showed the black cartridge was nearly full.
Issue
When the printer cannot continue printing for some reason (an error status), the printer beeps, the (Message) indicator comes on, and an error message that indicates the description of the error appears in the display. A Warning message appears in the display when the printer requires some remedy (a warning status) although the job is not affected.
If either of these messages appears, perform the following procedures according to the message.
NOTE
Clarifications of the operation and additional explanations for the procedure are indicated at the end of this page. Reading these notes is highly recommended.
Cause and Solution
| Message | Cause and Remedy |
| <E nnn-nnnn> («n» represents a number) | Cause: A problem has occurred inside the printer. Remedy : Solve the problem following the instructions in «Service Call Display». |
| <00 NO SLOT LOAD> | Cause: Because the printer is in the middle of printing, it forbids loading paper in the manual feed slot. Remedy : When loading paper in the manual feed slot, wait until printing and printer operation finish completely.Important: Make sure that the printer is not operating and the (Ready) indicator is on when loading paper in the manual feed slot. When printing multiple copies or multiple pages from the manual feed slot, make sure that the printer is not operating and the (Message) indicator is on before loading the second and subsequent paper. If paper is loaded in the manual feed slot while the printer is operating such as when the printer is printing or immediately after outputting paper, the loaded paper may be output without being printed, or this may result in paper jams.
|
| <OF OPT.CONN.ERR.> | Cause 1: The optional paper feeder is not installed properly. Remedy : Turn the power OFF, install the paper feeder properly, and then turn it ON again. Cause 2: Cause 3: Cause 4: |
| <11 NO «size» PAPER> | Cause: Paper of the size specified in the application is not loaded in the paper source (in all the paper sources when PAPER SOURCE is set to AUTO; in the specified paper source when the setting is fixed). Remedy 1: Refill or load paper. Remedy 2: Press the (Feeder Selection) key, then select other paper source for the same paper size or larger paper size.
|
| <12 COVER OPEN> | Cause: Paper is jammed inside the printer. Remedy : Remove the jammed paper and set the paper cassette and covers to the original position. If the printer is not online, press the (Online) key. |
| <13 PAPER JAM> | Cause: Paper is jammed inside the printer. Remedy : Remove the jammed paper and set the paper cassette and covers to the original position. If the printer is not online, press the (Online) key.Important:a. If paper jams have occurred at multiple areas at the same time, the areas appear in the display by rotation. b. If you have removed the jammed paper without opening any cover, be sure to open and close the front cover once, and then press the (Online)key. |
| <14 NO TONER CART> | Cause: The toner cartridge is not installed or installed improperly. Remedy : Install the toner cartridge properly. |
| <18 FEED ERROR> | Cause: Paper of the size or type that cannot be fed from the manual feed slot or paper cassette is specified. Remedy 1: If a paper source is specified, press the (Feeder Selection) key, then set PAPER SOURCE to AUTO.Remedy 2: Press the (Feeder Selection) key, select a paper source from which paper of the specified size or type can be fed, then load paper.Remedy 3: Specify the settings for STD PAPER SIZE and STD PAPER TYPE in the FEEDER MENU options in the SETUP menu to the size or type of paper that can be loaded in the paper source. Remedy 4: Press the (Online) key, then print from the currently selected paper source. However, this may result in deterioration in print quality.
|
| <18 CHK MANU SLOT > | Cause: Paper is loaded in the manual feed slot. Remedy 1: If you want to use the paper loaded in the manual feed slot for printing, press the the (Feeder Selection) key, and then set PAPER SOURCE to MANU.FEED SLOT.Remedy 2: Remove any paper loaded in the manual feed slot. |
| <1H CHK TNR CONN.>
(Warning Message) |
Cause: There is a possibility that the toner cartridge is not installed properly. Remedy 1: Remove the toner cartridge, then reinstall it properly. Remedy 2: If <1H CHK TNR CONN.> appears and there is a problem with the print quality even after applying the Remedy 1, remove the toner cartridge and replace it with a new one. |
| <23 DOWN.MEM.FULL>
<Auto Error Skip> |
Cause: The memory for registering overlay forms and custom characters has run out and overflowed. Remedy 1: The printer continues printing by pressing the (Online) key. However, the overflowed data cannot be registered.Remedy 2: Perform a soft reset using the RESET menu, increase the free space of RAM using the following procedure, register the data again, and then print again. — Perform a hard reset or cycle the power of the printer (Be aware that all the data in the memory will be deleted). |
| <26 SYS.MEM.FULL>
<Auto Error Skip> |
Cause: The work memory required for the printer process has run out while the system is processing the data (mainly the graphics data and text data). Remedy 1: The printer continues printing by pressing the (Online) key. However, the data with which an error has occurred is not printed properly.Remedy 2: Perform a soft reset using the RESET menu, and then increase the free space of RAM using the following procedure. — Perform a hard reset or cycle the power of the printer (Be aware that all the data in the memory will be deleted). |
| <27 JOB START ERR>
<Auto Error Skip> |
Cause: The specified emulation does not exist. Remedy : Press the (Online) key to continue printing from the next data. However, the data with which an error has occurred is not printed.
|
| <30 MEMORY FULL>
<Auto Error Skip> |
Cause : The work memory has run out while the system is processing the data. Remedy : The printer continues printing by pressing the (Online) key. However, the data with which an error has occurred may not be printed properly.
|
| <32 2-SIDED ERROR>
<Auto Error Skip> |
Cause : The printer received 2-sided printing data of paper sizes (including the orientation) or paper types unavailable for automatic 2-sided printing. Remedy 1: The printer continues printing by pressing the (Online) key. However, the data on each side is printed on two pages.Remedy 2: After performing a soft reset in the RESET menu, change the setting to a paper size or type available for automatic 2-sided printing, and then print again. |
| <33 WORK MEM.FULL>
<Auto Error Skip> |
Cause: The work memory for each operation mode cannot be secured. Remedy 1: The printer continues printing by pressing the (Online) key. However, the data with which an error has occurred is not printed properly.Important:When you continue printing by pressing the (Online) key, be aware that the data of overlay or macro that is already registered may be deleted.
Remedy 2: |
| <35 TABLE FULL>
<Auto Error Skip> |
Cause: The number of the documents in a job has exceeded 16. Remedy : The printer continues printing by pressing the (Online) key. However, the job with which an error has occurred is not printed.
|
| <38 LOW IMAGE QLTY>
<Auto Error Skip> |
Cause: The printer cannot process the data because it is too complicated. Remedy 1: The printer continues printing by pressing the (Online) key. However, the printer prints with the image quality level being lowered.Remedy 2: Perform a soft reset in the RESET menu, set GRADATION LEVEL in the QUALITY MENU options in the SETUP menu to STANDARD, and then print again. |
| <39 SPL MEM.FULL>
<Auto Error Skip> |
Cause: Because spool memory has run out, the printer cannot print. Remedy 1: The printer continues printing by pressing the (Online) key. However, the page with which an error has occurred is not printed.Remedy 2: Perform a soft reset in the RESET menu, specify the paper size smaller, and then print again. Remedy 3: Perform a soft reset in the RESET menu, set GRADATION LEVEL in the QUALITY MENU options in the SETUP menu to STANDARD, and then print again. Remedy 4: If 2-SIDED PRINT. in the FEEDER MENU options in the SETUP menu is set to ON, specify OFF, and then print again. Remedy 5: Change the setting for HALFTONES in the QUALITY MENU options in the SETUP menu, and then print again. |
| <41 CHK PAPER SZE> | Cause 1:
The size of the paper loaded in the manual feed slot or paper cassette is different from the setting for SLOT PAPER SIZE, CASSETTE1 SIZE, or CASSETTE2 SIZE specified from the computer or control panel. Cause 2:
You are using UFR II Printer Driver, and you loaded custom paper of its long edges 215.9 mm or less and printed when SLOT PAPER SIZE, CASSETTE1 SIZE, or CASSETTE2 SIZE in the FEEDER MENU options in the SETUP menu was set to MIXED SIZE. Load the paper in landscape orientation, then print again. Cause 3: Set SPECIAL MODE J to ON, then print again. |
| <52 RAST.MODE ERR>
<Auto Error Skip> |
Cause: The printer received data in format that it does not support during printing in the Raster mode. Remedy 1: The printer continues printing by pressing the (Online) key. However, the data may not be printed properly.Remedy 2: Print again using a printer driver that supports image data formats. |
| <53 SEC.PRINT ERR>
<Auto Error Skip> |
Cause:
Secured print data is sent from a printer driver that is not for LBP3360. |
| <53 STORE ERROR>
<Auto Error Skip> |
Cause: The data for which a stored job print is specified is sent from a printer driver that is not for LBP3360. Remedy : Press the (Online) key to cancel the job. |
| <58 JOB MEM.FULL>
<Auto Error Skip> |
Cause: There is not sufficient free RAM space to process jobs. Remedy 1: If you are processing multiple jobs at once, press the (Online) key to cancel printing, wait for other jobs complete, and then print again.Remedy 2: If the job data is too large, divide the job and print again. |
| <59 JOB RX ERROR>
<Auto Error Skip> |
Cause: The printer received any unanalyzable data while it is receiving a job, or it timed out. Remedy 1: Press the (Online) key to cancel printing, then print again.Remedy 2: A problem may be occurring in the network you are using. Check the status of the network that you are using. |
| <A4 nn ERROR> («nn» represents two-digit alphanumeric characters) | Cause: A problem has occurred and the printer does not operate properly. Remedy : Cycle the power of the printer. If the message appears even after cycling the power of the printer, note down the message in the display, and contact your local authorized Canon dealer. |
| <A5 nn ERROR> («nn» represents two-digit alphanumeric characters) | Cause: A problem has occurred and the printer does not operate properly. Remedy : Cycle the power of the printer. If the message appears even after cycling the power of the printer, note down the message in the display, and contact your local authorized Canon dealer. |
| <A7 nn ERROR> («nn» represents two-digit alphanumeric characters) | Cause: A problem has occurred and the printer does not operate properly. Remedy : Cycle the power of the printer. If the message appears even after cycling the power of the printer, note down the message in the display, and contact your local authorized Canon dealer. |
| <D7 nn ERROR> («nn» represents two-digit alphanumeric characters) | Cause: A problem has occurred and the printer does not operate properly. Remedy : Cycle the power of the printer. If the message appears even after cycling the power of the printer, note down the message in the display, and contact your local authorized Canon dealer. |
| <D8 LAYOUT ERROR> | Cause: The page cannot be laid out because the memory has run out. Remedy 1: Set [Graphics Mode] in UFR II Printer Driver to [Raster Mode], then print again. Remedy 2: After performing a soft reset using the RESET menu, perform a hard reset to increase the free memory space or cycle the power of the printer, and then print again. (Be aware that all the data in the memory that the printer has received will be deleted.) Remedy 3: Perform «Error Skip», then continue printing. However, the data with which an error has occurred is not printed properly. |
| <D8 VERSION ERROR> | Cause: Any job is sent from a UFR II Printer Driver that this printer does not support. Remedy 1: Change the version of the UFR II Printer Driver to that this printer supports, and then print again. Remedy 2: Perform «Error Skip», then continue printing. However, the data with which an error has occurred is not printed properly. |
| <D8 SYNTAX ERROR> | Cause: Invalid data is sent when printing using UFR II Printer Driver. Remedy 1: Press the (Online) key to continue printing from the next data. However, the page with which an error has occurred and its subsequent pages are not printed.Remedy 2: Confirm the data to be printed, then print again. |
| <D8 nn ERROR> («nn» represents two-digit alphanumeric characters) | Cause: A problem has occurred and the printer does not operate properly. Remedy : Cycle the power of the printer. If the message appears even after cycling the power of the printer, note down the message in the display, and contact your local authorized Canon dealer. |
| <F2 NO FONT>
< Auto Error Skip> |
Cause: The registered fonts used for creating overlay forms had been deleted during printing. Remedy 1: The printer continues printing by pressing the (Online) key. However, unregistered fonts are not printed.Remedy 2: Register the fonts in the memory again or create a form using usable registered fonts, and then print again. |
| <F9-nn PWR OFF>ON> («nn» represents two-digit alphanumeric characters) | Cause: A problem has occurred while the printer is processing print data. Remedy : Cycle the power of the printer. If the message appears even after cycling the power of the printer, note down the message in the display, and contact your local authorized Canon dealer. |
| <FF FONT FULL>
<Auto Error Skip> |
Cause: Because of too many fonts to be registered, the field (font table) for registering font information has run out and overflowed. Remedy : The printer continues printing by pressing the (Online) key. However, the page with which an error has occurred is not printed properly. |
| <FM SIZE ERROR>
<Auto Error Skip> |
Cause: There is some font with its size exceeds the pseudo-scalable font size. Remedy : Perform «Error Skip», then continue printing. However, the characters with which an error has occurred are not printed properly. |
| <FM SCALE ERROR>
<Auto Error Skip> |
Cause: There is a character in which the number of coordinate points on the contour lines exceeds the limitation of a pseudo-scalable font. Remedy : Perform «Error Skip», then continue printing. However, the characters with which an error has occurred are not printed properly. |
| <PC LOAD «size»> | Cause: The paper of the size specified in the application is not loaded in the paper cassette or manual feed slot, or the paper source for the different paper size is selected. Remedy 1: Load the paper of the size selected in the application (or the one specified by scaling factors). Remedy 2: If you are using the manual feed slot, check SLOT PAPER SIZE, and when the paper size does not match the size specified in the application, specify the setting properly. Remedy 3: Press the (Feeder Selection) key, then select the paper cassette in which the paper of the matched size is loaded.Remedy 4: Press the (Online) key, then print to the currently loaded paper forcibly. If you are using the manual feed slot, the setting for SLOT PAPER SIZE automatically changes to the setting specified in the application.Important:If you open the front cover when the message is displayed, the message may disappear. However, be sure to follow the directions in the displayed message to change the paper. |
NOTE
a. When multiple warnings are occurring at the same time, the Warning messages appear by rotation.
b. When the printer is in error status and warning status at the same time, the Warning message does not appear.
c. Even when a message with (Warning Message) appears (when the printer is in a warning status), the printer does not stop printing.
d. For a message with the <Auto Error Skip> mark, you can skip the error by pressing the (Online) key and continue printing. However, part of the print data may be missing or it may not be printed properly. When you want to stop the process, perform a soft reset to eliminate the cause of the error, press the (Online) key, and then print again. Also, you can automatically skip the errors to which this mark is attached by setting AUTO ERROR SKIP in the SETUP menu to ON.
Лазерный принтер HP LaserJet 1200 — При включении ошибка — н
Помогите разобраться, пожалуйста! При включеении принтера, после прохождения теста выдает ошибку нет картриджа или бумаги. Как реально проверить работоспосбность оптодатчиков? И, если дело не в них, то в чем еще?
- Михаил С.
- Консультант
- Сообщения: 793
- Зарегистрирован: 17:49 — 11.04.06
- Откуда: Пятигорск
- Баллы репутации: 0
![]() Ramcke » 14:19 — 16.05.06
Ramcke » 14:19 — 16.05.06
Проверьте вращение губчатого коротрона-если не крутится, промыть узлы крепления.
- Ramcke
- Консультант
- Сообщения: 475
- Зарегистрирован: 13:05 — 20.07.05
- Откуда: Пятигорск
- Баллы репутации: 0
![]() Владимир А. » 14:19 — 16.05.06
Владимир А. » 14:19 — 16.05.06
При включеении принтера, после прохождения теста
Что Вы понимаете под этими словами? Двигателем прокручивает? Или тока промаргивается?
- Владимир А.
- Помощник админа Консультант
- Сообщения: 6638
- Зарегистрирован: 14:47 — 09.02.06
- Откуда: г.Обнинск
- Баллы репутации: 1
-
- ICQ

![]() RTM » 14:27 — 16.05.06
RTM » 14:27 — 16.05.06
А до этого Вы его разбирали или проблема возникла спонтанно
по машинам HP DesignJet 500, 800, 1050, 4500 можете обращаться, помогу
- RTM
- Консультант
- Сообщения: 272
- Зарегистрирован: 21:17 — 31.03.06
- Откуда: Казахстан
- Баллы репутации: 0
![]() Михаил С. » 14:35 — 16.05.06
Михаил С. » 14:35 — 16.05.06
Двигатель прокручивает, после выхода на режим моргает. До этого не разбирался, отпечатал 50000 листов.
- Михаил С.
- Консультант
- Сообщения: 793
- Зарегистрирован: 17:49 — 11.04.06
- Откуда: Пятигорск
- Баллы репутации: 0
![]() Владимир А. » 14:46 — 16.05.06
Владимир А. » 14:46 — 16.05.06
Тогда проверить легкость вращения вала переноса под картриджем как советует Ramcke.
Может и нет контакта на фотобарабан(справа в принтере выдвижной контакт).
- Владимир А.
- Помощник админа Консультант
- Сообщения: 6638
- Зарегистрирован: 14:47 — 09.02.06
- Откуда: г.Обнинск
- Баллы репутации: 1
-
- ICQ
![]() Михаил С. » 15:29 — 16.05.06
Михаил С. » 15:29 — 16.05.06
Спасибо всем! Дело было скорее всего в датчиках. После двухкратной полной разбоки (кроме печки) принтер заработал, однако, не знаю почему, полностью обнулился — нет серийного № и страници начал считать с нуля. Мне, правда,это не мешает, хоть и интересно, почему?
- Михаил С.
- Консультант
- Сообщения: 793
- Зарегистрирован: 17:49 — 11.04.06
- Откуда: Пятигорск
- Баллы репутации: 0
![]() RTM » 19:52 — 16.05.06
RTM » 19:52 — 16.05.06
И вправду интересно? 
по машинам HP DesignJet 500, 800, 1050, 4500 можете обращаться, помогу
- RTM
- Консультант
- Сообщения: 272
- Зарегистрирован: 21:17 — 31.03.06
- Откуда: Казахстан
- Баллы репутации: 0
Re: Лазерный принтер HP LaserJet 1200 — При включении ошибка
![]() zwitter » 09:45 — 14.12.11
zwitter » 09:45 — 14.12.11
Можно воскресить тему?
Менял шестерню колебательного механизма, потерял пружинку что прижимает привод картриджа к картриджу, поставил вместо маленькой внутренней большую от 1320…
собрал, все крутится но после старта принтер моргает нижней маленькой лампочкой…
т.к. у меня вынь7, то поставил дрова юниверсал принтер драйвер, они мне пишет 14 no toner cart
что я мог зацепить?
кроме редуктора ничего не разбирал
- zwitter
- ученик
- Сообщения: 165
- Зарегистрирован: 10:04 — 23.04.07
- Откуда: Ukraine
- Баллы репутации: 0
- Владимир А.
- Помощник админа Консультант
- Сообщения: 6638
- Зарегистрирован: 14:47 — 09.02.06
- Откуда: г.Обнинск
- Баллы репутации: 1
-
- ICQ
Вернуться в HEWLETT PACKARD (HP)
Кто сейчас на конференции
Сейчас этот форум просматривают: нет зарегистрированных пользователей и гости: 0
“I have an HP LaserJet 4 printer with the error message 14 No EP Cart . I recently replaced the ink cartridge, ran ‘self test’ on the printer, now the message 14 No EP Cart won’t go away. The printer will not print. Help.”
There are several possible causes for the 14 No EP Cart error message that vary by HP printer model. For HP LaserJet 4 series printers, the likely cause is one of three things:
- The new toner cartridge may be defective.
- The high voltage unit in your printer may be defective.
- The contacts in the printer or on the printer cartridge are dirty or misaligned.
Issues 1 and 3 are the most common, especially when you’re simply changing out the toner cartridge. The key thing to look for is whether the metal rod on the bottom left side of the cartridge is making proper contact with the printer.

You may need to clean the contacts in the printer or adjust the metal rod to get the toner cartridge to seat properly. This is a problem more common to recycled cartridges because parts can get damaged through all the handling.
Here are some other common issues for all HP Printers related to the 14 No EP Cart Error Message.
- Print rollers in tray 2 and tray 3 are worn.
- You need to change all feed rollers.
- Toner cartridge not fully seated or not installed.
- Toner sensor tabs missing.
- Defective toner cartridge.
- A defective paper control PCA.
Solution
When the printer cannot continue printing for some reason (an error status), the printer beeps, the Message indicator comes on, and an error message that indicates the description of the error appears in the display. A Warning message appears in the display when the printer requires some remedy (a warning status) although the job is not affected.
If either of these messages appears, perform the following procedures according to the message.
NOTE
- When multiple warnings are occurring at the same time, the Warning messages appear by rotation.
- When the printer is in error status and warning status at the same time, the Warning message does not appear.
- Even when a message with (Warning Message) appears (when the printer is in a warning status), the printer does not stop printing.
- For a message with the <Auto Error Skip> mark, you can skip the error by pressing [Online] and continue printing. However, part of the print data may be missing or it may not be printed properly. When you want to stop the process, perform a soft reset to eliminate the cause of the error, press [Online], and then print again. Also, you can automatically skip the errors to which this mark is attached by setting AUTO ERROR SKIP in the SETUP menu to ON.
<E nnn-nnnn> («n» represents a number)
<Cause>
A problem has occurred inside the printer.
<Remedy>
Solve the problem following the instructions of «Service Call Display» in «Chapter 8 Troubleshooting» in User’s Guide in the CD-ROM supplied with the printer.
<OF OPT.CONN.ERR.>
<Cause 1>
The optional paper feeder is not installed properly.
<Remedy>
Turn the power OFF, install the paper feeder properly, and then turn it ON again.
<Cause 2>
The optional paper feeder is installed or removed when the printer is ON.
<Remedy>
Turn the power OFF, install or remove the paper feeder, then turn the printer ON again.
<Cause 3>
The connector of the optional paper feeder is disconnected.
<Remedy>
Turn the printer OFF, unplug the power plug from the AC power outlet and contact your local authorized Canon dealer.
<Cause 4>
A paper feeder that is not for this printer is installed.
<Remedy>
Turn the power OFF, install the paper feeder for this printer, and then turn it ON again.
<11 NO «size» PAPER>
<Cause>
Paper of the size specified in the application is not loaded in the paper source (in all the paper sources when PAPER SOURCE is set to AUTO; in the specified paper source when the setting is fixed).
<Remedy 1>
Refill or load paper.
<Remedy 2>
Press [Feeder Selection], then select other paper source for the same paper size or larger paper size.[Selecting a Paper Source]
<12 COVER OPEN>
<Cause>
The front cover is open.
<Remedy>
Close the front cover firmly. If the printer is not online, press [Online].
<13 PAPER JAM>
<Cause>
Paper is jammed inside the printer
<Remedy>
Remove the jammed paper and set the paper cassette and covers to the original position. If the printer is not online, press [Online]. [Paper Jams]
IMPORTANT
- If paper jams have occurred at multiple areas at the same time, the areas appear in the display by rotation.
- If you have removed the jammed paper without opening any cover, be sure to open and close the front cover once, and then press [Online].
<14 NO TONER CART>
<Cause>
The toner cartridge is not installed or installed improperly.
<Remedy>
<18 FEED ERROR>
<Cause>
Paper of the size or type that cannot be fed from the multi-purpose tray or paper cassette is specified.
<Remedy 1>
If a paper source is specified, press [Feeder Selection], then set PAPER SOURCE to AUTO.
<Remedy 2>
Press [Feeder Selection], select a paper source from which paper of the specified size or type can be fed, then load paper.
<Remedy 3>
Specify the settings for STD PAPER SIZE and STD PAPER TYPE in the FEEDER MENU options in the SETUP menu to the size or type of paper that can be loaded in the paper source.
<Remedy 4>
Press [Online], then print from the currently selected paper source. However, this may result in deterioration in print quality.
<1H CHK TNR CONN.> (Warning Message)
<Cause>
There is a possibility that the toner cartridge is not installed properly.
<Remedy 1>
Remove the toner cartridge, then reinstall it properly.
<Remedy 2>
If <1H CHK TNR CONN.> appears and there is a problem with the print quality even after applying the Remedy 1, remove the toner cartridge and replace it with a new one. [Replacing the Toner Cartridge]
<23 DOWN.MEM.FULL> <Auto Error Skip>
<Cause>
The memory for registering macro and custom characters has run out and overflowed.
<Remedy 1>
The printer continues printing by pressing [Online]. However, the overflowed data cannot be registered.
<Remedy 2>
Perform a soft reset using the RESET menu, increase the free space of RAM using the following procedure, register the data again, and then print again.
- Perform a hard reset or cycle the power of the printer (Be aware that all the data in the memory will be deleted).
<26 SYS.MEM.FULL> <Auto Error Skip>
<Cause>
The work memory required for the printer process has run out while the system is processing the data (mainly the graphics data and text data).
<Remedy 1>
The printer continues printing by pressing [Online]. However, the data with which an error has occurred is not printed properly.
<Remedy 2>
Perform a soft reset using the RESET menu, and then increase the free space of RAM using the following procedure.
- Perform a hard reset or cycle the power of the printer (Be aware that all thedata in the memory will be deleted).
<27 JOB START ERR> <Auto Error Skip>
<Cause>
The specified emulation does not exist.
<Remedy>
Press [Online] to continue printing from the next data. However, the data with which an error has occurred is not printed.
<30 MEMORY FULL> <Auto Error Skip>
<Cause>
The work memory has run out while the system is processing the data.
<Remedy>
The printer continues printing by pressing [Online]. However, the data with which an error has occurred may not be printed properly.
<32 2-SIDED ERROR> <Auto Error Skip>
<Cause>
The printer received 2-sided printing data of paper sizes (including the orientation) or paper types unavailable for automatic 2-sided printing.
<Remedy 1>
The printer continues printing by pressing [Online]. However, the data on each side is printed on two pages.
<Remedy 2>
After performing a soft reset in the RESET menu, change the setting to a paper size or type available for automatic 2-sided printing, and then print again.
<33 WORK MEM.FULL> <Auto Error Skip>
<Cause>
The work memory for each print mode cannot be secured.
<Remedy 1>
The printer continues printing by pressing [Online]. However, the data with which an error has occurred is not printed properly.
IMPORTANT
When you continue printing by pressing [Online], be aware that the data of macro that is already registered may be deleted.
<Remedy 2>
Perform a soft reset in the RESET menu, increase the free space of RAM using the following procedure, and then print again.
- Perform a hard reset or cycle the power of the printer (Be aware that all the data in the memory that the printer has received will be deleted).
<35 TABLE FULL> <Auto Error Skip>
<Cause>
The number of the documents in a job has exceeded 16.
<Remedy>
The printer continues printing by pressing [Online]. However, the job with which an error has occurred is not printed.
<38 LOW IMGE QLTY> <Auto Error Skip>
<Cause>
The printer cannot process the data because it is too complicated.
<Remedy 1>
The printer continues printing by pressing [Online]. However, the printer prints with the image quality level being lowered.
<Remedy 2>
Perform a soft reset in the RESET menu, set GRADATION LEVEL in the QUALITY MENU options in the SETUP menu to STANDARD, and then print again.
<39 SPL MEM.FULL> <Auto Error Skip>
<Cause>
Because spool memory has run out, the printer cannot print.
<Remedy 1>
The printer continues printing by pressing [Online]. However, the page with which an error has occurred is not printed.
<Remedy 2>
Perform a soft reset in the RESET menu, specify the paper size smaller, and then print again.
<Remedy 3>
Perform a soft reset in the RESET menu, set GRADATION LEVEL in the QUALITY MENU options in the SETUP menu to STANDARD, and then print again.
<Remedy 4>
If 2-SIDED PRINT. in the FEEDER MENU options in the SETUP menu is set to ON, specify OFF, and then print again.
<Remedy 5>
Change the setting for HALFTONES in the QUALITY MENU options in the SETUP menu, and then print again.
<41 CHK PAPER SZE>
<Cause 1>
The size of the paper loaded in the multi-purpose tray or paper cassette is different from the setting for TRAY PAPER SIZE, CASSETTE1 SIZE, or CASSETTE2 SIZE specified from the computer or control panel.
<Remedy>
Match the size specified in TRAY PAPER SIZE, CASSETTE1 SIZE, or CASSETTE2 SIZE and the size of the loaded paper, and then press [Online].
<Cause 2>
You are using UFR II Printer Driver, and you loaded custom paper of its long edges 215.9 mm or less and printed when TRAY PAPER SIZE, CASSETTE1 SIZE, or CASSETTE2 SIZE in the FEEDER MENU options in the SETUP menu was set to MIXED SIZE.
<Remedy>
Load the paper in landscape orientation, then print again.
<Cause 3>
CHK PAPER SIZE in the USER MAIN. options in the SETUP menu is set to OFF.
<Remedy>
<52 RAST.MODE ERR> <Auto Error Skip>
<Cause>
The printer received data in format that it does not support during printing in the Raster mode.
<Remedy 1>
The printer continues printing by pressing [Online]. However, the data may not be printed properly.
<Remedy 2>
Print again using a printer driver that supports image data formats.
<53 SEC.PRINT ERR> <Auto Error Skip>
<Cause>
Secured print data is sent from a printer driver that is not for LBP3370.
<Remedy>
Press [Online] to cancel the job.
<53 STORE ERROR> <Auto Error Skip>
<Cause>
The data for which a stored job print is specified is sent from a printer driver that is not for LBP3370.
<Remedy>
Press [Online] to cancel the job.
<58 JOB MEM.FULL> <Auto Error Skip>
<Cause>
There is not sufficient free RAM space to process jobs.
<Remedy 1>
If you are processing multiple jobs at once, press [Online] to cancel printing, wait for other jobs complete, and then print again.
<Remedy 2>
If the job data is too large, divide the job and print again.
<59 JOB RX ERROR> <Auto Error Skip>
<Cause>
The printer received any unanalyzable data while it is receiving a job, or it timed out.
<Remedy 1>
Press [Online] to cancel printing, then print again.
<Remedy 2>
A problem may be occurring in the network you are using. Check the status of the network that your are using.
<A4 nn ERROR> («nn» represents two-digit alphanumeric characters)
<Cause>
A problem has occurred and the printer does not operate properly.
<Remedy>
Cycle the power of the printer. If the message appears even after cycling the power of the printer, note down the message in the display, and contact your local authorized Canon dealer.
<A5 nn ERROR> («nn» represents two-digit alphanumeric characters)
<Cause>
A problem has occurred and the printer does not operate properly.
<Remedy>
Cycle the power of the printer. If the message appears even after cycling the power of the printer, note down the message in the display, and contact your local authorized Canon dealer.
<A7 nn ERROR> («nn» represents two-digit alphanumeric characters)
<Cause>
A problem has occurred and the printer does not operate properly.
<Remedy>
Cycle the power of the printer. If the message appears even after cycling the power of the printer, note down the message in the display, and contact your local authorized Canon dealer.
<D7 nn ERROR> («nn» represents two-digit alphanumeric characters)
<Cause>
A problem has occurred and the printer does not operate properly.
<Remedy>
Cycle the power of the printer. If the message appears even after cycling the power of the printer, note down the message in the display, and contact your local authorized Canon dealer.
<D8 LAYOUT ERROR>
<Cause>
The page cannot be laid out because the memory has run out.
<Remedy 1>
Set [Graphics Mode] in UFR II Printer Driver to [Raster Mode], then print again. (See Help of UFR II Printer Driver)
<Remedy 2>
After performing a soft reset using the RESET menu, perform a hard reset to increase the free memory space or cycle the power of the printer, and then print again. (Be aware that all the data in the memory that the printer has received will be deleted.)
<Remedy 3>
Perform «Error Skip», then continue printing. However, the data with which an error has occurred is not printed properly.
<D8 VERSION ERROR>
<Cause>
You tried to print from a printer driver that is not for LBP3370.
<Remedy>
Print from the printer driver for LBP3370.
<D8 SYNTAX ERROR>
<Cause>
Invalid data is sent when printing using UFR II Printer Driver.
<Remedy 1>
Press [Online] to continue printing from the next data. However, the page with which an error has occurred and its subsequent pages are not printed.
<Remedy 2>
Confirm the data to be printed, then print again.
<D8 nn ERROR> («nn» represents two-digit alphanumeric characters)
<Cause>
A problem has occurred and the printer does not operate properly.
<Remedy>
Cycle the power of the printer. If the message appears even after cycling the power of the printer, note down the message in the display, and contact your local authorized Canon dealer.
<D9 IMG.DATA ERR.>
<Cause>
Data which this printer cannot process is included in TIFF data or JPEG data.
<Remedy>
This printer cannot print the data. Press [Online] to cancel the job.
<D9 IMG.REFER.ERR>
<Cause>
Data which this printer cannot process is included in TIFF data.
<Remedy>
This printer cannot print the data. Press [Online] to cancel the job.
<D9 nn ERROR> («nn» represents two-digit alphanumeric characters)
<Cause>
A problem has occurred and the printer does not operate properly.
<Remedy>
Cycle the power of the printer. If the message appears even after cycling the power of the printer, note down the message in the display, and contact your local authorized Canon dealer.
<F9-nn PWR OFF>ON> («nn» represents two-digit alphanumeric characters)
<Cause>
A problem has occurred while the printer is processing print data.
<Remedy>
Cycle the power of the printer. If the message appears even after cycling the power of the printer, note down the message in the display, and contact your local authorized Canon dealer.
<FF FONT FULL> <Auto Error Skip>
<Cause>
Because of too many fonts to be registered, the field (font table) for registering font information has run out and overflowed.
<Remedy>
The printer continues printing by pressing [Online]. However, the page with which an error has occurred is not printed properly.
<FM SIZE ERROR> <Auto Error Skip>
<Cause>
There is some font with its size exceeds the pseudo-scalable font size.
<Remedy>
Perform «Error Skip», then continue printing. However, the characters with which an error has occurred are not printed properly.
<FM SCALE ERROR> <Auto Error Skip>
<Cause>
There is a character in which the number of coordinate points on the contour lines exceeds the limitation of a pseudo-scalable font.
<Remedy>
Perform «Error Skip», then continue printing. However, the characters with which an error has occurred are not printed properly.
<PC LOAD «size»>
<Cause>
The paper of the size specified in the application is not loaded in the paper cassette or multi-purpose tray, or the paper source for the different paper size is selected.
<Remedy 1>
<Remedy 2>
If you are using the multi-purpose tray, check TRAY PAPER SIZE, and when the paper size does not match the size specified in the application, specify the setting properly. [Loading Paper in the Multi-purpose Tray]
<Remedy 3>
Press [Feeder Selection], then select the paper cassette in which the paper of the matched size is loaded. [Selecting a Paper Source]
<Remedy 4>
Press [Online], then print to the currently loaded paper forcibly. If you are using the multi-purpose tray, the setting for TRAY PAPER SIZE automatically changes to the setting specified in the application.
IMPORTANT
If you open the front cover when the message <PC LOAD «size»> is displayed, the message may disappear. However, be sure to follow the directions in the displayed message to change the paper.
I’m using LD Products toner cartridges and have had no problems with them since I started useing them in all my printers starting about 2001.
After my original post, I noticed that my photo printouts were degraded. The colors were not what they should be and they had streaks in them. This forced me to find out what was going wrong since the printer was no help. So, the following ensued:
The diagnostic page shows the alignment to be correct. Using paint shop pro I generated a page with four color bars running across it. Black, cyan, magenta, and yellow. When I printed it I saw that the black cartridge was failing to print correctly. Now, I’ve been doing a ton of greyscale photo printing and the cartridge was about a year old. A call to LD Products informed that the cartridge was rated for 1200 pages at 5% coverage and the way I was using it would reduce that by as much as a half. Examining the cartridge, I found that the roller that is normally coated with toner, Was nearly bare. I removed it, shook it vigoursly, reinstalled it, and printed the test page again. The error message went away but the printout was still messed up. I’ve ordered a new cartridge and, after I install it, I’ll run a new print and le tyou know how it turns out.
Since the cartridge was, for all practical purposes empty, I would have thought the printer would have alerted me to this fact. Every time I printed something, the information window that pops up showed the black cartridge was nearly full.